Pixelating an image in Krita can be a fun and creative way to add a unique visual effect to your artwork or photos. Whether you're aiming for a retro look or simply want to obscure certain details in your image, pixelation is a great tool. Krita, known for its versatility as a digital painting program, offers a simple way to apply this effect. In this guide, we’ll walk you through why pixelation is useful and how you can easily achieve it in Krita to enhance your images.
Why You Might Want to Pixelate an Image in Krita

Pixelation can serve a variety of purposes, making it a versatile tool in image editing. Here are some common reasons why you might choose to pixelate an image in Krita:
- Privacy Protection: If you're editing a photo with sensitive information, pixelating parts of the image can protect privacy.
- Artistic Effect: Many artists use pixelation to give their artwork a nostalgic, 8-bit or retro video game look.
- Focus on Subject: Pixelation can help blur out distracting background details, bringing the focus to the main subject of the image.
- Removing Backgrounds: If you want to create a clean design without showing the background, pixelating the background can help achieve this effect.
No matter your goal, pixelation is an effective way to create eye-catching results in Krita. Let’s now explore how you can apply this effect step-by-step.
Also Read This: Copying an Image Without the Background
Step-by-Step Guide to Pixelating Images in Krita

Pixelating an image in Krita is straightforward. Follow these steps to get started:
- Open Your Image: Start by launching Krita and opening the image you want to pixelate. Simply go to File > Open and select your image.
- Select the Area to Pixelate: Use the Selection Tool to select the area you want to pixelate. If you want to pixelate the entire image, just select the whole canvas.
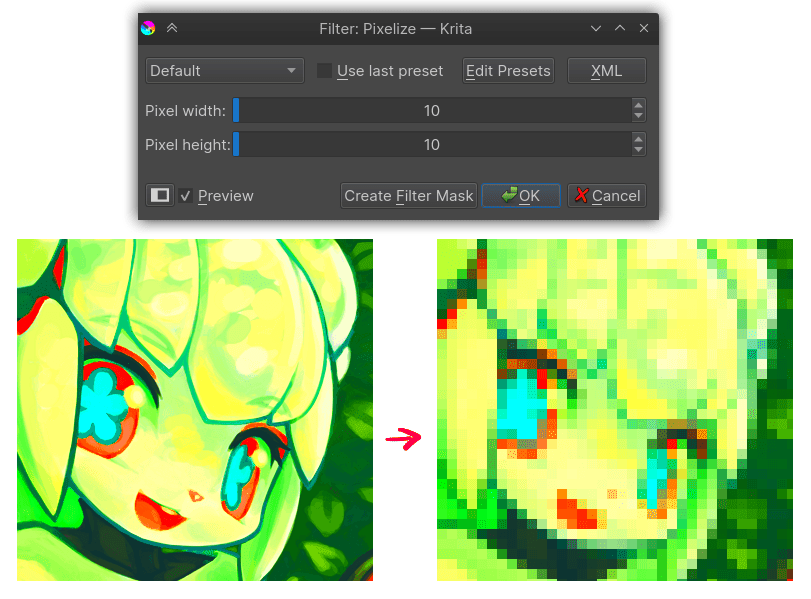
- Apply the Pixelation Effect: Go to Filter > Adjust > Pixelize. A dialog box will appear where you can adjust the level of pixelation.
- Adjust Pixel Size: In the dialog box, you can control the pixel size. Increasing the pixel size will make the image more blocky. Experiment with the settings until you get the desired effect.
- Fine-Tune the Effect: After applying the pixelation, you can further refine the effect by adjusting the opacity or blending modes of the layer.
- Save Your Image: Once you’re happy with the pixelation effect, don’t forget to save your work. Go to File > Save As to save the pixelated image in your preferred format.
That’s all there is to it! By following these simple steps, you can easily pixelate your images in Krita and give them a unique, creative flair.
Also Read This: How to Upload Photos to Getty Images – A Step-by-Step Guide for Contributors
Choosing the Right Brush for Pixelating in Krita

When you’re pixelating an image in Krita, the right brush can make a big difference. Krita offers a variety of brushes, but for pixelation, you’ll want to select one that suits your needs. Here are some tips to help you choose the perfect brush for the job:
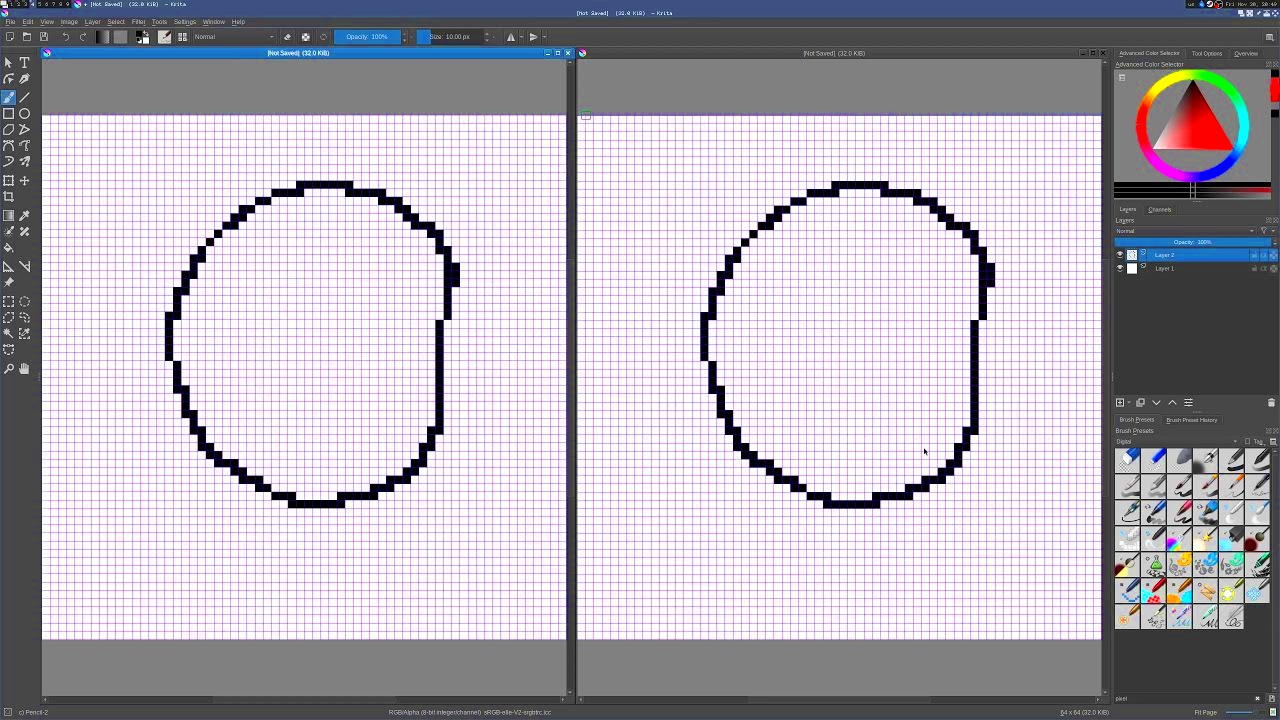
- Blocky Brushes: For a true pixelated look, select a brush that has a blocky, square shape. This mimics the appearance of individual pixels. The default Pixel Brush in Krita works well for this.
- Size and Spacing: Adjust the size of your brush to match the level of pixelation you want. Larger brushes will create more prominent pixels, while smaller brushes can give a subtler effect.
- Texture Brushes: If you're looking to add some texture or variation to the pixelated area, experiment with texture brushes. These brushes can help you achieve a more organic or artistic look.
- Hardness: Opt for a hard-edged brush to keep the pixelation clean and sharp. Soft brushes can make the pixels look blurry, which may not be ideal for sharp pixelation effects.
To customize a brush in Krita, you can also adjust the brush settings. These include spacing, size jitter, and opacity, all of which can impact how the pixelation effect turns out. Spend some time experimenting with these settings to find what works best for your image.
Also Read This: Displaying Side-by-Side Images for Easy Comparison
Adjusting Pixelation Settings for Different Effects
After you’ve selected the right brush, the next step is adjusting the pixelation settings in Krita. The beauty of pixelating in Krita is that you can tweak the settings to get the exact effect you're aiming for. Here’s how you can adjust these settings:
- Pixel Size: The size of the pixel blocks you create can be adjusted in the Pixelize filter. Larger pixel sizes give a more exaggerated effect, while smaller pixel sizes provide a more subtle blur. Play around with the slider until you get the look you want.
- Threshold Settings: When pixelating specific areas of an image, you may want to adjust the threshold. This controls how sensitive the pixelation effect is to the colors or tones in your image. A higher threshold will cause more of the image to be affected, while a lower threshold will only pixelate areas with stronger contrasts.
- Blur Option: Some pixelated effects can appear too harsh. If you want a softer transition between pixels, use a slight blur after pixelating. Krita allows you to apply a minimal blur to make the pixelation look less jarring.
- Layer Opacity: If the pixelation effect is too intense, consider reducing the opacity of the pixelated layer. This will blend the pixelated effect with the underlying layers and soften the result.
By adjusting these settings, you can create a variety of pixelation effects ranging from a clean, sharp pixel grid to a more subtle, blended pixelation effect. Don’t hesitate to experiment and adjust these parameters to achieve the perfect result.
Also Read This: Top YouTubers Residing in Texas
How to Fine-Tune Pixelation After Applying it in Krita
After you’ve applied the pixelation effect, it’s time to fine-tune it to make sure it’s just right. Krita offers several tools to help you adjust and refine your pixelated image, making it look polished and intentional. Here's how you can fine-tune your pixelation:
- Layer Masks: Use a layer mask to control which areas of your image are pixelated. With the mask, you can paint over areas you don’t want to pixelate, revealing the original image beneath. This is especially useful if you only want to pixelate part of an image while keeping other sections clear.
- Opacity and Blending Modes: If the pixelation effect is too strong, reduce the opacity of the layer. You can also experiment with different blending modes to control how the pixelated layer interacts with the layers underneath it. This can create different visual effects, depending on the look you’re going for.
- Refining Edges: If you want to smooth out the pixelated edges or reduce the harshness, you can use a soft brush or smudge tool on the mask. This will help blend the pixelated edges more naturally with the surrounding areas.
- Apply Multiple Layers: Sometimes, a single pass of pixelation isn’t enough. You can apply multiple layers of pixelation with varying levels of intensity. This layered approach can help you achieve a more complex and interesting look.
- Adjusting the Color Balance: After pixelating, the color might appear off, especially if the pixelation is too heavy. Adjusting the color balance of the pixelated layer or applying a slight color overlay can help make the effect more cohesive with the rest of the image.
Fine-tuning pixelation is all about control. With the right tools and techniques, you can create a seamless, polished pixelated effect that enhances your image and suits your creative vision.
Also Read This: Mastering Image Highlighting Techniques in Canva
Common Mistakes to Avoid When Pixelating in Krita
Pixelating in Krita is a great way to create a stylized effect, but like any tool, it’s easy to make mistakes if you're not careful. Here are some common pitfalls to avoid when applying pixelation to your images:
- Using Too Large of a Pixel Size: While large pixel blocks can create a bold effect, they can also make your image look too harsh or distorted. If you're aiming for a softer, more subtle pixelation, start with smaller pixel sizes and adjust as needed.
- Not Using Layer Masks: Forgetting to use layer masks is a common mistake. Layer masks allow you to selectively apply pixelation to certain parts of the image, leaving other areas untouched. Without this, you may end up pixelating areas you didn’t intend to.
- Over-pixelating Important Details: Sometimes, it’s tempting to apply pixelation too aggressively to large areas. However, over-pixelating important elements, like faces or text, can make the image look messy or unprofessional. Be selective about where you apply pixelation.
- Not Previewing the Effect: Krita gives you the ability to preview the pixelation effect before applying it. Always preview the effect to ensure it’s what you want. Failing to do this can result in an unwanted final effect.
- Not Adjusting the Threshold Properly: The threshold setting controls which parts of the image are pixelated. Setting the threshold too high can result in pixelating more of the image than necessary, while too low may leave certain areas untouched. Finding the right balance is key.
- Skipping Post-Pixelation Refinements: After applying pixelation, many users forget to refine their work. Fine-tuning the edges, opacity, and blending modes of the pixelated layer can significantly improve the final result.
By avoiding these common mistakes, you can make the most of Krita's pixelation tools and achieve a clean, effective result every time.
Also Read This: Editing Text Within an Image
Frequently Asked Questions
Here are some common questions people have when it comes to pixelating images in Krita. If you’re still unsure about something, this section might help clear things up:
- Can I undo the pixelation effect if I don’t like it?
Yes! Krita has an undo function (Ctrl+Z) that allows you to quickly revert back to the previous state if you’re unhappy with your pixelation. - How do I pixelate only part of an image?
You can use selection tools, like the Rectangular Selection or Freehand Selection tool, to choose specific areas of the image that you want to pixelate. Then, apply the pixelation effect only to the selected region. - Can I change the color of the pixelated area?
Yes, you can adjust the color balance, opacity, or even add a color overlay to the pixelated area to match the overall image tone. - Is pixelation in Krita non-destructive?
Pixelation in Krita is applied to layers, so if you use a non-destructive method, like layer masks or duplicate layers, you can always go back and modify or remove the pixelation effect. - Why does my pixelation look blurry?
If your pixelation looks blurry, it might be due to using a soft brush or low pixel size. Try using a hard-edged brush and experiment with larger pixel sizes for sharper results. - Can I apply pixelation to vector images in Krita?
While Krita is primarily a raster-based program, you can apply pixelation effects to rasterized versions of vector images. Simply convert the vector layer to a raster layer and apply pixelation as usual.
Conclusion
Pixelating images in Krita is a simple yet powerful technique that can add creativity and style to your artwork. Whether you’re pixelating for artistic reasons, privacy, or design, Krita offers all the tools you need to create unique pixelated effects. Remember, the key to a successful pixelation is in choosing the right settings, refining your technique, and avoiding common mistakes. By following the steps and tips in this guide, you’ll be able to achieve professional-quality results in no time.
Now that you have a deeper understanding of how to pixelate images in Krita, take the time to experiment with different brushes, settings, and effects. With practice, you’ll be able to perfect your pixelation technique and create stunning results for your projects.

 admin
admin


