Mirroring an image in PowerPoint is a simple yet effective way to flip an image horizontally or vertically. This can be useful when you need to create symmetrical designs, adjust the
Why You Might Want to Mirror an Image in PowerPoint

There are several reasons you might want to mirror an image in PowerPoint. Below are some common scenarios:
- Creating symmetry: Mirroring an image helps in achieving a balanced and symmetrical design, especially when you’re working with logos or graphics.
- Changing perspectives: Sometimes, flipping an image horizontally can change how it’s perceived. This can be useful for altering the direction of movement in images or visual elements.
- Design consistency: When using multiple images, mirroring them can help maintain a consistent design, particularly if they are part of a series or flow.
- Fixing orientation: If an image is facing the wrong direction, mirroring it can quickly fix the issue without needing to use external editing software.
Mirroring can save you time and enhance the quality of your presentation with minimal effort. It’s a quick tool that makes adjusting images easy, giving you more control over your content.
Also Read This: How to Overlay Images on iMovie for Dynamic Video Projects
Steps to Mirror an Image in PowerPoint Using the Format Tab
Mirroring an image in PowerPoint is straightforward, and you can do it using the Format tab. Here’s how:
- Insert the Image: Start by selecting the image you want to mirror. Click on the "Insert" tab, then choose "Pictures" to add the image to your slide.
- Select the Image: Click on the image you want to mirror to make sure it’s selected. This will display the image formatting options.
- Go to the Format Tab: With the image selected, go to the "Format" tab on the top toolbar. This will open up the image editing options.
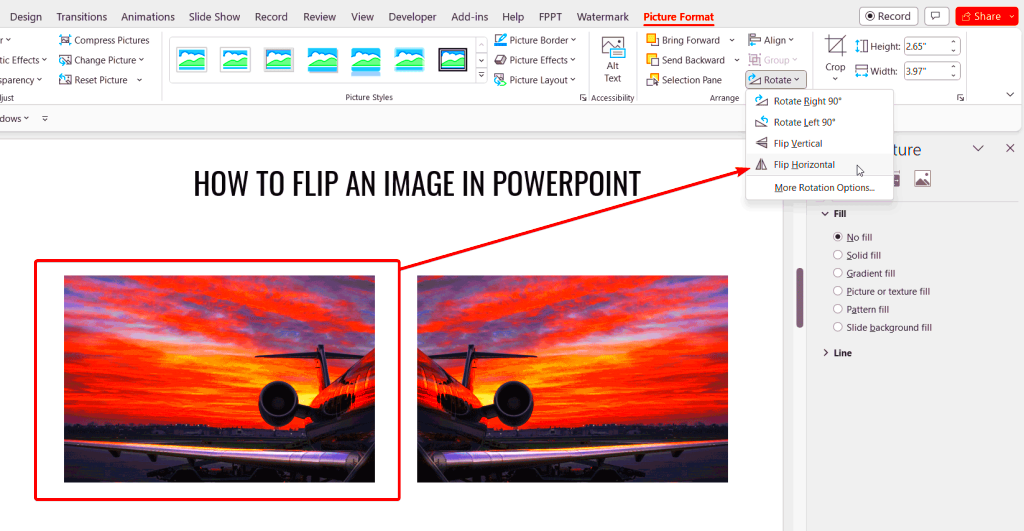
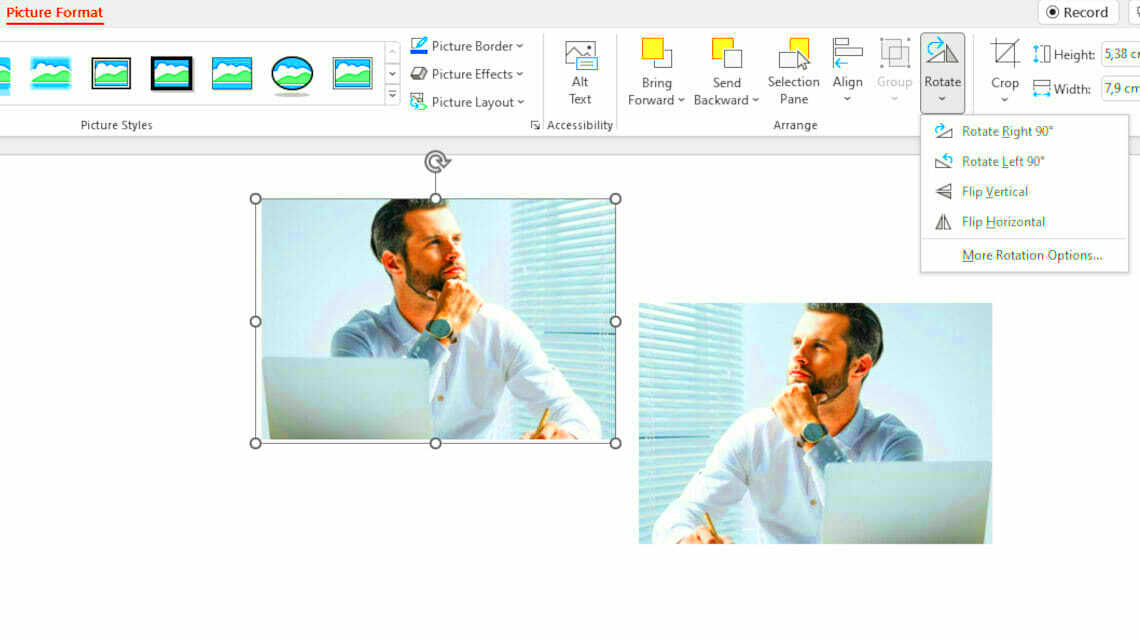
- Flip the Image: In the Format tab, find the "Rotate" button in the "Arrange" group. Click on it, and you will see a drop-down menu with multiple options, including "Flip Horizontal" and "Flip Vertical."
- Choose Your Flip Option: If you want to flip the image horizontally (left to right), select "Flip Horizontal." If you prefer to flip it vertically (top to bottom), choose "Flip Vertical."
- Adjust the Image: After flipping the image, you can resize it or reposition it as needed. Simply drag the corners or use the alignment tools to get the placement just right.
And that’s it! In just a few simple steps, you can mirror any image in PowerPoint to suit your needs. It’s an easy way to tweak your images without the need for external editing software.
Also Read This: A Complete Guide to Rasterizing an Image
How to Use the Flip Option for Mirroring Images
The Flip option in PowerPoint allows you to mirror images easily with just a couple of clicks. This is one of the simplest ways to flip an image horizontally or vertically, without having to manually adjust its position. Here’s how you can use the Flip option:
- Step 1: Select the Image – First, click on the image you want to mirror. Make sure it's selected, so you can access the editing tools.
- Step 2: Go to the Format Tab – With the image selected, go to the "Format" tab on the PowerPoint ribbon. This will show you several options to edit the image.
- Step 3: Choose Flip Option – In the "Arrange" group, you will see a "Rotate" button. Click on this, and a dropdown menu will appear with the Flip options.
- Step 4: Select Flip Horizontal or Flip Vertical – Choose "Flip Horizontal" to mirror the image from left to right, or "Flip Vertical" to mirror it from top to bottom.
The Flip options are perfect for quickly changing the direction of an image, whether it's a logo, a picture of a person, or a design element. It’s a fast and efficient way to get your image just right without needing to manually adjust the image’s orientation.
Also Read This: How to Create a Big Mouth Hippo Fun Crafts Tutorial on Dailymotion
Mirroring an Image Using the Rotate Option
The Rotate option in PowerPoint offers a more flexible way to adjust the orientation of your image, including mirroring it. This method is helpful when you want to rotate your image to a specific angle and also mirror it in the process. Here's how you can use the Rotate option:
- Step 1: Select Your Image – Click on the image you want to mirror and rotate to select it.
- Step 2: Open the Format Tab – With the image selected, go to the "Format" tab in the ribbon to access image formatting options.
- Step 3: Find the Rotate Button – In the "Arrange" group, click on the "Rotate" button. This will display several options, including Rotate Right, Rotate Left, and Flip options.
- Step 4: Rotate and Mirror – If you want to rotate the image by 90 degrees or flip it, select the desired option. To mirror the image, simply choose the "Flip Horizontal" or "Flip Vertical" option from the dropdown menu.
Using the Rotate option is perfect when you want to combine mirroring and rotating in one step, giving you more control over the image's orientation.
Also Read This: How to Purchase Getty Images for Your Projects
Adjusting the Image After Mirroring
After you mirror an image in PowerPoint, you may want to adjust its size, position, or other elements to make sure it fits perfectly in your slide. Mirroring the image can sometimes alter its proportions or alignment, so here’s how you can make adjustments:
- Resize the Image: After flipping an image, it may need to be resized to fit into your slide. To do this, click and drag the corner handles of the image to increase or decrease its size while maintaining its proportions.
- Reposition the Image: You can also drag the image to reposition it. This is particularly useful if the mirrored image doesn’t align with your slide layout. Use PowerPoint’s alignment guides to center or place the image as needed.
- Crop the Image: Sometimes, mirroring an image can create empty space or areas that don’t look great. You can crop the image by selecting the "Crop" button in the Format tab, then adjusting the cropping handles to remove unwanted parts of the image.
- Adjust Brightness or Contrast: After mirroring, you might want to adjust the image’s brightness, contrast, or color settings. Use the "Color" and "Corrections" options in the Format tab to make these changes.
Once you’ve mirrored the image, these simple adjustments can help you refine its appearance and ensure it fits seamlessly into your PowerPoint presentation. You have full control over how the final image looks after mirroring!
Also Read This: Stretching Images in Canva Without Cropping
Common Mistakes to Avoid When Mirroring an Image
While mirroring an image in PowerPoint is easy, there are a few common mistakes people make that can affect the final result. By being aware of these errors, you can ensure that your images appear just as you want them in your presentation. Here are some mistakes to watch out for:
- Not checking the image's orientation: Sometimes, after mirroring, an image may not look right if it's flipped in the wrong direction. Before finalizing, check to make sure the image’s new orientation makes sense in the context of your slide.
- Ignoring image proportions: When you mirror an image, it's important to maintain its proportions to avoid stretching or distorting it. Always hold the "Shift" key when resizing the image to ensure it scales uniformly.
- Over-mirroring: Flipping an image too many times can result in an awkward look. It's easy to get carried away with editing, but too much mirroring can make the image seem unnatural or disorienting.
- Not aligning the mirrored image properly: After mirroring, you might forget to align the image correctly on your slide. Use PowerPoint’s alignment guides or smart guides to ensure it’s centered or placed exactly where you want it.
- Forgetting about the image's context: Mirroring an image can change its meaning or how it's perceived. For example, mirroring a logo might alter its brand identity or make it look unprofessional. Always consider how the image will be interpreted after mirroring.
Avoiding these common mistakes will help you use the mirroring feature in PowerPoint effectively and maintain a polished, professional presentation.
Also Read This: How to Make Your Images Stand Out in Modern Designs
FAQ: Frequently Asked Questions About Mirroring Images in PowerPoint
Here are some of the most common questions people have when it comes to mirroring images in PowerPoint:
- Can I mirror an image multiple times?
- Yes, you can flip an image multiple times, but remember that each flip will change its orientation. If you flip an image twice, it will return to its original position.
- What’s the difference between rotating and flipping an image?
- Flipping an image mirrors it, either horizontally or vertically. Rotating an image involves turning it at an angle (e.g., 90 degrees, 180 degrees), which changes its orientation but not its mirroring.
- Can I flip a text box or shape in PowerPoint?
- Yes, you can mirror text boxes and shapes in PowerPoint, just like images. The process is the same—select the object and use the "Flip" options in the "Format" tab.
- Will flipping an image affect its quality?
- No, flipping an image does not affect its quality in PowerPoint. However, excessive resizing or stretching after flipping can cause image distortion, so it’s best to avoid that.
- Is there a shortcut to mirror an image?
- While there isn’t a specific shortcut for flipping images, you can quickly access the "Flip" options from the "Rotate" menu under the "Format" tab. This is as fast as it gets!
Conclusion: Mastering the Image Mirroring Feature in PowerPoint
Mastering the image mirroring feature in PowerPoint is a simple yet powerful way to enhance your presentations. Whether you're flipping logos, photos, or design elements, knowing how to mirror images effectively can save time and improve your slide designs. By following the easy steps outlined in this guide, you’ll be able to use this feature like a pro.
Remember to avoid common mistakes like over-mirroring, losing alignment, or distorting your images. Keep your images proportional, and always think about their context and meaning after flipping them. With practice, you’ll be able to use the mirror feature seamlessly to create visually appealing and balanced presentations.
Don’t be afraid to experiment with different image orientations. Mirroring an image can give your slides a fresh perspective, making your content stand out while keeping your designs professional and polished.

 admin
admin


