When it comes to graphic design, transparency can be a game-changer for your projects. Adobe Illustrator is a powerful tool that allows you to master the art of transparency, giving your designs depth and complexity. Whether you're looking to create eye-catching overlays, blend different elements seamlessly, or simply enhance the visual appeal of your designs, understanding how transparency works is essential. In this guide, we’ll dive into the ins and outs of transparency in Illustrator, making it easy for you to elevate your design game.
Understanding Stock Images in Adobe Illustrator

Stock images are an invaluable resource for designers, providing high-quality visuals that can be easily integrated into various projects. When used correctly, stock images can enhance your designs, convey messages effectively, and save you time during the creative process. Let's explore what you need to know about stock images in Adobe Illustrator.
- What are Stock Images?
Stock images are professional photographs, illustrations, or graphics that you can purchase or download for use in your projects. They come in various styles, themes, and formats, making it easy to find the right image for your needs.
- Why Use Stock Images?
Here are a few reasons why stock images are a great addition to your design toolkit:
- *Time-Saving: Stock images can drastically reduce the time you spend creating visuals from scratch.
- Diverse Choices: A wide array of styles and concepts are available, catering to various themes.
- Professional Quality*: Most stock images are shot by experienced photographers or designers, ensuring high resolution and quality.
- Where to Find Stock Images
You can find stock images on various platforms, including:
Platform Description Shutterstock Offers a massive library of images and vectors, perfect for commercial use. Adobe Stock A seamless integration with Adobe apps, providing high-quality assets. Unsplash Provides free, high-resolution images, great for personal and commercial projects. Pexels Another platform with a beautiful selection of free stock photos and videos.
Understanding stock images is crucial for leveraging them effectively in your designs, especially when paired with transparency techniques in Adobe Illustrator. By combining these elements, you can create stunning visuals that stand out and resonate with your audience. Let’s get started!
Also Read This: How to Record Sound from a YouTube Video Using a Simple Method
3. Steps to Use Transparent Stock Images

Using transparent stock images in your design projects can elevate your work and create unique compositions. Fortunately, working with transparent files in Adobe Illustrator is a straightforward process. Here’s a step-by-step guide to help you along the way:
- Choose the Right File Type: Start by sourcing transparent stock images, usually in PNG or SVG formats. These formats support transparency, allowing you to easily layer them without a background.
- Import the Image: Launch Adobe Illustrator and navigate to File > Place. Locate your transparent stock image file, select it, and click Place. Click anywhere on your canvas to position the image, or drag to set its size as you place it.
- Unlock the Layer: If your image is on a locked layer, you won't be able to edit it. Click on the Layers panel (found under Window > Layers) and unlock the layer containing your image.
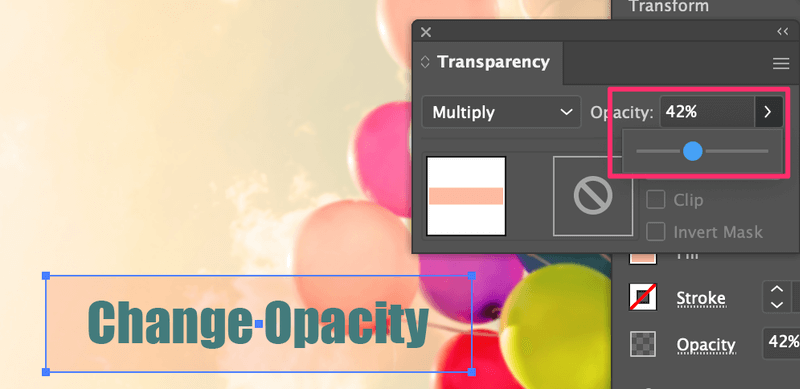
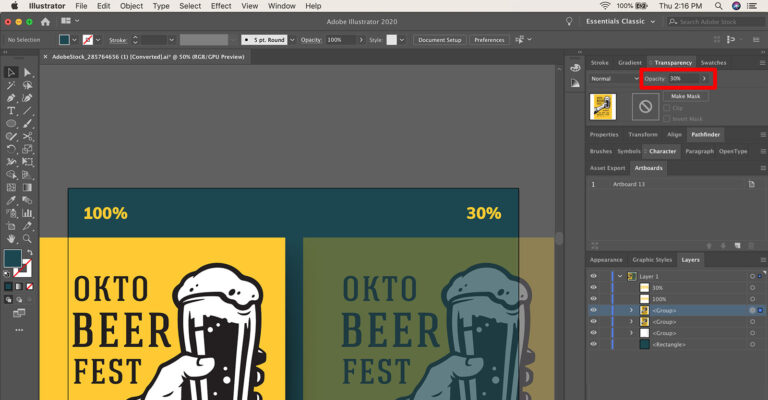
- Use the Transparency Panel: Open the Transparency panel by going to Window > Transparency. This gives you access to options to modify the opacity and blending modes of your transparent image.
- Layer and Blend: Feel free to layer your transparent image on top of other elements. Experiment with different blending modes in the transparency panel to achieve the desired effect!
By following these steps, you can effectively incorporate transparent stock images into your designs, creating visually appealing projects that stand out.
Also Read This: Simple Steps for Sharing YouTube Videos on IG Stories and Posts
4. Adjusting Transparency Settings for Optimal Results
Getting the opacity just right can make a significant difference in how your design is perceived. Here’s how you can fine-tune the transparency settings in Adobe Illustrator for stunning results:
- Opacity Adjustment: Select your transparent image, then look for the Opacity slider in the Transparency panel. A lower opacity (e.g., 30-60%) can give your image a ghostly feel, while a higher opacity (70-100%) makes it more prominent. Slide it to your desired level!
- Blending Modes: Experiment with blending modes to see how they affect the appearance of your image. To do this, click the dropdown menu in the Transparency panel. Options like Multiply or Screen can drastically change how your image interacts with the background.
- Using Gradients: A gradient overlay can create a smooth transition in opacity. Select the image, then apply a gradient fill that goes from opaque to transparent for a dynamic effect.
- Masking: Create a mask by going to Object > Clipping Mask > Make. This allows you to reveal or hide parts of your image. Use this to adjust visibility without altering the original image.
Adjusting these settings may take a little practice, but once mastered, they'll help you create designs that are not only beautiful but also effectively communicate your vision.
Also Read This: How to Redeem iStock Items on Magisto: A Step-by-Step Tutorial
Creative Techniques for Layering with Transparency
Layering with transparency in Adobe Illustrator can create stunning visuals and add depth to your designs. Here are some creative techniques you can use to make the most of transparency:
- Overlay Effects: By placing an image on top of a colored background, you can create amazing overlay effects. Adjust the opacity of the image to allow the background color to show through.
- Gradient Transparency: Use gradients to create smooth transitions of transparency. This technique is great for fading edges or creating soft blends between images and backgrounds.
- Blending Modes: Experiment with different blending modes found in the transparency panel. These modes can drastically change how layers interact, producing unique visuals that pop.
- Image Masks: Use image masks to control which parts of an image are visible. By masking parts of an image, you can create intriguing shapes and designs that have the appearance of depth.
- Textured Layers: Incorporate textures using stock images, adjusting their transparency to create layered backgrounds. This adds complexity to your design, making it visually engaging.
Each of these techniques can help you develop a signature style while mastering the art of layering with transparency. Don't hesitate to combine different methods – creativity often lies at the intersection of techniques!
Also Read This: How to Determine the Source of an Image
Common Challenges and Solutions
When working with transparency in Adobe Illustrator, you might encounter some challenges. Here’s a look at common issues and how to solve them:
| Challenge | Solution |
|---|---|
| Unwanted Visibility: | Use the layers panel to change the stacking order of your images. This ensures the relevant layers are visible while hiding the unnecessary ones. |
| Color Distortion: | To avoid color changes when lowering opacity, consider converting images to CMYK color mode before importing them into Illustrator. |
| Bland Designs: | If your design looks flat, try adding depth by combining multiple transparency effects and playing with shadows or highlights. |
| Too Much Clutter: | Sometimes too many layers can clutter your design. Use transparency wisely to create focal points while minimizing visual noise. |
By understanding these challenges and employing effective solutions, you'll enhance your experience with transparency in Adobe Illustrator and create eye-catching designs with ease.
Also Read This: Effortless Guide to Uploading a 2.50 Hour Video on Dailymotion
Mastering Transparency in Adobe Illustrator with Stock Images
Adobe Illustrator is a powerful tool for graphic design, and one of its most useful features is the ability to manipulate transparency. Mastering transparency can elevate your designs by adding depth, interest, and a professional touch. This guide will help you effectively use transparency with stock images in Adobe Illustrator.
When working with stock images, you'll first want to ensure that the image is licensed for your intended use. Once you have your images, follow these steps to incorporate transparency:
- Import the Stock Image: Use the "File" menu to import the desired image into your Illustrator workspace.
- Use the Transparency Panel: Access the transparency panel by going to Window > Transparency. This panel allows you to adjust the opacity and apply blend modes.
- Adjust Opacity: Select the image and adjust the opacity slider to achieve your desired level of transparency. This allows for layering effects.
- Apply Masking Techniques: Use clipping masks to reveal or hide parts of your image without erasing any information. This method maintains flexibility in your design.
- Experiment with Blend Modes: Blend modes can affect how your stock image interacts with other layers. Try different modes to see how they alter the image's appearance.
Additionally, consider utilizing vector images for a clean finish. Vector graphics retain quality regardless of scaling, complementing stock images beautifully without pixelation issues.
By mastering transparency with stock images, you can transform your designs into eye-catching graphics that capture the viewer's attention and communicate your message effectively.
Conclusion and Further Resources
In summary, mastering transparency in Adobe Illustrator while using stock images can significantly enhance your design capabilities. Engage with available resources such as Adobe's official tutorials, online courses on platforms like Skillshare or Udemy, and communities in forums & networks to further hone your skills.
 admin
admin


