Nail art stamping is a fun and creative way to achieve stunning nail designs with ease! If you've ever admired intricate patterns on someone's nails and wondered how they do it, stamping is likely the answer. This technique involves applying specially designed images from a stamping plate onto your nails, making it accessible for both beginners and experienced nail artists alike. With a bit of practice, you can create beautiful, professional-looking nail art in a fraction of the time compared to freehand methods. Whether you want to go for a simple floral design or an elaborate geometric pattern, nail art stamping offers endless possibilities!
Essential Tools and Materials
If you want to embark on your nail art stamping journey, you'll need a few essential tools and materials to get started. Here's a handy list of what you'll need:
- Nail Polish: Choose high-quality nail polishes that work well with stamping. Opt for opaque, fast-drying colors for the best results.
- Stamping Plates: These plates feature various designs that you can transfer onto your nails. Look for stainless steel plates for durability and optimal image quality.
- Stamping Stamper: This tool allows you to pick up designs from the stamping plate and transfer them onto your nails. Silicone stampers are popular for their ability to press against the nails easily.
- Scraper Card: A flexible scraper card helps to remove excess polish from the stamping plate, ensuring a clean design.
- Nail Art Clean-Up Brush: A small brush dipped in acetone can help you tidy up any stray polish around your nails after stamping.
- Top Coat: Seal your beautiful designs with a quality top coat to protect your art and enhance shine.
Once you gather these tools, you’ll be well on your way to creating eye-catching nail designs! Remember, practice makes perfect, so don’t get discouraged if your first attempts don’t turn out as expected. Enjoy the process and let your creativity shine!
Also Read This: How to Open Adobe Stock Image Previews in Photoshop
Step-by-Step Guide to Using a Nail Art Stamping Kit

Are you ready to dive into the world of nail art stamping? It’s easier than you might think! Whether you’re a seasoned nail artist or a newbie, this step-by-step guide will help you master the art of stamping.
- Gather Your Supplies:
Before you begin, you'll need a few essential items:
- Nail art stamping kit (stamping plate, scraper, and stamper)
- Base coat and top coat
- Non-toxic nail polish (preferably stamping polish)
- Nail polish remover and cotton pads
- Prep Your Nails:
Start with clean, dry nails. Apply a base coat to protect your nails and follow it with your chosen nail polish color. Allow it to dry completely.
- Choose Your Design:
Pick a stamping plate that features the designs you love. Each plate will have various patterns and images to choose from.
- Apply Polish to the Stamp Plate:
Using the scraper, apply a small amount of stamping polish over your chosen design on the plate. Make sure to cover it completely.
- Scrape the Excess Polish:
Take your scraper at a 45-degree angle and swipe across the plate to remove any excess polish. This step is crucial for getting the design just right!
- Pick Up the Design:
Now, take your stamper and gently roll it over the design on the plate to pick it up. A good stamper will seamlessly transfer the image onto your stamper.
- Stamp Your Nails:
Position the stamper on your nail and press down firmly. Lift it off quickly to reveal your freshly stamped design!
- Finish with Top Coat:
After making sure your design is dry, apply a top coat to seal it all in and enhance the shine. Voila! You’re all set!
Also Read This: How to Upload a Video to YouTube Using Your iPhone
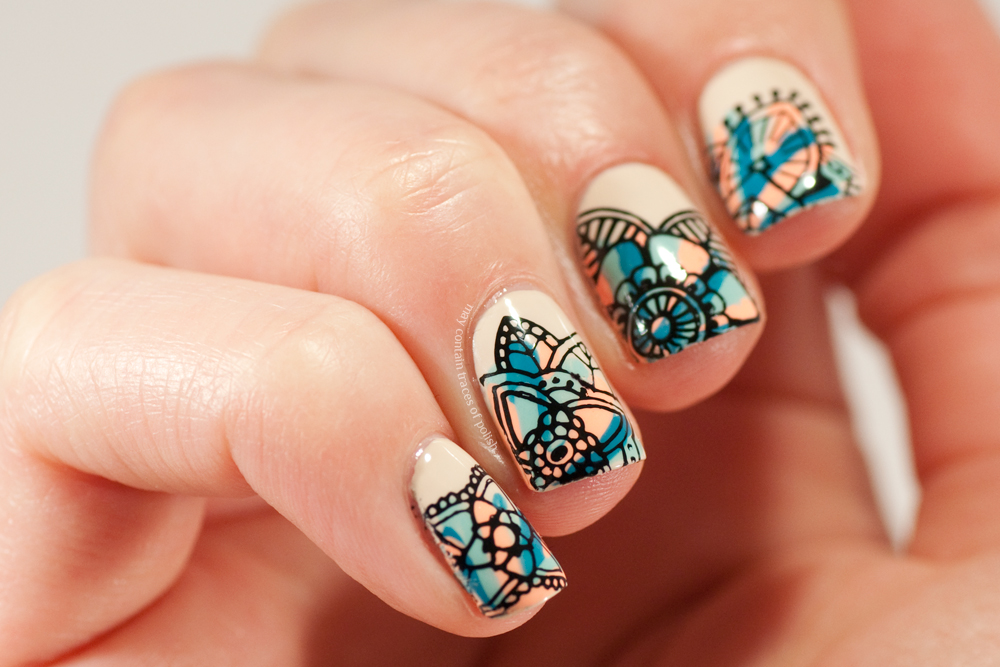
Creative Design Ideas for Nail Art Stamping
Feeling inspired? Nail art stamping allows for endless creativity. Here are some fun and trendy design ideas to help you elevate your nail game:
- Floral Patterns:
A classic choice! Use detailed floral stamping plates for a timeless look. Combine different colors for a vibrant, garden-like effect!
- Geometric Designs:
With sharp lines and shapes, geometric patterns can add a modern twist to your nails. Use metallic polishes to make the design pop!
- Ombre Effects:
Create an ombre background by blending two colors. Then stamp a contrasting design on top for a stunning visual effect!
- Animal Prints:
From leopard spots to zebra stripes, animal prints are fierce and trendy. Choose earthy colors for a more natural vibe or go bold with bright shades!
- Seasonal Themes:
Embrace the seasons! Use winter-themed stamps for snowy designs, autumn leaves, or bright flowers for spring. Change designs with the seasons for fresh looks!
- Custom Quotes:
Who doesn’t love a bit of positivity? Stamp your favorite quote or phrase on your nails for a personal touch.
With these creative ideas in mind, you’re well on your way to mastering nail art stamping! Don’t be afraid to experiment and make each design your own!
Also Read This: How to Put an Image on a Shirt: Step-by-Step Guide for Custom Apparel
5. Common Mistakes and Tips for Success
When it comes to nail art stamping, even the pros make mistakes sometimes! Let’s dive into some common pitfalls and how you can avoid them, ensuring your nail art shines.
- Inconsistent Pressure: One of the most frequent mistakes is pressing too hard or too lightly when stamping. The key is to find a balance. Aim for even pressure to ensure a clean transfer of the design.
- Poor Plate Preparation: Not cleaning your stamp plates before use can lead to smudged or incomplete designs. Always wipe your plates with a lint-free cloth or a little nail polish remover before stamping.
- Using the Wrong Polishes: Not all nail polishes are created equal for stamping. Regular polish might not transfer well. Instead, opt for stamping-specific polishes for the best results!
- Neglecting the Speed: Timing is essential in stamping. If you take too long to stamp after applying the polish, the design might dry too much on the plate. Work quickly but carefully for the best outcome.
- Choosing the Wrong Tools: The quality of your stamping tools matters! Using cheap or worn-out stampers can hinder your results. Invest in a good quality stamper and scraper for better performance.
By keeping these common mistakes in mind and making a few adjustments, you can elevate your nail art game. Practice makes perfect, so don’t be afraid to experiment!
Also Read This: Creating a YouTube Channel on Your iPad
6. Caring for Your Nail Art Stamping Tools
Your nail art stamping tools are essential for creating those amazing designs, so taking care of them is crucial! Here's how to keep them in tip-top shape:
- Cleaning After Use: Always clean your stamping plates and stampers after each use to avoid polish build-up. Use a gentle cleaner or nail polish remover and a lint-free cloth. For stubborn residues, a toothbrush can work wonders!
- Storing Properly: Store your plates flat and away from direct sunlight. Consider investing in a protective case to avoid scratches and damage. As for your stampers, keep them in a cool, dry place.
- Avoiding Deep Scratches: Be gentle while scraping off the excess polish from the plates. Using a hard or sharp tool can cause deep scratches, which can ruin the designs.
- Regularly Inspect Your Tools: Regularly check your stamper and scraper for wear and tear. If it’s starting to lose its effectiveness, it might be time for a replacement!
- Use the Right Products: Some polishes can be damaging to your stampers. Avoid using gel polishes or any thick formulas that can cause wear on the stamp tip.
By following these simple care tips, you’ll ensure that your stamping tools remain effective and last longer, giving you the perfect canvas for all your fabulous nail designs!
Mastering Nail Art Stamping Kits for Stunning Nail Designs
Nail art stamping is a fantastic technique that allows you to create intricate designs on your nails with ease. Nail art stamping kits are widely available and come with all the essential tools you need to create stunning nail designs. Here, we will explore how to use these kits effectively, and the tips and tricks to achieve professional-looking results.
*Components of a Nail Art Stamping Kit:
- Stamping Plates: These are metal or plastic with engraved designs that transfer to your nails.
- Stamping Tool: A silicone or rubber stamp that picks up the design from the stamping plate.
- Scraper: A plastic tool used to remove excess polish from the plate.
- Nail Polish: Special stamping nail polishes that are thick and creamy, ideal for transferring designs.
Steps to Mastering Nail Art Stamping:*
- Prep Your Nails: Start with clean, dry nails. Apply a base coat to protect your nails.
- Choose Your Design: Select a design from your stamping plate that you want to replicate.
- Apply Nail Polish: Apply a generous amount of stamping polish over the design on the plate.
- Scrape the Excess: Use the scraper to remove excess polish, leaving color only in the design.
- Pick Up the Design: Press the stamping tool on the design firmly, ensuring the pattern adheres to the stamp.
- Transfer to Your Nail: Press the stamp onto your nail in a rolling motion for even transfer.
- Seal with Topcoat: After the design dries, seal it with a top coat for longevity.
With practice and creativity, you can master the art of nail art stamping and achieve beautiful designs. Explore various designs, colors, and techniques to truly show off your personality through your nails.
Conclusion: Unleash Your Creativity with Nail Art Stamping
 admin
admin


