Have you ever found yourself in need of high-quality images, videos, or graphics to elevate your project? If so, Adobe Stock is your go-to resource. Adobe Stock offers a vast collection of assets that can seamlessly integrate into your creative workflow, especially in Adobe Premiere Pro.
With millions of high-quality images, vectors, videos, and templates at your fingertips, Adobe Stock makes it easier for you to find the perfect asset without straying too far from your editing platform. It's all about convenience and speed, allowing you to effortlessly enhance your projects while saving valuable time.
The beauty of Adobe Stock lies in its variety. Whether you're looking for stunning visuals for a documentary, engaging graphics for a corporate video, or atmospheric soundtracks for a cinematic piece, Adobe Stock has you covered. Coupled with Adobe's reliable licensing, you can dive into your creative projects with peace of mind, knowing that you’re using content legally and properly.
In this blog post, we'll guide you through the essential steps to master Adobe Stock integration within Premiere Pro, ensuring that you have the tools necessary to create high-impact visuals and tell compelling stories through your editing.
Installing and Accessing Adobe Stock in Premiere Pro
Getting started with Adobe Stock in Premiere Pro is a breeze, especially since the integration is designed to fit smoothly into your existing workflow. Let’s dive into the steps to install and access Adobe Stock assets right within your editing environment.
Step 1: Ensure You Have Adobe Creative Cloud
First things first, to access Adobe Stock, you need to be a part of the Adobe Creative Cloud ecosystem. If you already have a subscription, fantastic! If not, visit the Adobe website and subscribe to one of their plans that include Premiere Pro.
Step 2: Open Premiere Pro and Sign In
Launch Adobe Premiere Pro and sign in with your Adobe ID. This step is crucial because it links your Adobe Stock account directly to your Premiere Pro project.
Step 3: Access Adobe Stock
Once you’re signed in, go to the Essential Graphics panel or the Media Browser. You can do this by navigating to Window in the top menu and selecting Essential Graphics or Media Browser from the dropdown.
| Panel | How to Access |
|---|---|
| Essential Graphics | Window > Essential Graphics |
| Media Browser | Window > Media Browser |
In the Essential Graphics panel, click on the Browse tab. You’ll see options to search through the Adobe Stock library using keywords or categories.
Step 4: Searching for Assets
Use the search bar to enter keywords related to the type of asset you are looking for. From here, you can filter results by type (photos, videos, templates) and licensing options.
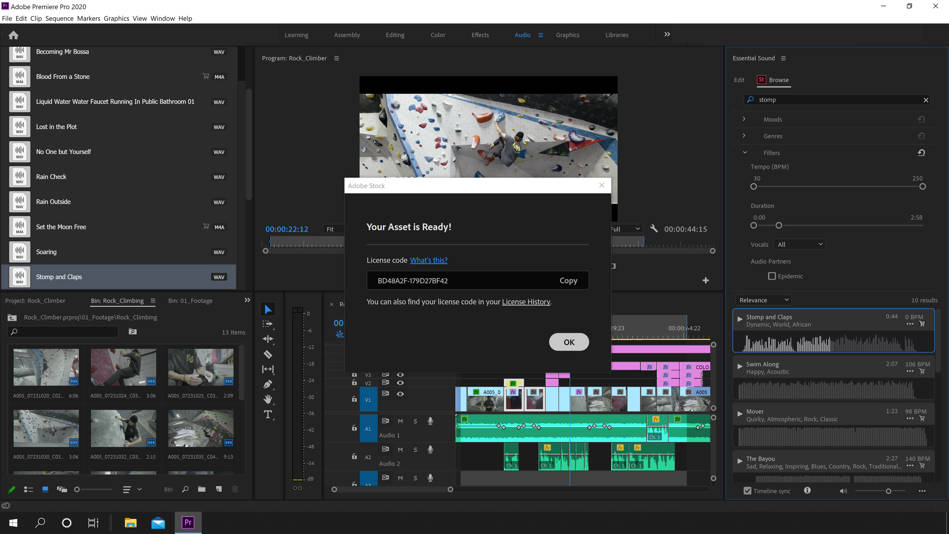
Step 5: Licensing and Downloading
Once you find an asset you love, click on it to see the preview and licensing options. Adobe Stock offers a free trial for new users, so you may be able to download assets free of charge initially. After you’ve reviewed the licensing options, simply click the License button, and the asset will be downloaded and made available directly in your project timeline.
And voila! You’re all set to explore the amazing variety of content Adobe Stock has to offer without ever leaving Premiere Pro. Integrating high-quality assets into your creative work has never been easier!
Also Read This: Sell on VectorStock: A Comprehensive Guide to Making Money
Searching for Assets: Tips and Tricks
Searching for assets on Adobe Stock can feel like an overwhelming task, especially with the vast library of images, videos, and audio files at your disposal. However, with a little strategy, you can streamline your search, saving time and enhancing your projects!
Here are some handy tips:
- Use Specific Keywords: When searching, be as specific as possible. Instead of just entering "ocean," try "sunset ocean waves" to narrow down your results.
- Apply Filters: Utilize the filter options to refine your search results by content type, orientation, color, and even contributor. This can help you find exactly what you need without endless scrolling.
- Save Your Searches: If you're regularly searching for similar assets, save your search queries. This will allow you to quickly revisit your favorite types of assets in the future.
- Browse Collections: Adobe Stock often curates collections around popular themes. Exploring these can lead you to hidden gems you may not have thought of searching for.
- Use Synonyms: If you aren’t finding what you need, don’t hesitate to try synonyms or phrases related to your initial search. This can open up new avenues of results.
By leveraging these tips, you’ll not only find assets faster but potentially discover new styles and ideas that can elevate your work!
Also Read This: Crafting a Paper Camera – A Complete Guide
Using Adobe Stock Footage in Your Projects
Once you've found the perfect stock footage on Adobe Stock, the next step is integrating it seamlessly into your Premiere Pro project. This process is straightforward and can significantly enhance your videos.
Here’s how to effectively use Adobe Stock footage:
- Download Your Assets: Once you’ve chosen your footage, click on the download button. Make sure to check the resolution and format that best suits your project.
- Import into Premiere Pro: Open Premiere Pro, navigate to the 'Media Browser,' and locate your downloaded footage. Simply drag it into your project panel or timeline.
- Organize Your Project: As your project grows, keep it organized by creating bins within your Premiere Pro project. Label them according to asset types, such as “Stock Footage,” “Images,” or “Audio.”
- Seamless Integration: Trim, split, or layer your footage as needed to ensure it blends well with your existing clips. Utilize effects, transitions, and color grading to match the style of your project.
- Check Licensing: Before sharing your project, ensure that you comply with the licensing terms for the stock footage used. Pay attention to any restrictions, especially if you plan to monetize the content.
With these steps, you can confidently incorporate Adobe Stock footage into your projects, enhancing their quality and visual storytelling.
Also Read This: How to Download YouTube Videos for Free with No Cost
Editing and Customizing Stock Footage
When you’re using stock footage in Adobe Premiere Pro, the real magic happens in the editing and customization phase. Stock footage can be a fantastic foundation for your project, but to make it truly yours, you’ll want to fine-tune it. Here’s how you can do that:
First, trimming the clip to fit your timeline is essential. By selecting the in and out points, you can ensure that you’re using just the right segment of the footage that fits your story.
Next, consider using color correction and grading. Adobe Premiere Pro has excellent tools like Lumetri Color to adjust brightness, contrast, saturation, and color grading. Here’s a quick guide to get started:
- Basic Correction: Start with white balance and exposure adjustments.
- Creative Adjustments: Use LUTs or custom color grading for a unique look.
- Curves and Color Wheels: Fine-tune highlights, midtones, and shadows.
Additionally, think about integrating transitions and effects. Simple transitions like fades or dissolves can help your stock footage blend seamlessly with original clips. You can drag and drop effects from the effects panel and tweak them to your liking.
Lastly, don't overlook audio. If your stock footage comes with sound, you might want to adjust it using Adobe’s audio editing tools or add your own sound elements to enhance the scene.
Also Read This: How to Obtain and Utilize YouTube Transcripts
Best Practices for Using Adobe Stock in Premiere Pro
Using Adobe Stock effectively in Premiere Pro can significantly enhance your video projects. To make the most out of it, consider these best practices:
1. *Choose the Right Footage: Take your time in selecting stock footage that complements your narrative. The more it aligns with your vision, the richer your project will be.
2. Utilize Watermarked Previews: Before committing to a purchase, use the watermarked previews to gauge how the footage fits within your edit. This is a great way to experiment without budget concerns.
3. Organize Your Assets: Create a dedicated folder for your stock footage and keep it organized by scenes or themes. This will save you time during the editing process.
4. Legality and Licensing: Always check the licensing terms associated with your Adobe Stock footage to avoid any legal issues later on. Understanding the usage rights will save you headaches down the road.
5. Combine Stock with Original Content: Mix and match stock footage with your own original clips. This approach will help maintain a personal touch and keep your content engaging.
6. Stay Updated*: Keep an eye on Adobe Stock’s updates and offerings. You might find new footage that better aligns with your evolving project needs.
By following these best practices, you’ll be on your way to successfully integrating stock footage into your projects while maintaining your unique creative voice!
Mastering Adobe Stock Integration in Premiere Pro
Adobe Stock is a vast library of high-quality assets that can elevate your video projects. Integrating Adobe Stock into Adobe Premiere Pro allows you to access a plethora of stock footage, images, templates, and audio tracks seamlessly throughout your editing process. Here’s a comprehensive guide on how to make the most of this integration.
Benefits of Adobe Stock Integration
- Access to a vast library: Gain access to millions of high-quality assets without leaving your Premiere Pro workspace.
- Time-saving: Streamline your workflow by searching and importing assets directly within the application.
- Advanced search filters: Use tailored search options to find exactly what you need, from specific themes to resolutions.
- License assets effortlessly: Automatically handle licensing rights as you purchase and use assets in your projects.
How to Use Adobe Stock in Premiere Pro
The following steps will help you utilize Adobe Stock effectively:
- Launch Adobe Premiere Pro: Open your project or create a new one.
- Open the Libraries panel: Navigate to the Window menu, select Libraries.
- Search for Assets: Use the search bar in the Libraries panel to find stock footage, images, or audio.
- Preview Assets: Click on any asset to view a preview before importing.
- License and Download: Upon choosing an asset, license it to download and use directly in your project.
Best Practices
| Practice | Description |
|---|---|
| Choose the Right Resolution | Consider your project's final output resolution to avoid unnecessary file sizes. |
| Organize Assets | Use folders and tags in the Libraries panel for quick access to commonly used assets. |
By mastering Adobe Stock's integration in Premiere Pro, you can significantly enhance your editing experience, making the process more efficient while enriching your projects with high-quality content.
Conclusion: Elevate Your Projects with Adobe Stock
 admin
admin


