Creating circular images in Google Slides can add a unique touch to your presentations. Whether you're preparing a slide for a business pitch, a school project, or a personal showcase, circular images help to create a visually appealing layout. This guide will walk you through the process step by step, making it easy for anyone to enhance their slides with stunning circular images. So, let’s get started!
Understanding the Basics of Google Slides
Before diving into creating circular images, it’s essential to understand the basic features of Google Slides. It’s a user-friendly tool that allows you to create presentations online. Here are some key points to note:
- Accessibility: Google Slides is available from any device with internet access, so you can work from anywhere.
- Collaboration: You can invite others to edit or comment on your slides, making it great for team projects.
- Integration: It easily integrates with other Google services, like Google Drive and Google Photos.
Getting familiar with these features will help you make the most of your presentation experience.
Step-by-Step Guide to Insert an Image
Inserting an image in Google Slides is straightforward. Here’s how you can do it:
- Open Your Presentation: Start by opening the Google Slides presentation where you want to add the image.
- Select the Slide: Click on the slide where you want the image to appear.
- Insert the Image:
- Go to the menu at the top and click on Insert.
- From the dropdown, select Image.
- Choose the source of the image. You can upload from your computer, search the web, or select from Google Drive.
- Position the Image: Click and drag the image to move it to your desired location on the slide.
Once you’ve inserted the image, you’re ready to start the process of making it circular!
Using the Masking Tool for Circular Images
Now that you have your image inserted, it’s time to turn it into a circular shape using the masking tool. This feature in Google Slides allows you to crop your images into various shapes easily, including circles. Here’s how to do it:
- Select the Image: Click on the image you want to mask.
- Access the Masking Tool: In the toolbar, look for the Crop Image icon. Click the small arrow next to it to open the dropdown menu.
- Choose a Shape: Hover over Mask with Shape and a selection of shapes will appear. Click on the oval shape.
- Adjust the Mask: You can now click and drag the corners of the oval to make it a perfect circle. Make sure to hold the Shift key while dragging to maintain the circular proportions.
Once you've done this, your image will be beautifully cropped into a circle! This simple step can transform your presentation by making images stand out more effectively.
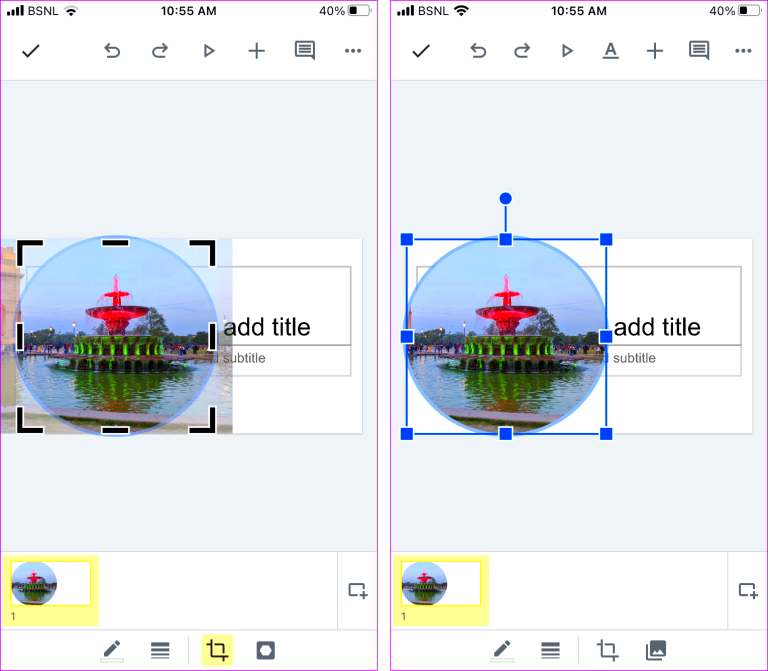
Adjusting Image Size and Positioning
After masking your image into a circle, the next step is to adjust its size and position. This is crucial for ensuring that your slide looks balanced and visually appealing. Here’s how you can make these adjustments:
- Resize the Image: Click on the image, and you will see small blue squares (handles) around it. Click and drag these handles to resize the image. To maintain the circle shape while resizing, hold the Shift key.
- Position the Image: Click and drag the image to place it where you want on the slide. Consider the overall layout—centered images often look more polished.
- Using Guidelines: If you want precise placement, you can enable guidelines by going to View > Guides. This helps you align images and text easily.
Adjusting the size and position of your circular image not only enhances aesthetics but also helps convey your message more effectively.
Applying Borders and Effects to Circular Images
To give your circular images an extra flair, you can apply borders and effects. This adds depth and makes your images pop on the slide. Here’s how you can enhance your images:
- Select the Image: Click on your circular image to select it.
- Add a Border: In the toolbar, find the Border weight option. You can choose the thickness and color of the border. A contrasting color can make your image stand out more.
- Apply Shadow Effects: Click on Format Options (found in the toolbar). Under the Drop Shadow section, you can customize the angle, distance, and transparency. This effect gives your image a 3D look.
- Experiment with Reflections: Also under Format Options, you can add reflections to your image. Adjust the transparency and size of the reflection for the best effect.
Adding borders and effects is a great way to personalize your images, making them more eye-catching and engaging for your audience. Just remember to keep it simple; too many effects can be distracting!
Saving and Sharing Your Google Slides Presentation
Once you've created your stunning circular images and crafted your presentation, the next step is saving and sharing it with others. Google Slides makes this process super simple, ensuring that your hard work is always accessible. Here’s how to do it:
- Automatic Saving: One of the best features of Google Slides is that your presentation automatically saves to your Google Drive. There’s no need to click “save” every few minutes; Google takes care of that for you.
- Check Your Internet Connection: Ensure you’re connected to the internet, as this allows your changes to sync in real-time.
- Share Your Presentation:
- Click the Share button in the top right corner of your screen.
- Enter the email addresses of the people you want to share with. You can choose their permission level—either Viewer, Commenter, or Editor.
- Optionally, add a message before hitting Send.
- Download Options: If you need to send your presentation as a file, you can download it in various formats like PDF, PPTX, or even as a JPEG. Go to File > Download and choose your preferred format.
With these steps, you can easily save and share your Google Slides presentation, making collaboration effortless!
Frequently Asked Questions
As you work on creating circular images in Google Slides, you might have a few questions. Here are some common queries and their answers:
- Can I create other shapes besides circles? Yes! You can use the masking tool to create various shapes like squares, stars, or custom shapes.
- What if I need to edit the image after masking it? You can always right-click the image and select Edit Mask to make changes.
- Will my images still look good when printed? Yes, as long as you use high-quality images, your circular images should print well.
- How can I enhance the visibility of circular images? Using borders and shadows can significantly improve visibility, especially on busy backgrounds.
If you have other questions, feel free to explore the Google Slides Help Center for more detailed information!
Conclusion on Making Circular Images in Google Slides
Creating circular images in Google Slides is a fun and effective way to enhance your presentations. Not only does it give your slides a modern look, but it also helps you convey your message more effectively. Throughout this guide, you’ve learned:
- How to insert and mask images into circles.
- The importance of adjusting size and positioning for a balanced layout.
- Ways to apply borders and effects to make your images pop.
- How to save and share your presentations effortlessly.
With these skills in your toolkit, you can create visually appealing presentations that will engage your audience. So, go ahead and experiment with your designs—your creativity is the only limit!
 admin
admin


