Google Slides is a great tool for creating presentations, and one of the simplest ways to enhance the look of your slides is by using rounded images. Rounded images can add a more polished, modern feel to your presentations compared to traditional square or rectangular images. Whether you’re designing for a business pitch, an educational presentation, or even a creative project, rounded images can help you make your content visually appealing and professional.
In this post, we’ll guide you through how to create rounded images in Google Slides. You don’t need any design experience to follow along—just a few simple steps, and you’ll be able to create polished, rounded images in no time. Let’s dive into why this feature is so useful and how to achieve it in just a few clicks.
Why Use Rounded Images in Google Slides?

Rounded images can make your slides look cleaner and more aesthetically pleasing. Here are some reasons why you should consider using them:
- Improved Visual Appeal: Rounded corners soften the edges of images, making them look more dynamic and less harsh compared to sharp-edged images.
- Better Flow with Other Elements: Rounded images can blend seamlessly with other content on your slides, including text, charts, and icons, creating a smoother overall presentation.
- Professional Look: Rounded images give your presentation a more polished, modern design, helping to communicate a professional image.
- Personalized Touch: They add a creative touch to your slides, allowing you to stand out and capture your audience’s attention.
Incorporating rounded images into your Google Slides presentation can make a big difference in the way your content is perceived. Let’s look at how you can start creating these images yourself.
Steps to Create Rounded Images in Google Slides

Creating rounded images in Google Slides is quick and easy. Follow these simple steps:
- Insert an Image: First, click on the "Insert" tab at the top of your screen, then select "Image" and choose how you want to upload your image (from your computer, the web, etc.).
- Resize Your Image: After your image is inserted, you can resize it by clicking and dragging the corners. Adjust it to fit your slide layout.
- Select the Image: Click on the image to select it, and you’ll see a toolbar at the top of the screen.
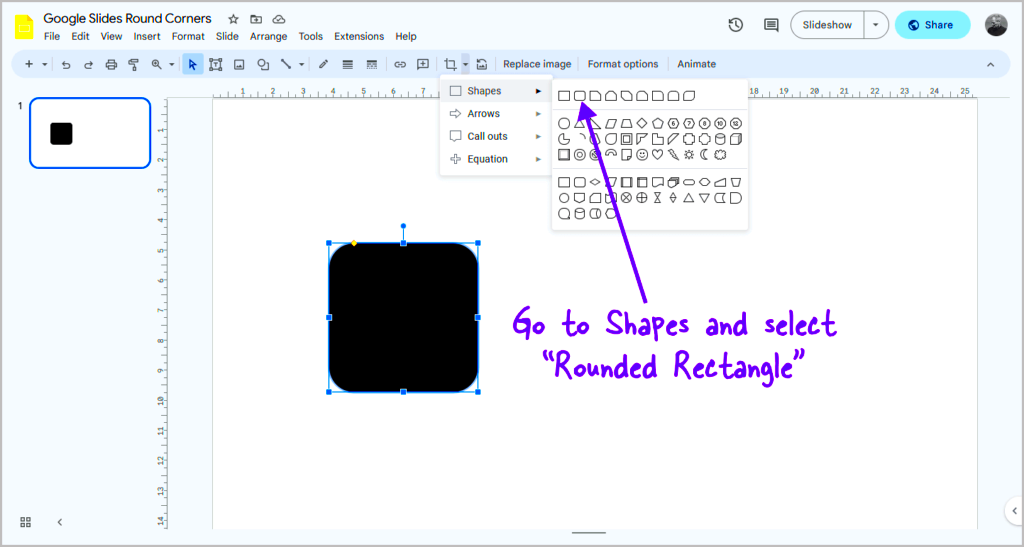
- Click the Mask Image Icon: In the toolbar, find the "Crop Image" icon (it looks like a small triangle inside a square). Click the small arrow next to it to open a dropdown menu. Select the “Shapes” option.
- Choose the Rounded Shape: From the shape options, select the circle or rounded rectangle shape. Your image will automatically take the shape of the selected option.
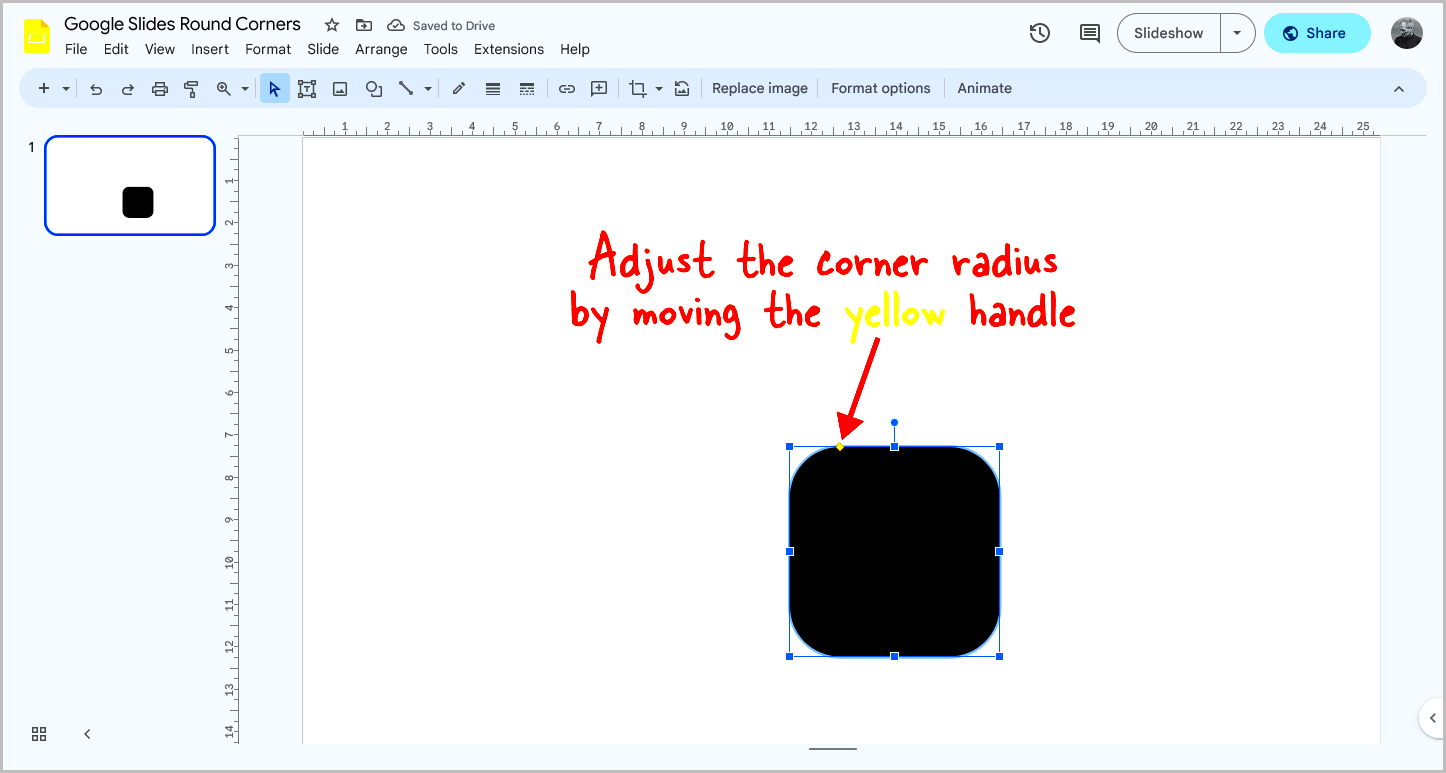
- Adjust the Roundness: To make the edges more or less rounded, you can adjust the corner radius by clicking and dragging the image’s edges. Play around with the shape until you’re happy with the result.
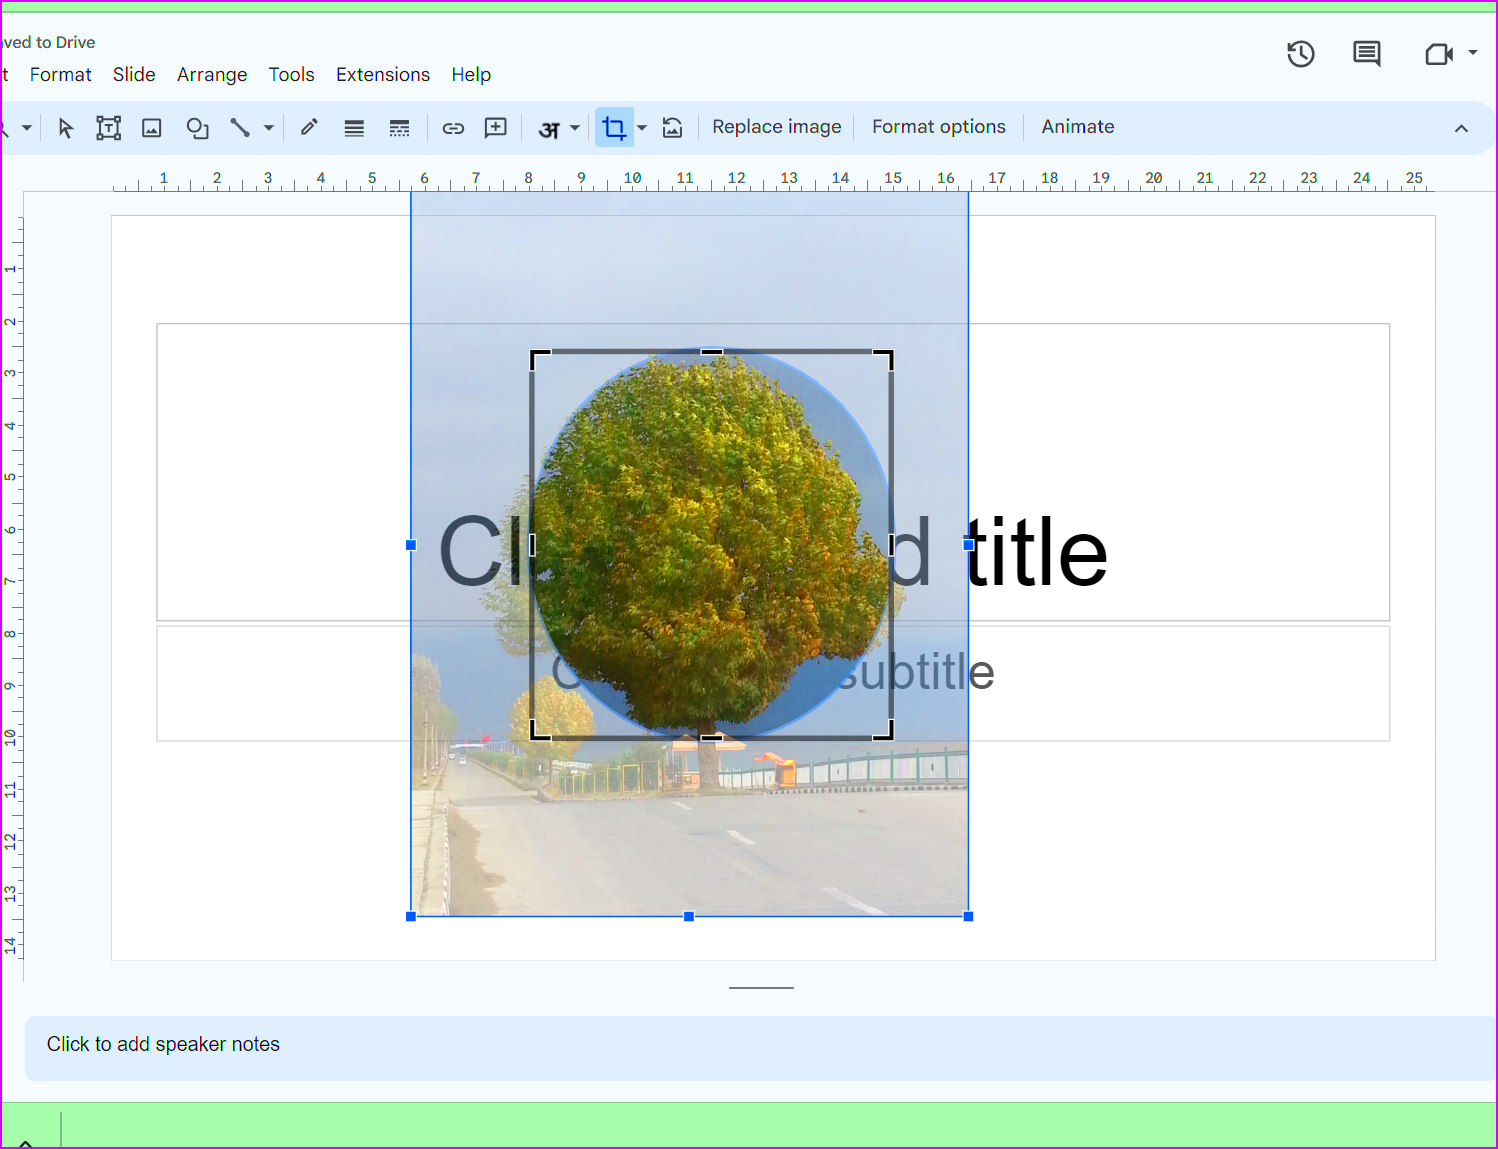
- Fine-tune the Image: If necessary, adjust the position of the image inside the rounded shape by clicking "Crop" again and repositioning it to get the perfect frame.
And that’s it! You’ve successfully created a rounded image in Google Slides. It’s a simple but effective way to enhance the design of your presentation without any special tools or software.
Customizing the Shape and Size of Your Rounded Image
Once you’ve created your rounded image, it’s time to make sure it fits perfectly within your Google Slides presentation. Customizing the shape and size of your image is an essential step in ensuring it complements the rest of your content and looks just right. Google Slides offers a few easy ways to modify the size and shape to match your design needs.
Here’s how you can customize the shape and size of your rounded image:
- Resize the Image: After inserting your rounded image, you can click and drag the corners of the image to resize it. Hold the shift key while dragging to maintain the aspect ratio.
- Adjust Image Proportions: If you need to make the image wider or taller, click the image and drag the sides. However, be mindful of distortion. It’s best to keep the original proportions unless you’re intentionally cropping part of the image.
- Change Shape Type: If the roundness of the shape isn’t working for you, go back to the "Mask Image" tool. You can change the shape from a circle to a rounded rectangle or another shape entirely to better suit your presentation’s design.
- Reposition the Image: After resizing, you might need to reposition the image inside its shape. You can do this by double-clicking the image and dragging it to the right spot.
By adjusting both the shape and size of your rounded image, you can ensure it enhances the overall look of your slides, making them more cohesive and professional.
Using the Mask Image Feature for Perfect Rounded Edges
The Mask Image feature in Google Slides is a powerful tool that helps you create perfectly rounded edges for your images. While simply using the "Crop to Shape" tool is useful, the Mask Image feature takes it a step further, offering more precision and flexibility in how you can shape your
Here’s how you can use the Mask Image feature to get perfect rounded edges:
- Select Your Image: Start by clicking on the image that you want to edit. A toolbar will appear at the top of the screen.
- Click the "Crop Image" Icon: This icon looks like a square with a diagonal line through it. Once you click it, a dropdown will appear with several options.
- Choose "Shapes": In the dropdown menu, click on "Shapes" to view the available shape options. Select the circle or rounded rectangle shape that suits your design.
- Adjust the Image Inside the Shape: After the mask is applied, you can click on the image to move it around or resize it inside the shape. This allows you to focus on the most important part of the image while keeping the rounded edges intact.
- Refine the Edges: To fine-tune the roundness, you can use the corner handles to adjust the curve of the mask. This ensures you get the exact look you’re going for.
By using the Mask Image feature, you can achieve perfectly rounded edges, making your presentation look professional and polished with minimal effort.
Tips for Enhancing Rounded Images in Your Google Slides Presentation
Now that you know how to create and customize your rounded images, it's time to enhance them further. Here are some tips to make your rounded images stand out and add more style to your Google Slides presentation:
- Use Borders for Extra Definition: Adding a border around your rounded images can help them stand out more on the slide. To do this, click on the image, and in the toolbar, select the “Border weight” option. Choose a color and thickness that complements your slide design.
- Shadow Effects: Shadows can add depth to your image, making it pop off the page. You can apply a subtle shadow by selecting your image, clicking on “Format options,” and adjusting the shadow settings like opacity, angle, and distance.
- Pair Rounded Images with Minimalist Design: When using rounded images, keep the rest of your slide design clean and minimalist. This ensures that the rounded images stay the focal point, rather than being overwhelmed by too many other elements.
- Align Your Images Properly: Ensure your images are aligned properly with other elements on the slide. Use the alignment tools in Google Slides to center, left-align, or right-align your images for a neat, organized look.
- Use Rounded Images for Emphasis: Consider using rounded images to emphasize key points in your presentation, like team photos, product images, or icons. This draws attention to important content and keeps your slides engaging.
With these tips, you can take your rounded images to the next level, adding a touch of creativity and professionalism that will elevate your entire presentation.
Common Mistakes to Avoid When Creating Rounded Images
While creating rounded images in Google Slides is straightforward, there are a few common mistakes that can affect the quality and design of your slides. By avoiding these pitfalls, you’ll ensure that your images look professional and enhance your presentation rather than detract from it.
Here are some common mistakes to avoid when creating rounded images:
- Not Maintaining Aspect Ratio: Resizing images without keeping the aspect ratio intact can result in distorted images. This can make your presentation look unprofessional. Always hold down the shift key while resizing to maintain the correct proportions.
- Overcrowding the Slide: While rounded images look great, it’s easy to go overboard. Too many images on a single slide can overwhelm the viewer. Make sure to use images sparingly and leave enough white space for a balanced design.
- Ignoring Image Resolution: Low-resolution images can appear blurry, especially when they are resized. Always use high-quality images to ensure they look sharp, even when scaled down.
- Forgetting to Align Images: Misaligned images can make your slides look messy. Always make sure your images are properly aligned using the alignment tools in Google Slides. This creates a cleaner and more cohesive design.
- Choosing the Wrong Shape: Not every image fits well into every shape. For example, a portrait-style photo may look awkward inside a circle. Experiment with different shapes to see what works best for each image.
Avoiding these common mistakes will help you create polished, professional-looking slides that make a strong impression on your audience.
FAQ: Frequently Asked Questions About Rounded Images in Google Slides
When working with rounded images in Google Slides, there are often questions that come up. Here are some of the most frequently asked questions (FAQs) and their answers to help clear up any confusion:
- How do I make a perfectly circular image?
To create a perfect circle, select your image, click the "Mask Image" option, and choose the circle shape. Then, adjust the size of the image to ensure it’s perfectly round. - Can I change the roundness of the corners?
Yes, you can change the roundness of your image by selecting a rounded rectangle shape instead of a circle. After that, you can adjust the corner radius by resizing the image within the shape. - Can I use rounded images with transparent backgrounds?
Yes, if your image has a transparent background (like a PNG), the rounded corners will show cleanly without a background box around the image. - How do I adjust the size of the rounded image?
After selecting your image, click and drag the corners to resize it. Hold the shift key to maintain the aspect ratio while resizing. - Can I add borders to my rounded images?
Yes, you can add borders by selecting your image and using the "Border weight" option in the toolbar. You can adjust the border thickness and color to fit your design.
If you have any other questions or run into issues while creating rounded images, feel free to consult Google Slides Help or experiment with the different tools available in the app.
Conclusion: Making the Most of Rounded Images in Google Slides
Rounded images are a simple yet powerful way to enhance the look of your Google Slides presentations. By incorporating rounded images, you can achieve a clean, modern, and professional design that makes your content stand out. Whether you’re presenting to colleagues, clients, or an audience, using rounded images effectively can help you make a lasting impression.
Remember to:
- Customize your images to fit the design and flow of your presentation.
- Avoid common mistakes like poor resolution, misalignment, or overcrowding.
- Experiment with different shapes to see what works best for each image.
- Use borders and shadows to enhance the visual appeal of your images.
By following these tips, you’ll be able to create stunning, rounded images that elevate the overall quality of your presentations. With just a few simple tools and techniques, you can take your Google Slides projects from good to great!

 admin
admin


