Creating a bootable ISO image is an essential skill, especially when you need to install or repair an operating system. A bootable ISO file allows you to boot up your computer directly from the image, eliminating the need for an existing operating system. Whether you're looking to reinstall Windows, set up a Linux distribution, or create a recovery tool, understanding how to make a bootable ISO
Understanding What a Bootable ISO Image Is
A bootable ISO image is a disk image file that contains all the necessary files to boot up a computer. The term “ISO” refers to the ISO 9660 file system, which is a standard used for optical discs like CDs and DVDs. The bootable part means that the ISO
When you burn this ISO image to a USB drive or DVD, it becomes bootable, allowing your computer to load a fresh OS installation, recovery tool, or system diagnostic. This process is especially useful in scenarios where the system's current OS is corrupted or when you want to install a new OS without needing to access a running computer.
Some common uses of bootable ISO images include:
- Installing or reinstalling an operating system
- Creating a system repair disk
- Running diagnostic tools
- Setting up multi-boot systems
Essential Tools Required for Creating a Bootable ISO Image
To create a bootable ISO image, you’ll need a few tools to ensure the process goes smoothly. These tools help you convert the ISO file into a bootable format and transfer it to a USB drive or DVD. Here’s a list of essential tools you'll need:
- ISO File - This is the image you want to make bootable. It can be a Windows, Linux, or other operating system installation file.
- USB Drive or DVD - A USB flash drive (at least 4GB in size) or a blank DVD is needed to store the bootable image.
- Rufus (for Windows) - This free tool is easy to use and helps create bootable USB drives from ISO files. It supports both UEFI and BIOS modes, making it ideal for a wide range of computers.
- UNetbootin (for Windows and Linux) - Another tool for creating bootable USB drives, especially for Linux distributions.
- Disk Utility (for Mac) - A built-in tool on macOS that allows you to create bootable USB drives easily.
- dd Command (for Linux) - A powerful Linux command-line tool for copying data from one location to another, including creating bootable USBs.
Once you have these tools, you can follow a few simple steps to create your bootable ISO image. Just make sure your USB drive or DVD is properly formatted before starting the process to avoid any errors.
Step by Step Guide for Creating a Bootable ISO Image on Windows
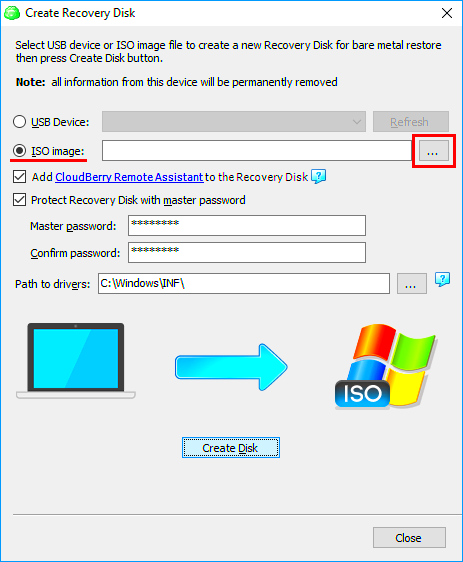
Creating a bootable ISO image on Windows is a straightforward process, especially when using a reliable tool like Rufus. Here’s a simple, step-by-step guide to help you get started:
- Download Rufus: First, you need to download Rufus from its official website. It’s a free, portable application that doesn’t require installation.
- Prepare Your USB Drive: Plug your USB drive into your computer. Ensure it has at least 4GB of free space and back up any important files, as the process will erase all data on the drive.
- Select the ISO File: Open Rufus and, under the "Boot Selection" section, click "SELECT" to choose your ISO file. This could be a Windows OS or any other bootable ISO.
- Choose USB Drive: In the "Device" dropdown, select your USB drive. Double-check to ensure it's the correct drive to avoid overwriting any important data.
- Choose Partition Scheme and File System: For most modern PCs, choose "GPT" for partition scheme and "FAT32" for the file system. If you're creating a bootable drive for older systems, select "MBR" and "FAT32."
- Start the Process: Once everything looks good, click "START" and wait for the process to complete. This can take anywhere from 10 minutes to an hour, depending on the size of the ISO file.
Once finished, you’ll have a bootable USB drive ready to install or repair your operating system. You can now boot from the USB by adjusting your BIOS settings to boot from the USB drive.
How to Create a Bootable ISO Image on Mac
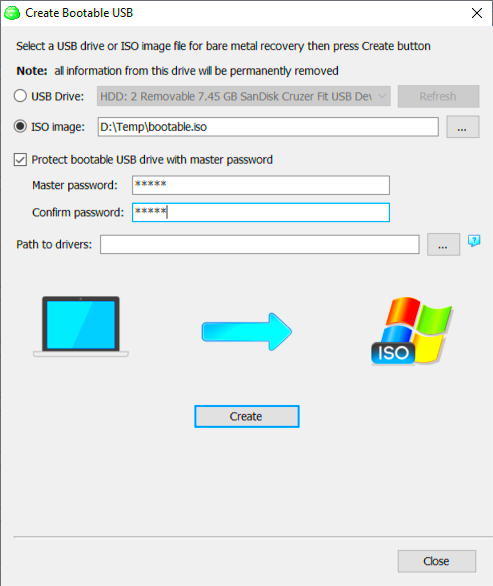
Creating a bootable ISO image on a Mac is a bit different from Windows, but it’s still simple. Here’s how to do it using the built-in Disk Utility tool:
- Prepare Your USB Drive: Plug in your USB drive (at least 8GB in size). Open "Disk Utility" from your Applications > Utilities folder and select your USB drive from the list.
- Format the USB Drive: Click "Erase" and choose "Mac OS Extended (Journaled)" as the format, and "GUID Partition Map" as the scheme. Click "Erase" to format the drive.
- Open Terminal: Now open the Terminal app, located in your Applications > Utilities folder. You’ll use a command to copy the ISO file to the USB drive.
- Use the 'dd' Command: In Terminal, type the following command (replace “path_to_your_iso” with the actual path of your ISO file and “/dev/diskX” with your USB drive's location):
sudo dd if=path_to_your_iso of=/dev/diskX bs=1m
Press Enter and provide your administrator password if prompted. - Wait for the Process to Finish: The process can take several minutes to an hour, depending on the ISO file size. Once it’s done, you’ll have a bootable USB drive.
To test it, restart your Mac and hold down the "Option" key during startup. You’ll be able to select the USB drive to boot from.
Common Issues and How to Troubleshoot When Making a Bootable ISO Image
While creating a bootable ISO image is usually a smooth process, there are a few common issues you may encounter. Here are some tips to help you troubleshoot:
- USB Drive Not Recognized: If your USB drive isn’t recognized after the bootable image is created, make sure it’s properly formatted. On Windows, use FAT32 for compatibility. On macOS, use the GUID Partition Map scheme.
- ISO File Is Corrupted: Sometimes, the ISO file may be corrupted or incomplete, leading to errors during the process. Try downloading the ISO file again from a trusted source and ensure it’s not damaged.
- Booting Issues (UEFI vs. Legacy BIOS): If your computer isn’t booting from the USB, check if your system uses UEFI or Legacy BIOS. For newer computers, UEFI is generally preferred. Make sure to select the appropriate partition scheme in the tool you're using (GPT for UEFI and MBR for Legacy BIOS).
- Slow Copying Process: The process of writing the ISO image to the USB drive can take time. If it seems unusually slow, ensure that your USB drive is working properly and that you're using a fast port (USB 3.0 is faster than USB 2.0).
- Bootable USB Not Showing Up: If your USB drive doesn’t appear as a boot option, try plugging it into a different USB port. Also, check your BIOS settings to ensure USB booting is enabled.
If you continue to experience issues, it’s a good idea to try a different USB drive or software tool. Rufus, UNetbootin, and the Disk Utility tool on macOS are all excellent options for creating bootable images.
Best Practices for Using Bootable ISO Images
Using bootable ISO images is a powerful way to install or repair an operating system, but to ensure the process goes smoothly, following some best practices can help you avoid common mistakes. Here are a few tips to make the most of your bootable ISO images:
- Verify the ISO File Integrity: Before you start, always verify the integrity of your ISO file. A corrupted ISO can lead to incomplete installations or errors during boot. Use checksums (SHA-256 or MD5) provided by the ISO source to verify that the file is complete and untampered.
- Use Reliable Tools: Stick with well-known and trusted tools like Rufus for Windows, UNetbootin for Linux, and Disk Utility for macOS. These tools are regularly updated and have been tested by a large number of users.
- Choose the Right Partition Scheme: Ensure you select the correct partition scheme based on your computer’s firmware. Modern systems typically use UEFI (Unified Extensible Firmware Interface), so select GPT for partitioning. For older systems with BIOS, MBR is the preferred option.
- Test the Bootable Media: After creating the bootable USB or DVD, test it by booting from it before relying on it for an OS installation. You can do this by accessing your BIOS or UEFI settings and selecting the USB or DVD as the boot device.
- Keep Backup Copies: Always keep a backup of your bootable ISO image in case your USB drive or DVD becomes corrupted. Having multiple copies stored in different locations (like an external hard drive or cloud storage) ensures you don’t lose access to your installation media.
By following these practices, you can ensure that your bootable ISO images work reliably and efficiently whenever you need them.
FAQ
1. Can I use a bootable ISO image to install an operating system on any computer?
Yes, as long as the computer supports booting from a USB drive or DVD, you can use a bootable ISO image to install an operating system. Just make sure the ISO file matches the hardware architecture (e.g., 32-bit or 64-bit) of the system you're installing it on.
2. How do I create a bootable ISO image for a Mac?
To create a bootable ISO image on Mac, you can use the Disk Utility tool or the Terminal app with the 'dd' command. Be sure to format your USB drive properly and choose the correct ISO file for the installation.
3. What should I do if my bootable USB drive isn’t showing up in the BIOS?
If your bootable USB drive isn’t showing up in the BIOS, try reconnecting it to a different USB port. Make sure USB booting is enabled in the BIOS settings. Also, check that the USB drive is properly formatted and contains a valid bootable ISO.
4. Can I use a bootable ISO to create a recovery drive?
Yes, bootable ISO images can be used to create recovery drives for troubleshooting and repairing your system. Many operating systems offer recovery options that can be booted from a USB drive or DVD.
Conclusion
Creating and using bootable ISO images is an essential skill for anyone who needs to install or repair operating systems. By understanding the process and following best practices, you can ensure that your bootable media works reliably and efficiently. Whether you're working with Windows, macOS, or Linux, the steps are straightforward and the tools are readily available. Remember to test your bootable USB or DVD before using it in critical situations and always keep backup copies of your ISO files for peace of mind.
By following the tips and troubleshooting methods outlined in this guide, you’ll be well-equipped to handle any situation that requires a bootable ISO. With the right tools and knowledge, you can confidently perform OS installations, repairs, and other advanced tasks with ease.
 admin
admin


