Are you ready to dive into the world of nail art? Water-inspired designs are not only refreshing but also incredibly fun to create. From ocean waves to serene lakes, the possibilities are endless! In this post, we’ll explore the beauty of water-themed nail art and what you need to get started. Let’s make a splash with your nails!
Introduction to Water-Inspired Nail Art
Water-inspired nail art is a creative way to express your love for nature and bring a bit of the aquatic world to your fingertips. Imagine having the hues of the ocean, the sparkle of sunlight on water, or the tranquility of a calm lake gracing your nails. Sounds dreamy, right?
One of the most exciting aspects of this type of nail art is the variety of techniques you can use. For instance, you can achieve a marble effect that mimics the swirls of ocean currents, or use a watercolor technique that gives a soft, dreamy appearance reminiscent of reflections on water. Dailymotion is full of fantastic tutorials showcasing these methods, making it easy for beginners and seasoned nail artists alike to learn.
Water-inspired designs are not just visually appealing; they also allow for a great deal of personalization. You can play with colors that resonate with you—whether it’s bright turquoise, deep navy, or soft pastels. Plus, incorporating elements like tiny seashells or starfish decals can add a delightful touch!
Whether you're preparing for a summer getaway, a beach-themed party, or just want to add a splash of creativity to your everyday look, water-inspired nail art is a fantastic choice. You don’t need to be a professional to create stunning designs; just a little patience and creativity will go a long way!
Also Read This: Celebrating Festive Stories and Uplifting Content on Dailymotion
Materials Needed for Water-Inspired Nail Designs
Before you dive into your water-inspired nail art journey, it’s essential to gather the right materials. Here’s a handy list of what you’ll need:
- Nail Polish: Choose a selection of colors that resonate with water themes, such as blues, greens, and whites. You might also want glitter polishes to mimic the sparkle of water.
- Base Coat: This is crucial for protecting your nails and ensuring a smooth application.
- Top Coat: To seal your design and add shine, a good top coat is a must.
- Water Cup: If you’re trying the water marble technique, you'll need a cup filled with room temperature water.
- Nail Art Brushes: For precise designs, having different sizes of brushes will help you create fine details.
- Dotting Tools: These are great for adding small dots or intricate patterns that resemble bubbles or water droplets.
- Striping Tape: This will help you create clean lines and patterns, especially useful for designs that need solid edges.
- Sponges: Makeup sponges can be useful for the watercolor technique, allowing you to blend colors smoothly.
- Nail Stickers or Decals: If you want to add a little extra flair, look for water-themed stickers like fish, shells, or waves.
- Acetone and Cotton Balls: For clean-up, and to fix any mistakes, having acetone on hand is essential.
With these materials at your fingertips, you’ll be well-prepared to start creating stunning water-inspired designs. Remember, the key to beautiful nail art is practice and patience, so don’t be afraid to experiment! You can find a wealth of tutorials on Dailymotion that will guide you through each technique step-by-step, making your nail art journey enjoyable and rewarding.
Also Read This: How to Make Bun Hairstyles for Short Hair: Creative Styling Tips on Dailymotion
3. Step-by-Step Guide to Creating Water-Inspired Nail Art
If you’re looking to dip your toes into the world of water-inspired nail art, you’re in for a treat! Creating beautiful designs that mimic the calming essence of water can be both fun and therapeutic. Here’s a simple step-by-step guide to help you create stunning water designs right at home:
- Gather Your Supplies: You’ll need a few essential items:
- Nail polish in shades of blue, turquoise, and white
- A small cup of water
- A toothpick or a fine brush
- Nail tape (optional)
- Base coat and top coat
- Prep Your Nails: Start by cleaning and filing your nails. Apply a base coat to help the polish adhere better and protect your natural nails.
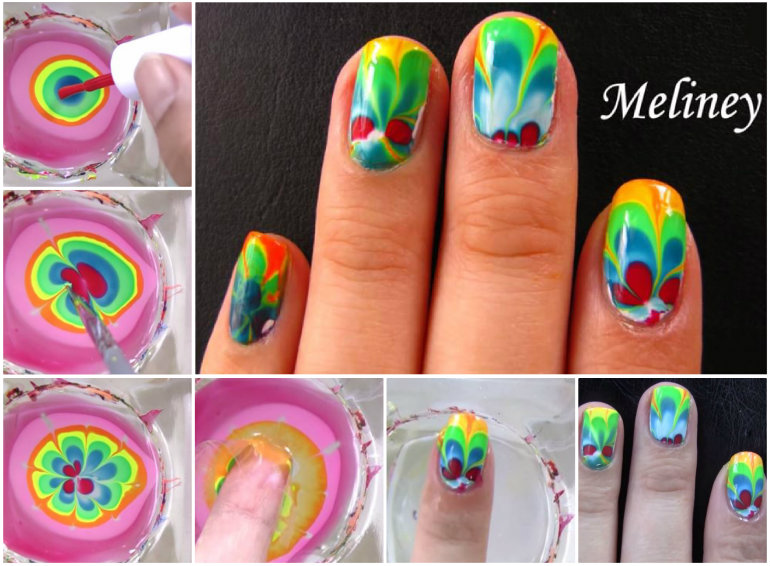
- Create Your Design: Here comes the fun part! Fill a small cup with room temperature water.
Take your first nail polish color (let’s say a light blue) and drop a drop into the water. Then, quickly follow with a drop of your second color (maybe a darker blue). You’ll notice the colors spread and create beautiful patterns. Use your toothpick to swirl the colors together to achieve a marbled effect.
- Dip Your Nail: Once the design is ready, dip your nail into the water, ensuring that the polish sticks to your nail. You might need to move your nail slightly to get the best part of the design. Once dipped, lift your finger out and gently clean the excess polish from the water's surface using your toothpick.
- Seal the Deal: After dipping, let your nail dry for a minute or two. Then, apply a top coat to seal in your design and add a glossy finish. Voila! You now have a gorgeous water-inspired nail art!
Remember, practice makes perfect! Don’t be discouraged if your first try isn’t flawless. With a little patience, you’ll master the art of creating stunning, aquatic-themed nails.
Also Read This: Build a Paper Jet Plane That Flies: Watch Tutorials on Dailymotion
4. Tips for Achieving Perfect Water Designs
Getting that perfect water-inspired nail art isn’t just about the technique; it’s also about knowing some insider tips that can make a world of difference. Here are some tried-and-true tips to elevate your nail game:
- Use Room Temperature Water: This is crucial! Cold water can cause the nail polish to harden too quickly, while hot water can make it too fluid. Aim for a comfortable room temperature for the best results.
- Choose High-Quality Polishes: Invest in nail polishes that have a good consistency. Some brands float better than others, which is key for water marbling. Brands like OPI and Essie are often praised for their performance in water marbling.
- Quick & Steady Movements: When dropping polish into the water and dipping your nails, be quick and steady. This ensures that the design doesn’t have time to dry before you get your nails in.
- Practice Different Patterns: Experiment with various swirling techniques and color combinations. Don't limit yourself to just blues; try greens, purples, and even metallics for a unique look.
- Cleanup is Key: Use tape around your nails or a clean-up brush with some acetone to tidy up any excess polish around your nails after you dip. This gives your final look a clean, polished appearance.
With these tips in your toolkit, you’ll be well on your way to mastering water-inspired nail designs that impress and inspire. Happy painting!
Also Read This: How to Create Stocking Net Flowers: Easy Craft Tutorial on Dailymotion
5. Popular Water-Inspired Nail Art Techniques
If you're diving into the world of water-inspired nail art, there are several techniques that can help you create stunning designs. Here are a few favorites that you can easily master:
- Water Marble: This technique involves swirling nail polish in water to create beautiful, marbled patterns. Start by filling a cup with room temperature water. Drop different colors of polish onto the surface of the water, then use a stick to swirl them together. Dip your nail in to pick up the design!
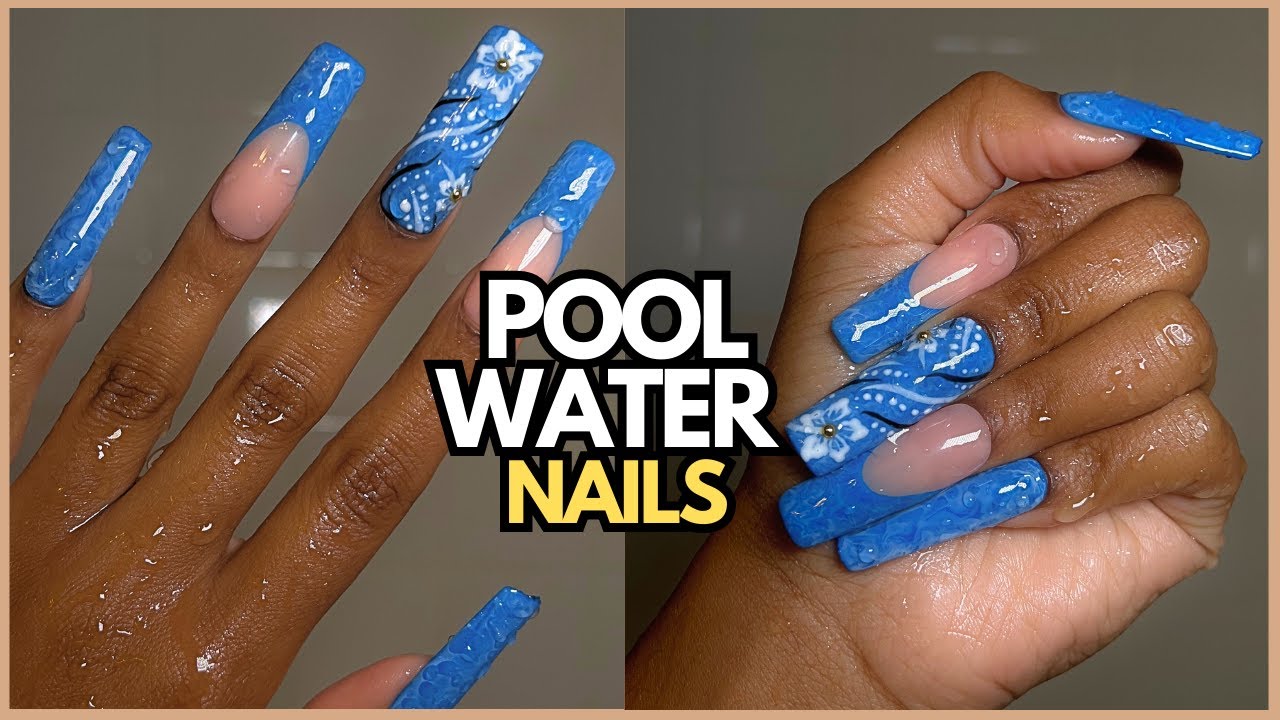
- Ombre Effect: A gradient look reminiscent of the ocean’s depths can be achieved using the ombre technique. Apply a light blue polish at the cuticle and a darker blue at the tip. Use a makeup sponge to blend the two colors for a smooth transition.
- Bubble Nail Art: This fun technique mimics the look of bubbles rising in water. Apply a base coat, then use a dotting tool or a toothpick to create small dots of white or light blue polish over your colored base. Top it off with a glossy top coat for a 3D effect!
- Underwater Scene: For a more artistic approach, create an underwater scene complete with tiny fish and seaweed. Use fine brushes and polishes in various colors to paint your design. Add some glitter for a sparkling effect that mimics sunlight filtering through water.
- Splatter Technique: This playful style can resemble splashes of water. Use an old toothbrush or a fan brush to flick tiny drops of different blue hues onto a white base. It’s a quick and fun way to get that water splash effect!
Each of these techniques showcases the beauty of water in different ways, allowing you to express your creativity. Whether you prefer a simple ombre effect or a detailed underwater scene, there’s something here for every nail art enthusiast!
6. How to Find Tutorials on Dailymotion
Diving into nail art tutorials on Dailymotion is a breeze! With a plethora of videos available, you can easily find inspiration and step-by-step guides. Here’s how you can navigate the platform effectively:
- Search Bar: Start by using the search bar at the top. Type in keywords like “water nail art,” “nail polish techniques,” or “nail art tutorials.” You’ll get a variety of results that cater to your interests.
- Use Hashtags: When you find a tutorial you like, check the hashtags used in the video description. Clicking on these can lead you to related content, making it easier to discover new styles and techniques.
- Follow Nail Art Creators: As you find creators whose styles resonate with you, consider following them. This way, you’ll be alerted to their new uploads, ensuring you never miss a fresh tutorial!
- Playlists: Many creators organize their videos into playlists. Look for playlists dedicated to nail art techniques; this can save you time by grouping similar tutorials together.
- Comment Section: Don’t overlook the comments! Engaging with the community can lead to even more recommendations. Ask for tips or additional resources; fellow nail art lovers are often happy to share!
By using these strategies, you can easily find a wealth of tutorials that will inspire your next nail art session. So grab your polish, get comfortable, and let Dailymotion guide you to your next creative masterpiece!
 admin
admin


