MacBook Screen Share: Sharing Screen on Microsoft Teams on MacBook
By: HD Stock Images
March 2, 2024
837
Setting up screen sharing on Microsoft Teams for your MacBook is a straightforward process. Follow these steps to get started:
Open Microsoft Teams: Launch the Microsoft Teams application on your MacBook. If you don't have it installed, download and install it from the Microsoft website.
Join or Start a Meeting: Join an existing meeting or start a new one by clicking on the "Meetings" tab and selecting "Join" or "Schedule a meeting."
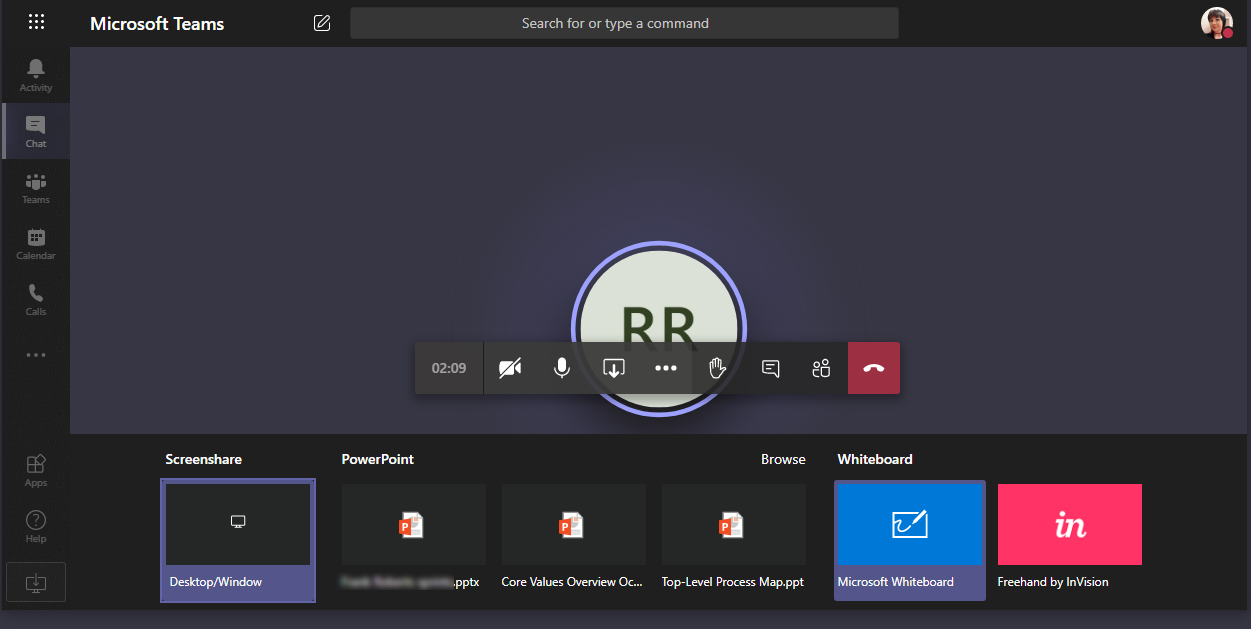
Initiate Screen Sharing: Once you're in the meeting, locate the toolbar at the bottom of the screen. Click on the "Share" button, represented by an arrow pointing up.
Select Screen: A pop-up window will appear with different options for sharing. Choose "Desktop" to share your entire screen or "Window" to share a specific application window. Click "Share" to confirm.
Start Screen Sharing: Your screen will now be shared with the meeting participants. You'll see a green border around the shared screen to indicate that it's being shared.
That's it! You've successfully set up screen sharing on Microsoft Teams for your MacBook. Now you can collaborate, present, or demonstrate with ease.
If you encounter any issues during the setup process, refer to the troubleshooting section below for assistance.
3. Troubleshooting Common Issues
While setting up screen sharing on Microsoft Teams for MacBook is usually smooth, you may encounter some common issues along the way. Here are troubleshooting tips to address them:
Poor Network Connection: Ensure that your MacBook is connected to a stable internet connection. A weak or unstable network connection can cause screen sharing to lag or disconnect.
Permissions: Check your system preferences to ensure that Microsoft Teams has the necessary permissions to access your screen. Go to "System Preferences" > "Security & Privacy" > "Privacy" > "Screen Recording" and make sure Teams is checked.
Software Updates: Make sure that both Microsoft Teams and your MacBook's operating system are up to date. Updates often include bug fixes and improvements that can resolve screen sharing issues.
Compatibility: Verify that your MacBook meets the system requirements for screen sharing on Microsoft Teams. Older models or outdated software may not fully support this feature.
Firewall Settings: Check your firewall settings to ensure that Microsoft Teams is allowed to communicate through the firewall. Adjust the settings if necessary to allow Teams to function properly.
If you're still experiencing issues after trying these troubleshooting steps, consider reaching out to Microsoft support or consulting online forums for further assistance. It's also helpful to provide specific details about the problem you're encountering to expedite the troubleshooting process.
Common Screen Sharing Issues and Solutions
Issue
Solution
Poor network connection
Ensure stable internet connection
Permissions not granted
Check system preferences for permissions
Outdated software
Update Microsoft Teams and macOS
Incompatibility
Verify system requirements
Firewall blocking
Adjust firewall settings
4. Tips for Effective Screen Sharing
Screen sharing can greatly enhance collaboration and communication during virtual meetings. Follow these tips to ensure a smooth and effective screen sharing experience:
Prepare Your Content: Before starting the screen sharing session, organize your content and ensure that relevant files or documents are readily accessible.
Use a Clear Title: When sharing your screen, use a clear and descriptive title to indicate the purpose of the presentation or demonstration.
Minimize Distractions: Close unnecessary applications or browser tabs to minimize distractions and keep the focus on the content being shared.
Test in Advance: Conduct a test run of your screen sharing setup to ensure that everything works smoothly before the actual meeting or presentation.
Be Mindful of Bandwidth: Avoid streaming high-definition videos or multimedia content during screen sharing to prevent bandwidth issues and ensure smooth playback for participants.
Engage Participants: Encourage active participation from meeting participants by inviting questions, feedback, or discussion points during the screen sharing session.
Highlight Key Points: Use annotation tools or highlighting features to draw attention to key points or important information on the shared screen.
Monitor Chat and Reactions: Keep an eye on the chat window and participant reactions to address any questions or concerns that may arise during the screen sharing session.
By following these tips, you can make your screen sharing sessions more engaging, informative, and productive for all participants involved.
Effective Screen Sharing Tips
Tip
Description
Prepare Your Content
Organize and prepare relevant content in advance
Use a Clear Title
Indicate the purpose of the presentation with a descriptive title
Minimize Distractions
Close unnecessary applications to maintain focus
Test in Advance
Conduct a test run to ensure smooth operation
Be Mindful of Bandwidth
Avoid streaming high-definition content to prevent bandwidth issues
Engage Participants
Encourage active participation from meeting attendees
Highlight Key Points
Use annotation tools to emphasize important information
Monitor Chat and Reactions
Stay attentive to participant questions and reactions
5. Integrating Screen Sharing with Other Microsoft Tools
Microsoft Teams offers seamless integration with other Microsoft tools and applications, enhancing your overall productivity and collaboration experience. Here's how you can integrate screen sharing with some of the most commonly used Microsoft tools:
Microsoft PowerPoint: When presenting a PowerPoint slideshow in Microsoft Teams, you can easily share your screen to showcase your slides to meeting participants. Simply open your PowerPoint presentation and select the "Share" option from the Teams meeting toolbar.
Microsoft Whiteboard: Collaborate in real-time with colleagues using the Microsoft Whiteboard app while screen sharing in Teams. Access the Whiteboard directly from the meeting toolbar and start brainstorming, drawing, or taking notes together.
Microsoft OneNote: Share notes, documents, or drawings from your OneNote notebook during a Teams meeting by sharing your screen. Navigate to the relevant OneNote page and select the "Share" option to make your content visible to others.
Microsoft Excel: Showcase Excel spreadsheets or data analysis tools by sharing your screen during a Teams meeting. Open the Excel file you wish to share and click on the "Share" button to display your screen contents to meeting participants.
These integrations allow you to seamlessly incorporate screen sharing into your workflow while leveraging the power of Microsoft's suite of productivity tools. Whether you're delivering a presentation, collaborating on a project, or conducting a training session, integrating screen sharing with other Microsoft tools enhances communication and collaboration among team members.
Integrating Screen Sharing with Microsoft Tools
Microsoft Tool
Integration Method
Microsoft PowerPoint
Select "Share" option from Teams meeting toolbar
Microsoft Whiteboard
Access Whiteboard from meeting toolbar and start sharing
Microsoft OneNote
Select relevant OneNote page and click "Share" option
Microsoft Excel
Open Excel file and click "Share" button
6. Best Practices for Screen Sharing Etiquette
Effective screen sharing etiquette is essential for maintaining professionalism and facilitating productive collaboration during virtual meetings. Here are some best practices to follow:
Announce Screen Sharing: Inform meeting participants before initiating screen sharing to give them context and prepare them for the upcoming presentation or demonstration.
Share Relevant Content: Only share content that is relevant to the discussion or agenda of the meeting. Avoid cluttering the screen with unnecessary information.
Provide Clear Instructions: Offer clear instructions on how to navigate through the shared content, especially if participants need to interact with it or follow along.
Minimize Distractions: Close personal or sensitive information on your screen that is not relevant to the meeting to avoid distractions or privacy concerns.
Use Zoom and Focus Features: Zoom in or use focus features to emphasize specific areas of the shared content, making it easier for participants to follow along and understand key points.
Engage Participants: Encourage active participation from meeting attendees by soliciting feedback, questions, or comments during the screen sharing session.
Be Mindful of Bandwidth: Avoid sharing large files or streaming high-definition content during screen sharing to prevent bandwidth issues for participants with slower internet connections.
End Screen Sharing Appropriately: Once the screen sharing session is complete, announce the end of screen sharing and ensure that participants have returned their focus to the main meeting.
By following these best practices, you can create a positive and professional screen sharing experience for all meeting participants, enhancing collaboration and productivity in virtual settings.
Best Practices for Screen Sharing Etiquette
Practice
Description
Announce Screen Sharing
Inform participants before initiating screen sharing
Share Relevant Content
Only display content pertinent to the meeting agenda
Provide Clear Instructions
Offer guidance on navigating shared content
Minimize Distractions
Close unrelated information on screen
Use Zoom and Focus Features
Emphasize specific areas of shared content
Engage Participants
Encourage active participation from attendees
Be Mindful of Bandwidth
Avoid heavy bandwidth usage during sharing
End Screen Sharing Appropriately
Announce the end of screen sharing and return focus to the main meeting
7. Conclusion
In conclusion, mastering the art of screen sharing on Microsoft Teams for MacBook can significantly enhance your virtual collaboration and communication experience. By following the steps outlined in this guide and implementing best practices for effective screen sharing etiquette, you can facilitate seamless presentations, demonstrations, and discussions with your team members, clients, or stakeholders.
Whether you're working remotely, conducting virtual meetings, or delivering presentations, screen sharing on Microsoft Teams provides a versatile and powerful tool for sharing ideas, information, and content.
Remember to troubleshoot any technical issues that may arise, integrate screen sharing with other Microsoft tools for added functionality, and always adhere to best practices to ensure a professional and productive screen sharing experience.
With these tips and techniques, you'll be well-equipped to leverage the full potential of screen sharing on Microsoft Teams for MacBook and collaborate efficiently in today's digital workplace.
About Author
admin
Making up design and coding is fun. Nothings bring me more pleasure than making something out of nothing. Even when the results are far from my ideal expectations. I find the whole ceremony of creativity completely enthralling. Stock Photography expert.
 admin
admin


