When working with Google Docs, you might find that the images you insert can sometimes shift around, especially when you’re editing or collaborating with others. Locking images in place helps ensure that they stay exactly where you want them. It’s an easy process and can save a lot of frustration, especially if you’re working on a document that needs to maintain a consistent layout or design. This simple feature can be a game-changer when it comes to keeping your work looking professional and organized.
Why Locking Images in Google Docs is Important
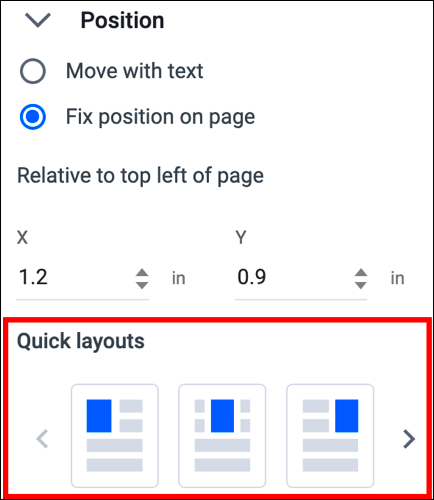
Locking images in Google Docs is essential for anyone who wants to maintain control over the layout of their documents. Here are a few reasons why it's so important:
- Prevent accidental edits: When you lock an image, it can’t be moved or resized by accident. This ensures that your image stays exactly where you intended it.
- Maintain formatting: If your document has a specific design, locking images keeps them in place and prevents them from disrupting the flow of text or other content.
- Improve collaboration: In team projects, locking images ensures that everyone working on the document respects the layout and doesn’t accidentally change something important.
- Save time: Once your images are locked, you won’t have to worry about adjusting them again every time you make edits to your document.
Locking your images may seem like a small step, but it can make a big difference in keeping your documents professional and easy to manage.
Step-by-Step Guide to Locking an Image in Google Docs
Locking an image in Google Docs is a simple process. Here’s how you can do it:
- Insert your image: First, you need to add the image to your document. Go to the "Insert" menu, click on "Image," and select your image file.
- Select the image: Once your image is in place, click on it to select it. You should see a blue border around the image when it’s selected.
- Open the image options: After selecting the image, click on the small "Image options" button in the toolbar (usually located at the top of the page).
- Choose the wrap text option: In the "Image options" menu, select "Wrap Text." This allows you to move the image freely around the document, but the key step is adjusting the position.
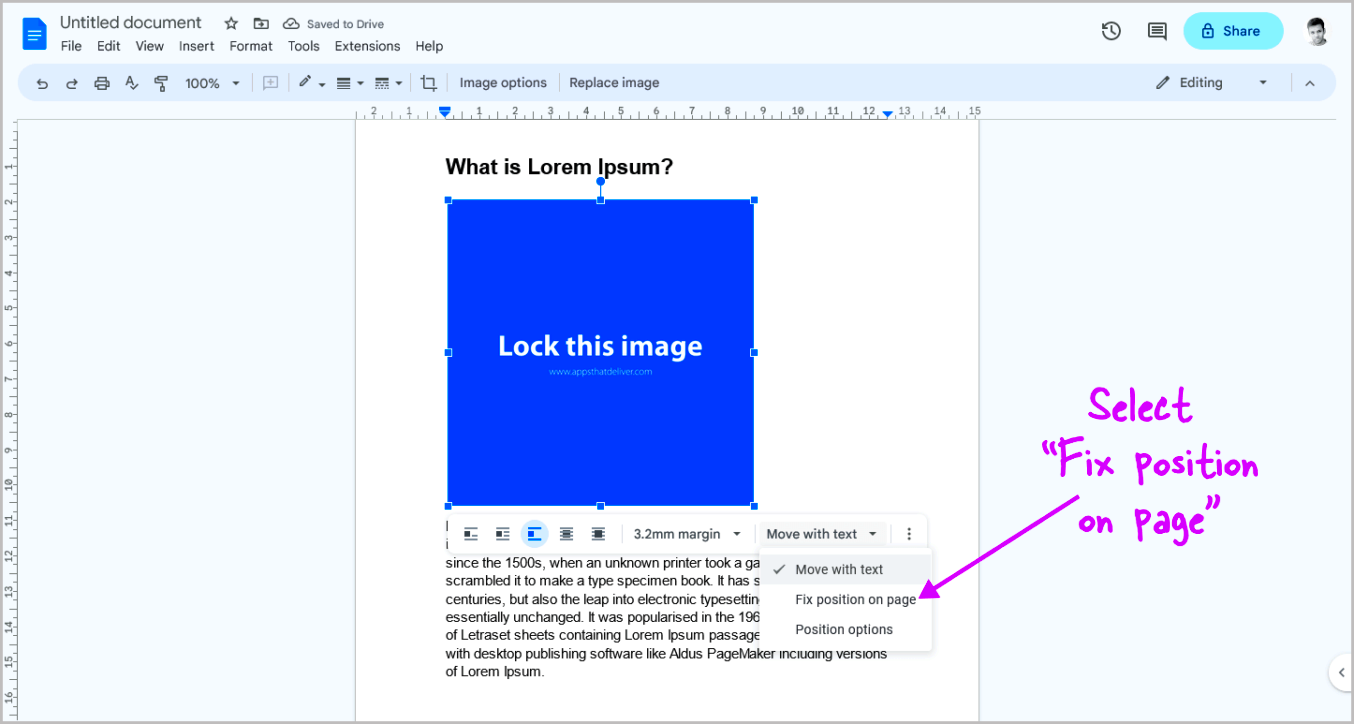
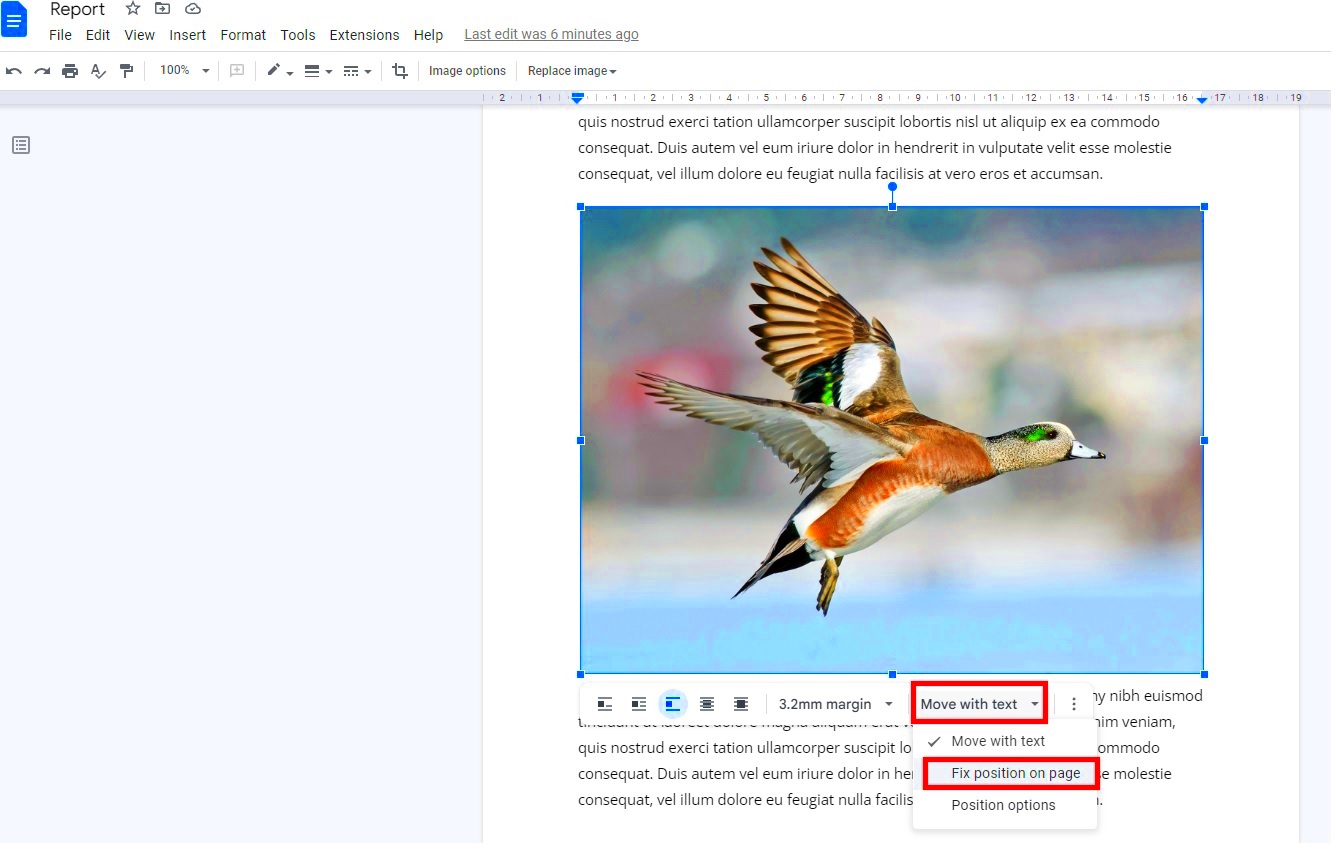
- Lock the image: Now, to lock the image in place, select "Fix position on page." This will ensure the image stays where you place it and won’t move when text is added or deleted.
That’s it! Your image is now locked in place. No matter what edits you or others make to the text, your image will stay exactly where you want it. This simple feature can save you a lot of time and effort, especially when working with complex documents.
How to Lock Images Using the "Wrap Text" Option
Locking images in Google Docs can be done with a few simple steps. One of the most effective ways to do this is by using the "Wrap Text" option. This option gives you control over how the image interacts with the text around it, making sure that it stays in the right position. It’s a great way to ensure that your images are locked into place, even when the text around them changes.
Here’s how you can lock your image using the "Wrap Text" option:
- Insert your image: Start by inserting the image into your document from the "Insert" menu.
- Select the image: Once the image is in your document, click on it to select it.
- Open image options: Click on the "Image options" button that appears at the top when the image is selected.
- Choose "Wrap Text": In the menu that opens, you’ll see different text-wrapping options. Choose "Wrap Text" to make sure the text wraps around the image, but more importantly, this will allow you to adjust its position without worrying about the image shifting when you edit the text.
- Fix the image position: Now that your image is wrapped, click on "Fix position on page." This will lock the image in place, ensuring it stays exactly where you’ve put it, no matter what changes you make to the text.
This method is perfect for keeping your images stable in documents with lots of text and edits. It gives you flexibility in positioning while still locking the image in place where it belongs.
Locking Images for Collaboration in Google Docs
When you’re working on a shared Google Docs document, collaboration can sometimes make it hard to maintain a consistent layout. Multiple people working on a document can easily move or resize images unintentionally. That’s where locking images for collaboration comes in handy. By locking the images, you ensure that no one else can change the image’s position or format, keeping your document looking just the way you want it.
Here’s how you can lock images for collaboration:
- Insert and select your image: Add your image to the document and select it by clicking on it.
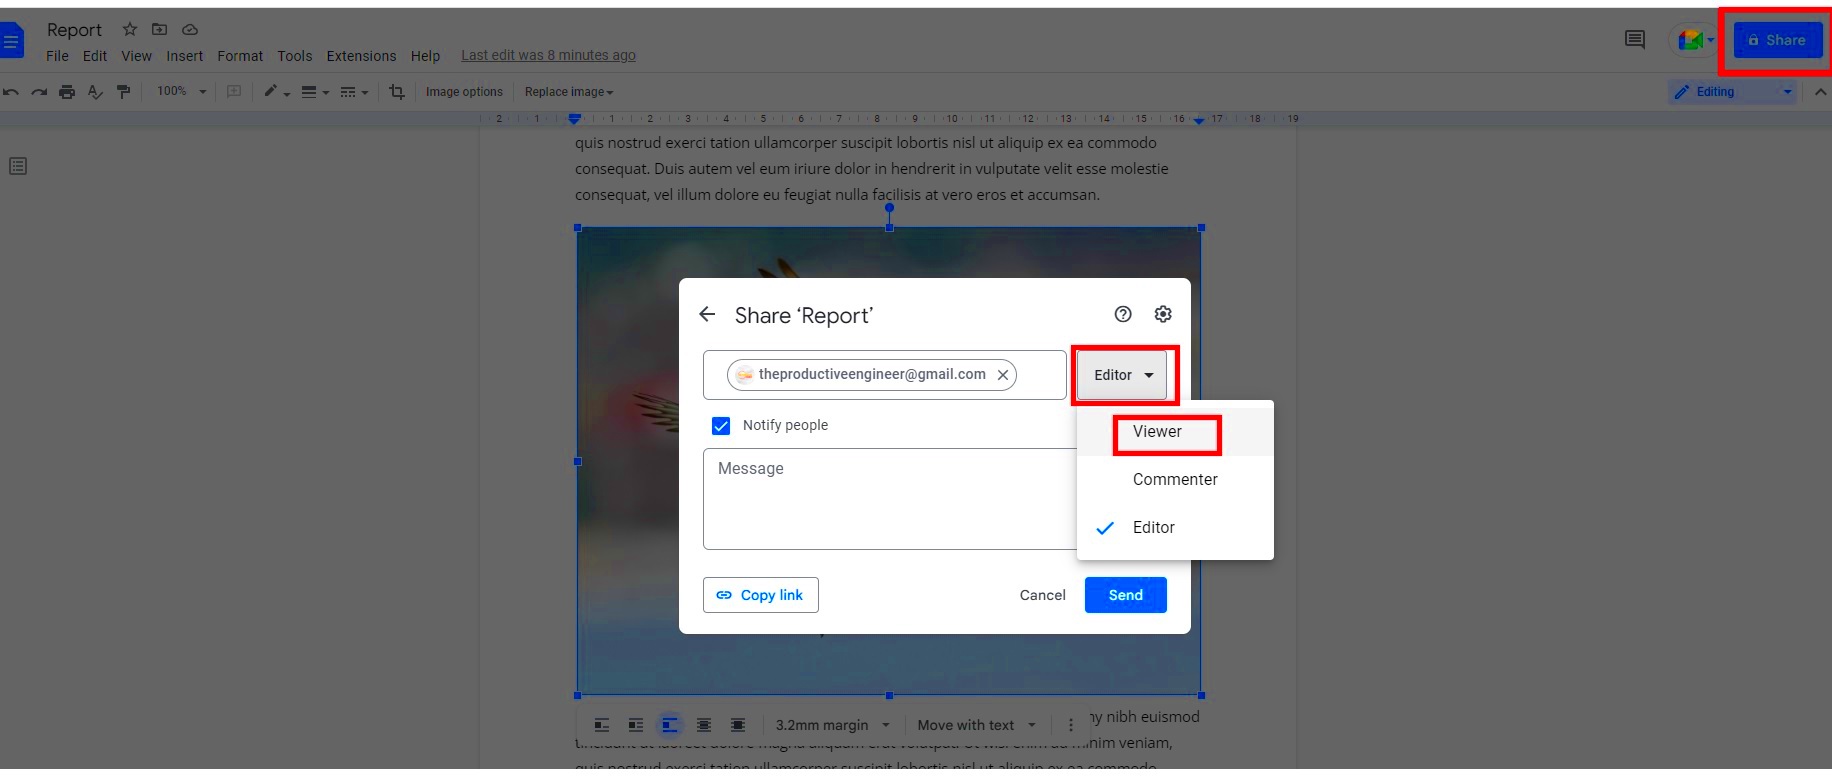
- Enable "Fix position on page": Open the "Image options" menu and check the "Fix position on page" option. This ensures that the image stays locked in place, no matter how others edit the text.
- Share your document: After locking the image, share the document with collaborators. You can set permissions for editing, but the locked image will remain unchanged, even if someone with editing access works on the document.
- Explain the importance of locked images: In a collaborative environment, it’s helpful to let your collaborators know that the images are locked. This reduces the chances of accidental edits or changes to the layout.
By locking images, you can ensure that everyone working on the document maintains the intended layout, making collaboration smoother and more efficient.
Common Issues When Locking Images and How to Fix Them
Locking images in Google Docs is generally straightforward, but you might encounter a few issues along the way. Fortunately, most of these problems can be fixed with just a few adjustments. Let’s take a look at some common issues and their solutions:
- Issue: Image moves after locking it.
Solution: Double-check that you’ve selected "Fix position on page" under the "Image options." If this option is unchecked, the image may move when text is added or deleted.
- Issue: Image is not wrapping text properly.
Solution: Make sure you've selected the "Wrap Text" option in the "Image options" menu. This allows the image to interact with text while staying locked in its position.
- Issue: Image resizing unexpectedly.
Solution: Once the image is locked, ensure that the "Resize" option is disabled. Sometimes, collaborators may unintentionally resize the image, but you can fix this by re-enabling the lock on the size.
- Issue: Image disappears or becomes distorted.
Solution: This might happen if there’s a glitch in Google Docs. Try reloading the page, or remove and reinsert the image. Always ensure your browser is up to date to avoid these issues.
By knowing how to fix these common issues, you can keep your images locked in place without any unnecessary frustration. Most of the time, a quick check of your settings will resolve the problem and get your document back on track.
Additional Tips for Managing Images in Google Docs
Managing images in Google Docs goes beyond just locking them in place. There are a variety of other useful features and tips that can help you organize and present your images more effectively. Whether you’re working on a presentation, report, or any document that includes images, these tips can make your images look better and keep your layout intact.
Here are some additional tips for managing your images in Google Docs:
- Resize images proportionally: When you resize an image, hold down the "Shift" key while dragging the corners. This ensures the image retains its proportions and doesn't get stretched out.
- Use the "In line" option for more control: If you want an image to stay at a specific place with the text flowing around it, use the "In line" option under the "Image options" menu. This keeps the image within the text block and helps you align it better.
- Use captions for context: Adding captions to your images can provide additional context. This can be especially helpful in reports or educational documents. To add a caption, simply type below the image after inserting it, and format it as needed.
- Group images for better layout: If you’re using multiple images that need to stay together, consider grouping them. This helps you move and resize the set of images at once, keeping them aligned and organized.
- Adjust margins around images: To ensure your images don’t appear too close to text or other elements, adjust the margins around your images in the "Image options" menu. This adds space around the image for a cleaner look.
These tips will help you make the most out of the images you use in your Google Docs documents, ensuring they look great and stay organized, no matter how much editing or collaboration occurs.
FAQ
Here are some frequently asked questions about locking and managing images in Google Docs, along with their answers:
- Can I lock multiple images at once?
Answer: Unfortunately, Google Docs doesn’t allow you to lock multiple images simultaneously. You’ll need to lock each image individually using the steps outlined earlier.
- How do I unlock an image?
Answer: To unlock an image, click on it, go to the "Image options" menu, and uncheck the "Fix position on page" box. This will allow the image to move with text edits again.
- Why is my image not locking correctly?
Answer: Make sure you’ve selected the "Fix position on page" option in the "Image options" menu. If this is unchecked, the image will move when text changes. If it still doesn’t lock, try refreshing your document or re-inserting the image.
- Can I resize a locked image?
Answer: Yes, you can resize a locked image. However, it’s important to make sure you do it while the "Fix position on page" option is active, so the image stays in its locked position.
- What happens if multiple people are editing the same document?
Answer: If multiple people are editing a shared document, the locked images will stay in place. However, collaborators won’t be able to move or resize them unless the image is unlocked.
Conclusion
Locking images in Google Docs is a simple but powerful way to keep your document’s layout intact and prevent accidental edits. Whether you're working solo or collaborating with a team, this feature ensures that your images stay where you need them, improving both your productivity and the document's overall look. By understanding how to use features like the "Wrap Text" option and "Fix position on page," as well as following a few additional tips for managing your images, you can make your Google Docs documents cleaner, more professional, and easier to navigate.
With these tips and techniques in mind, you can confidently work with images in Google Docs, knowing that you have full control over their placement and formatting. Happy documenting!
 admin
admin


