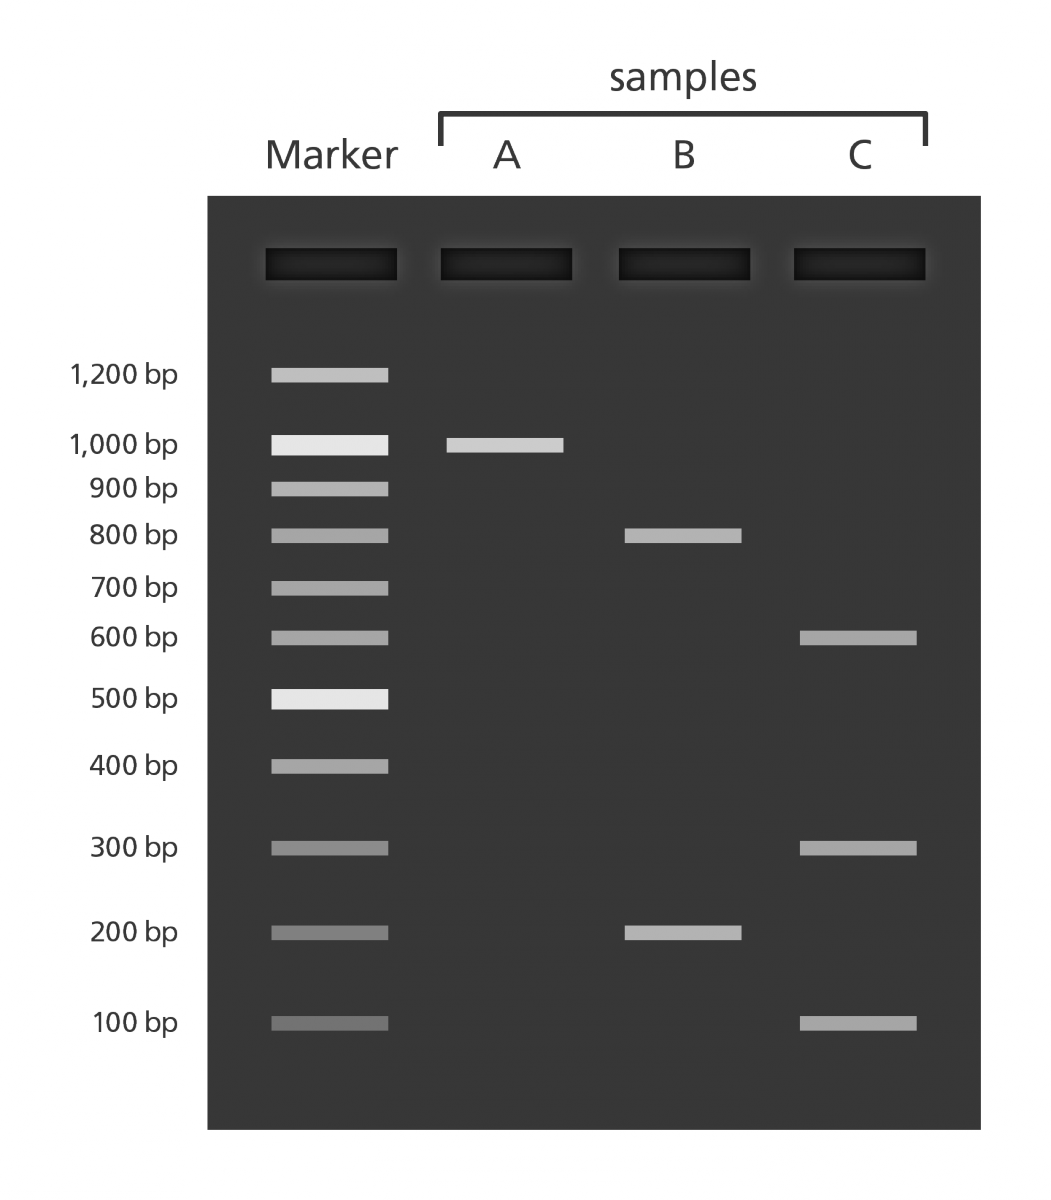
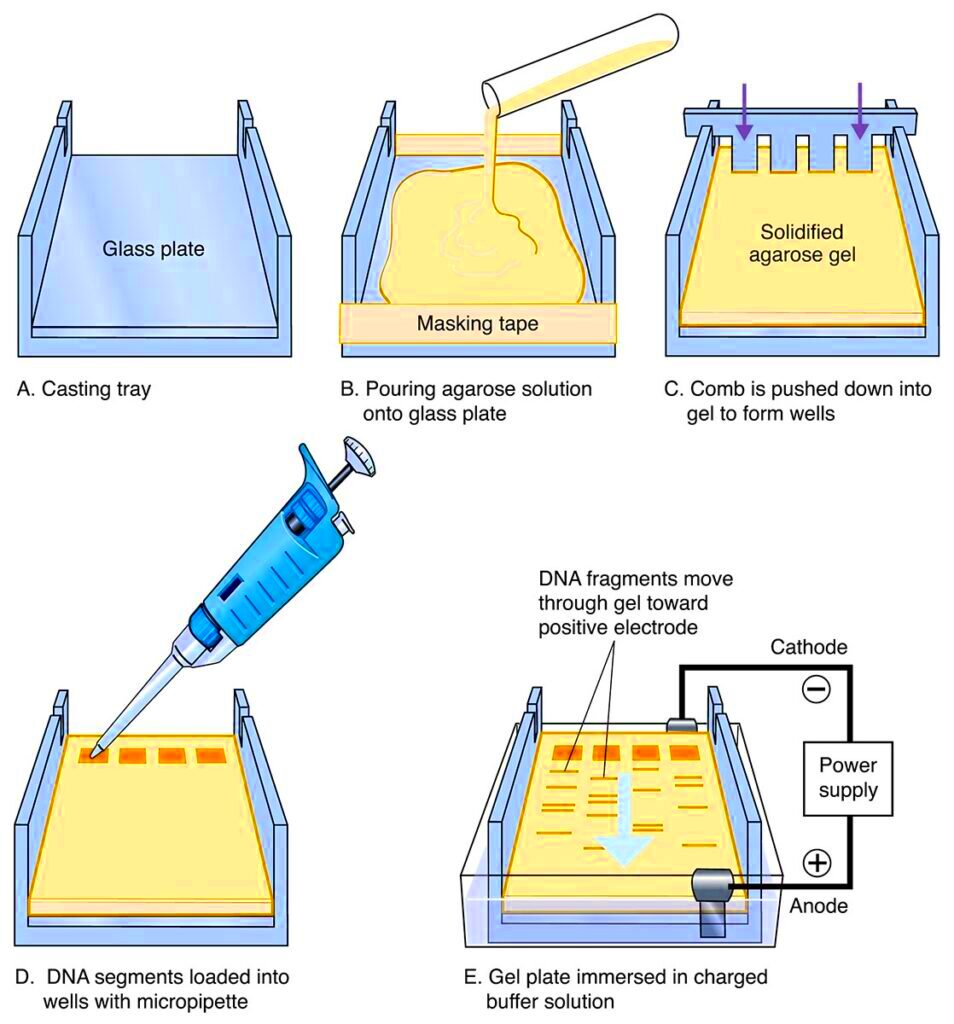
In molecular biology, a core method that involves the separation of DNA, RNA or proteins by size and charge is called gel electrophoresis. This process is essential for various areas like genetics, forensic science and biochemistry. The electric field facilitates movement of the molecules through a gel matrix which enables researchers to observe and scrutinize them.
The significance of gel electrophoresis? A couple of factors are highlighted here below:
- Research Advancement: It helps researchers study genetic disorders and develop treatments.
- Quality Control: In labs, it ensures the purity and integrity of DNA or proteins.
- Forensic Analysis: It aids in DNA profiling for criminal investigations.
To put it simply, anybody dealing with life sciences should comprehend gel electrophoresis since apart from being a way of accessing an in-depth knowledge in molecular biology.
Getting Started with Gel Electrophoresis Images

Capturing images of in gel electrophoresis begins with a good mental attitude and essential equipment. The preparation of the gel itself and availability of the equipment must be confirmed. In this regard, here’s a checklist you may use:
- Prepare Your Gel: Make sure the gel is correctly polymerized and has wells for samples.
- Load Samples: Carefully load your samples into the gel to avoid mixing.
- Run the Gel: Set the appropriate voltage and run the gel for the recommended time.
When the exercise is over, you can see your gel under the UV light. Be careful to handle your samples and gels to prevent pollution or disintegration.
Also Read This: Understanding the Delays in Alamy Image Uploads
Steps to Capture High-Quality Gel Electrophoresis Images
The production of good resolution images for gel electrophoresis results is key in ensuring their precise evaluation and records management. Below are procedures you should follow step by step:
- Set Up Your Equipment: Ensure your camera or smartphone is equipped with a good lens and the right settings. Use a tripod to stabilize your shots.
- Illumination: Use proper lighting to enhance visibility. UV transilluminators are often used for DNA gels. Avoid direct light that might create glare.
- Capture the Image: Position the camera directly above the gel. Use a timer or remote shutter to prevent movement during the shot.
- Check the Focus: Ensure the image is sharp and clear. Zoom in to confirm the quality before moving on.
- Edit if Necessary: Use image editing software to adjust contrast and brightness. This can enhance the visibility of bands.
So, if you want your gel electrophoresis images to be both clear and suitable for review, just do these things.
Also Read This: How to Sell Your Pictures to Getty Images
Choosing the Right Tools for Imaging
Choosing the best instruments for imaging gel electrophoresis results is critical in getting clear and high quality images. Since there are many options available, most beginners find it hard on where to start from. These are some of the key tools that you should think about:
- Camera: A good-quality digital camera or smartphone can work well. Look for one with a high-resolution sensor to capture fine details.
- UV Transilluminator: This is crucial for visualizing DNA and RNA gels. It provides the necessary light to see the samples clearly.
- Tripod: Stability is key to avoid blurriness in your images. A tripod will help keep your camera steady during the shot.
- Image Capture Software: Programs like ImageJ can help you analyze and enhance your images after capturing them.
- Lighting Equipment: Ensure proper lighting setup. Softboxes or ring lights can help reduce glare and shadows.
Investing in high-quality tools could have a huge impact on how clearly you can see, be it during an evaluation or while presenting. So please take your time looking for those that match up with your requirements!
Also Read This: Explore This Simple Tool to Download Videos from YouTube in Mp4
Common Challenges in Gel Electrophoresis Imaging
Even if you have the correct tools, visualizing the results of gel electrophoresis can be a challenging task. Understanding these challenges can aid in better preparations. The following are some frequent difficulties:
- Poor Resolution: Images may turn out blurry if the camera is not steady. This can be avoided with a tripod.
- Overexposure: Too much light can wash out your bands. Use the right settings on your camera to prevent this.
- Low Contrast: If the bands are hard to see, adjust your lighting or use image editing software to enhance contrast.
- Contamination: Fingerprints or dust on the gel can affect image quality. Always handle your gel with clean gloves and avoid touching the surface.
- Software Issues: If you’re using image analysis software, make sure you’re familiar with its features to avoid mishaps.
The quality of gelatin photographs can be enhanced notably if you are cognizant of these problems and take steps to avert them.
Also Read This: Here is How to Download Dailymotion Videos Online with No Software
Tips for Enhancing Your Gel Electrophoresis Images
It is essential that for proper interpretation and presentation of the gel electrophoresis images, they are enhanced. To achieve this, here are some practical suggestions:
- Use High-Quality Reagents: Ensure your gels are made with high-quality agarose or polyacrylamide to get sharper bands.
- Adjust Exposure Settings: Experiment with different exposure times on your camera to find the best balance for clarity without overexposing.
- Consider Color Filters: Using filters can help enhance specific bands, especially when using a UV transilluminator.
- Image Editing: After capturing your image, consider using software to enhance brightness and contrast. Adjust the levels to make the bands pop.
- Document Everything: Keep detailed records of your imaging settings and conditions to replicate good results in future experiments.
By utilizing these pointers, the quality and substance of your gel electrophoresis images can be greatly enhanced, which would make your investigations and presentations unique.
Also Read This: Making Money through Adobe Stock or Shutterstock
Using Image Analysis Software Effectively
Looking to analyze gel electrophoresis results? Gel electrophoresis image analysis software is what you need. Quantify your bands, judge their purity, and compare samples effectively with these tools. However, for these software to be maximally beneficial to the user, one must learn how to use them well. Below are some pointers on getting started:
- Choose the Right Software: There are many options available, like ImageJ, GelAnalyzer, and others. Select one that meets your needs, whether for basic analysis or advanced quantification.
- Familiarize Yourself: Take the time to learn how to use the software. Most programs offer tutorials or user manuals that can help you get started.
- Calibrate Your Images: Ensure your images are properly calibrated before analysis. This includes setting a reference for size and brightness.
- Analyze Consistently: Use consistent settings for all your images to ensure that your results are comparable. This helps avoid bias in your data.
- Save Your Work: Always save your analysis results and images. Documentation is key to replicating your work or revisiting it later.
Gel electrophoresis graphical representations can consequently be transformed into scientifically meaningful information due to the resourceful application of image processing computer programs.
Also Read This: Modi’s Moments Redux: A Guide on How to Watch the BBC Modi Documentary
Frequently Asked Questions about Gel Electrophoresis Imaging
Delving into the realm of gel electrophoresis imaging often leaves one with numerous queries. Below are some commonly posed inquiries intended at giving insight and clarity on the subject matter:
- What is gel electrophoresis? It’s a technique used to separate and visualize DNA, RNA, or proteins based on size and charge.
- Why is image quality important? High-quality images allow for accurate analysis and documentation, making your research more reliable.
- What tools do I need for imaging? A good camera, UV transilluminator, tripod, and image analysis software are essential tools.
- How can I improve my gel images? Use proper lighting, a steady camera setup, and high-quality reagents to enhance image quality.
- Can I edit gel images? Yes, using image editing software can help improve contrast and clarity but be careful not to misrepresent data.
In case you have more inquiries, feel free to connect with your colleagues or search for some supplementary materials that can enhance your comprehension.
Conclusion: Simplifying Gel Electrophoresis Imaging
Gel electrophoresis imaging is an important ability for every staff member of a molecular biology lab. You can make it easy and improve the quality of results by understanding its fundamentals and utilizing the best tools and techniques. Keep in mind that:
- Invest in quality imaging tools that fit your needs.
- Be aware of common challenges and how to overcome them.
- Utilize image analysis software to extract meaningful data.
Just a small amount of practice and using the right methods could make gel electrophoresis imaging amicable and fulfilling to your research schedule. Whether you’re taking beautiful pictures or analyzing the information, these steps will enable you to improve your work and add value to your discipline.

 admin
admin


