Importing images from your Fujifilm camera to your MacBook can seem tricky at first, but it's actually a simple process once you understand the steps. Whether you're a professional photographer or just someone who loves taking pictures, knowing how to transfer your photos efficiently is essential. In this guide, we’ll walk you through everything you need to know about importing your Fujifilm images to your MacBook. By the end, you’ll be able to easily move your pictures and organize them without any hassle.
Understanding the Requirements for Importing Images

Before you begin importing images, it's important to ensure that your setup is ready. There are a few things you’ll need to have in place:
- Fujifilm Camera: Your camera should be ready with photos you want to transfer.
- MacBook: Make sure your MacBook is powered on and updated to the latest version of macOS.
- USB Cable or Card Reader: You’ll need a USB cable to connect your Fujifilm camera or a card reader to your MacBook if you’re using a memory card.
- Software (Optional): Some Fujifilm cameras may require specific software like Fujifilm X Acquire for transferring photos, though this isn't always necessary.
Once you have everything in place, you’re ready to move on to connecting your camera and importing your images.
Also Read This: How to Change Background in Adobe Photoshop 7.0
Connecting Fujifilm Camera to Your MacBook

The first step in importing your photos is connecting your Fujifilm camera to your MacBook. There are two main methods for doing this:
- Using a USB Cable:
Connect your Fujifilm camera to your MacBook using a USB cable. Once connected, your MacBook should automatically detect the device and open the appropriate import dialog or software.
- Using a Card Reader:
If your camera uses an SD card, you can remove the card and insert it into a card reader connected to your MacBook. This method is usually quicker as it doesn't require turning on the camera.
Once you’ve made the connection, your MacBook should recognize the camera or card and you’ll be able to start importing the images. Make sure the camera is powered on and set to the correct mode for transferring files.
Also Read This: How to Download Vimeo Videos to MP3? A Step by Step Free Guide
Using the Built-In Image Capture App for Importing
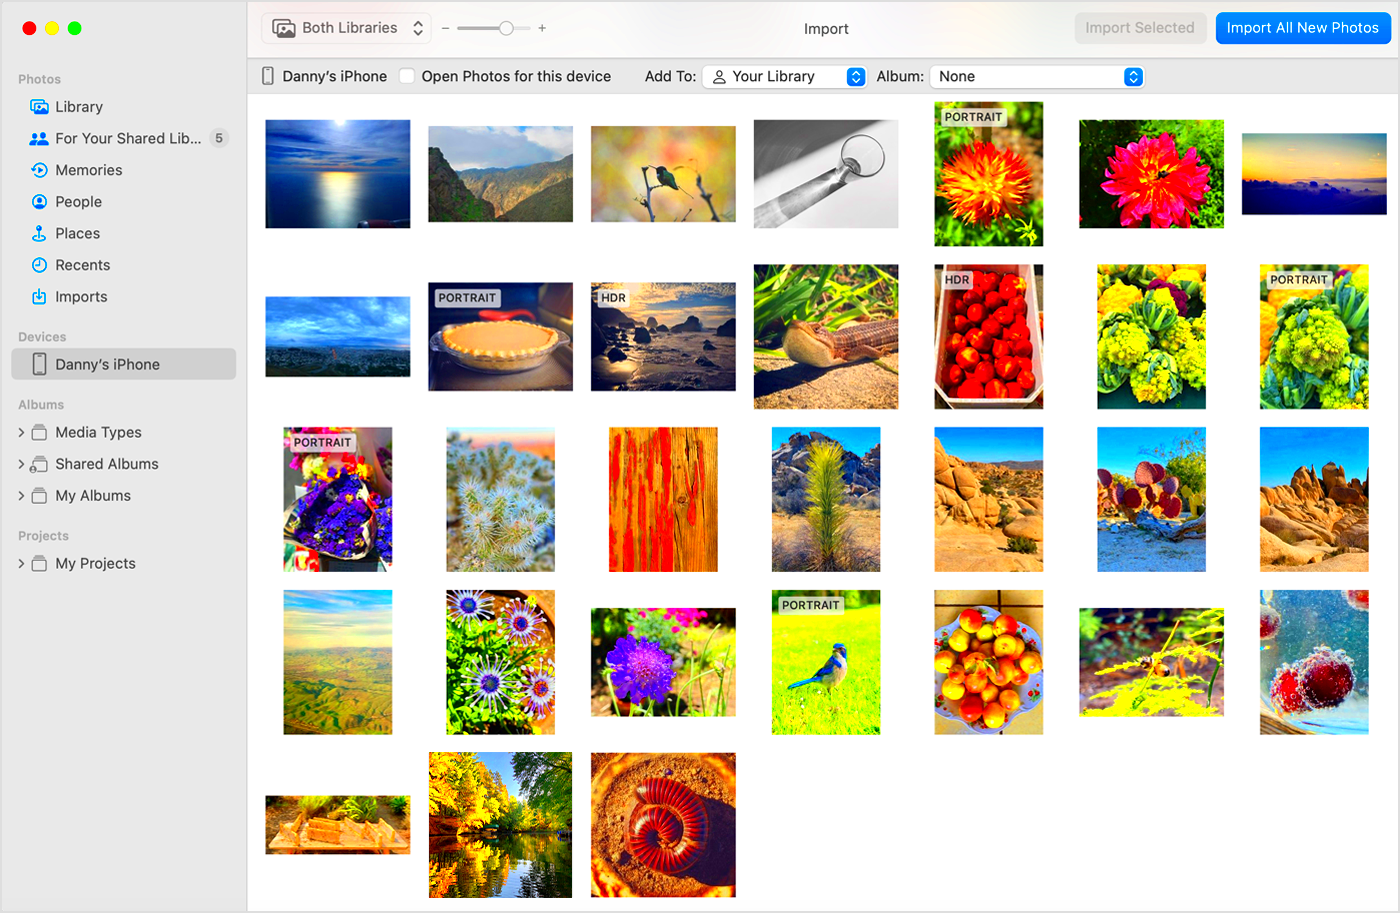
One of the easiest ways to import your photos from your Fujifilm camera to your MacBook is by using the built-in Image Capture app. This app is simple to use and comes pre-installed on all macOS devices, so you don’t need to download anything extra. Here’s how you can use it:
- Step 1: Connect your Fujifilm camera to your MacBook via USB cable or insert your SD card into the card reader.
- Step 2: Open the Image Capture app by searching for it in Spotlight or finding it in the Applications folder.
- Step 3: In the Image Capture window, your Fujifilm camera or SD card will appear on the left side under the "Devices" section.
- Step 4: Select the photos you want to import, or click "Import All" to transfer all the images.
- Step 5: Choose where you’d like to save the images on your MacBook, and click "Import" to start the transfer.
That’s it! Your images will be imported to your MacBook and stored in the folder you selected. The Image Capture app offers a quick and no-fuss solution for getting your photos onto your computer.
Also Read This: how to plug in adobe stock templates in premier pro
Transferring Images Using the Fujifilm Software
For users who prefer a more tailored experience, Fujifilm offers software like Fujifilm X Acquire or Fujifilm Camera Remote, which can help with transferring images from your camera to your MacBook. These apps are especially useful if you’re using Fujifilm’s higher-end models. Here’s how to use Fujifilm’s software to transfer your photos:
- Step 1: Download and install Fujifilm X Acquire or Fujifilm Camera Remote from the official website.
- Step 2: Connect your Fujifilm camera to your MacBook using a USB cable or Wi-Fi connection (depending on the camera model).
- Step 3: Open the Fujifilm software on your MacBook.
- Step 4: The software will automatically detect your camera and show all the images available for transfer.
- Step 5: Select the images you want to import, and choose where to save them on your MacBook. Then, click "Import" to start the process.
Using Fujifilm software provides more control over the import process, especially when managing large image files or when shooting in RAW format. It’s a good choice if you need additional features like image sorting or metadata management.
Also Read This: Explore How to Download Reel Without Watermark
Importing Images Using Finder on MacBook
If you prefer a more direct approach to importing images, you can use Finder on your MacBook. Finder allows you to browse the files on your camera or SD card and manually copy the images to your MacBook. Here’s how you can do it:
- Step 1: Connect your Fujifilm camera or SD card to your MacBook via USB cable or card reader.
- Step 2: Open Finder, and in the sidebar, you should see your Fujifilm camera or SD card listed under "Devices."
- Step 3: Click on the camera or SD card icon to open its contents and view the images stored on it.
- Step 4: Select the images you want to transfer. You can select multiple photos by holding the Command key while clicking.
- Step 5: Drag the selected images into the folder on your MacBook where you want to store them.
This method is ideal if you prefer manually organizing your images and don’t need any extra software to do so. It's a simple, quick way to get your photos onto your MacBook without the need for additional apps or software. However, it requires a little more effort compared to using apps like Image Capture.
Also Read This: Fast Track: Unlocking the Secrets to Fast Shipping on AliExpress
Managing Your Imported Images on MacBook
Once your photos are imported to your MacBook, it’s important to keep them organized and easy to access. This will help you find specific images quickly and ensure your workspace remains clutter-free. Here are some tips for managing your imported images:
- Creating Folders: Organize your images into folders based on dates, events, or shoots. For example, create a folder for each photography session and place all related images in it. This makes it easier to browse through your collection later.
- Renaming Files: Rename your image files with meaningful names. Instead of having generic filenames like “IMG_1234.jpg,” rename them based on the subject or event, like "Beach_Trip_2024.jpg." This will help you identify images faster.
- Using Tags and Keywords: You can use Finder's tagging system to mark images with color codes or keywords. This helps you filter images based on specific tags like “vacation,” “portrait,” or “landscape.”
- Backing Up Your Images: Always have a backup plan. Use cloud storage services like iCloud or Google Drive, or external hard drives, to back up your imported images. It ensures your photos are safe in case anything happens to your MacBook.
- Editing and Exporting: After importing, you may want to edit some photos. Use photo editing software like Adobe Lightroom or macOS Preview to make adjustments. Once edited, export the images in the desired format and resolution for sharing or printing.
By following these simple tips, you’ll keep your photo collection organized and easy to access, making your workflow more efficient.
Also Read This: How to Capture Videos from YouTube
FAQ about Importing Images on MacBook for Fujifilm
Here are some frequently asked questions about importing images from Fujifilm cameras to MacBook:
- Do I need special software to transfer images from my Fujifilm camera?
Not necessarily. You can use the built-in Image Capture app or Finder to transfer images. However, if you want advanced features, Fujifilm software like X Acquire is a great choice.
- Can I transfer images wirelessly from my Fujifilm camera to my MacBook?
Yes! Some Fujifilm cameras support Wi-Fi transfer. You can use Fujifilm’s Camera Remote app to send images wirelessly to your MacBook.
- How do I transfer RAW files from my Fujifilm camera?
RAW files can be transferred just like any other image file. However, you’ll need compatible software like Lightroom or Capture One to open and edit them on your MacBook.
- What if my MacBook doesn’t recognize my Fujifilm camera?
Try restarting both your MacBook and your camera. If using a USB cable, make sure it’s securely connected. Also, check if you need any camera drivers or software updates from Fujifilm’s official website.
- Is there a way to batch import photos from my Fujifilm camera?
Yes, both the Image Capture app and Finder allow you to select and import multiple photos at once. You can either use “Import All” or select specific images for batch transfer.
Conclusion and Final Tips
Importing images from your Fujifilm camera to your MacBook doesn’t have to be a complicated process. Whether you’re using the built-in Image Capture app, Fujifilm’s dedicated software, or Finder, you can quickly transfer your photos and start organizing them. Here are a few final tips to make the process smoother:
- Always double-check connections: Make sure your camera or SD card is properly connected to your MacBook before starting the import process to avoid errors.
- Stay organized: Create a consistent system for naming files and organizing images into folders. This will save you time when searching for specific photos later.
- Backup your images: Never skip backing up your photos. Use cloud storage or an external hard drive to ensure you don’t lose your important images.
- Keep your software up to date: Ensure both your MacBook and Fujifilm camera have the latest updates for smooth compatibility and new features.
With these tips and tools at your disposal, you’ll be able to manage your Fujifilm images on your MacBook with ease. Happy shooting!

 admin
admin


