The process of transforming raster pictures composed of pixels into vector pictures created from paths is known as vectorization. This change is imperative because vector images do not lose quality when scaled which makes it ideal for logos, and various other illustrations or graphic design assignments.
Here’s why vectorization should not be underestimated:
- Scalability: Vector images can be resized infinitely without losing clarity.
- File Size: They often have smaller file sizes compared to raster images.
- Editing: It's easier to edit vector images since they consist of paths rather than pixels.
- Print Quality: Vectors provide high-quality output for printing.
Understanding why vectorization is important can help you make the right choices regarding your design work. If you are creating digital illustrations or preparing files for printing, knowing how to effectively vector images is an important skill to have.
Getting Started with Procreate for Vectorization
Procreate, an incredibly popular digital illustration app that is specific to iPad, provides users with many instrumentals as far as artistry and design are concerned. The first thing to do before venturing into vectorization is to appropriately configure one's Procreate working area.
So, there are certain guidelines that you will need to follow if you want to start on these.
- Download and Install Procreate: Ensure you have the latest version of Procreate installed on your iPad.
- Create a New Canvas: Open Procreate and create a new canvas. A larger canvas is usually better for vectorization.
- Familiarize Yourself with the Tools: Spend some time exploring Procreate's brushes and tools. The Brush tool and Selection tool are particularly important for vector work.
Upon becoming accustomed to the interface, you may start vectorization. Procreate has options for pressure sensitivity among others as well as many brushes that make your job easier.
Also Read This: Building a Successful Portfolio on Getty Images: Tips for Capturing Market Demand
Choosing the Right Image for Vectorization
Choosing an appropriate image is vital for good vectorization. Not every image is suitable for vector conversion; thus, it is important to follow these guidelines in your selection:
- High Contrast: Images with clear contrast between colors and shapes are easier to vectorize.
- Simplicity: Simple designs or illustrations with minimal detail work best.
- Defined Edges: Look for images that have well-defined edges and shapes.
- Avoid Complex Patterns: Intricate patterns may lose their clarity during the vectorization process.
By keeping these factors in mind, your choice of images for use in Procreate will be the best that can be vectorized. The difference you make at this beginning point will have a great influence on what you finally get.
Also Read This: Capture ShareChat Screenshots Easily with This Eye-Opening Guide
Steps to Vectorize an Image in Procreate
At the beginning, the notion of vectorizing an image in Procreate may appear really intimidating. Nevertheless, after understanding how to go about it, everything becomes easy. You can take this step-by-step instruction as a guide:
- Import Your Image: Start by opening Procreate and importing the raster image you want to vectorize. You can do this by tapping the "+" icon and selecting "Insert a photo."
- Create a New Layer: After importing, create a new layer above your image. This will help you trace over the image without altering the original.
- Use the Brush Tool: Select the Brush tool and choose a suitable brush for tracing. A hard brush works well for clean lines. Begin tracing over the edges of your image, focusing on key details.
- Utilize the Selection Tool: Once you've traced the main shapes, use the Selection tool to select and manipulate different parts of your vector image. You can easily move, resize, or rotate shapes as needed.
- Refine Your Lines: After tracing, go back and refine your lines. You can adjust the thickness and smoothness to achieve a polished look.
- Add Color: If your image requires color, create additional layers for different colors and use the Fill tool to fill in shapes.
Procreate, an image vectorization tool, is very effective when images are vectorized following the subsequent measures. Once you learn, it will only take you a while before making beautiful vector graphics.
Also Read This: Adobe Stock Images No Watermark: How to Use Them Legally
Adjusting Your Vector Image for Better Results
After vectorizing your image, the next step is to tidy it up in order to get the most out of it. Adjusting your vector image is crucial in order to get a professional touch on it. Here are some pointers that could help you improve your work:
- Simplify Shapes: Look for any unnecessary complexity in your vector paths. Simplifying shapes can improve the overall clarity of your image.
- Smooth Out Lines: Use the "Smoothing" feature in Procreate to refine any jagged edges. This will help create clean, flowing lines.
- Adjust Color Saturation: Play around with color saturation to ensure your colors pop. Use the color adjustment tool for fine-tuning.
- Check for Overlaps: Ensure that shapes are not overlapping in ways that make them hard to distinguish. Adjust layers if needed.
- Group Layers: To keep your workspace organized, group similar layers together. This will make future adjustments easier.
This modification can potentially enhance the caliber of vector images; giving them a more refined and business-like appearance.
Also Read This: Complete Guide to Selling Getty Images as a Contributor
Exporting Your Vectorized Image from Procreate
When you are finally contented with what you see as your vectorized image, it is about time for exporting it. Procreate allows for different export options depending on the wants of the user. This is how one goes about exporting a vector image:
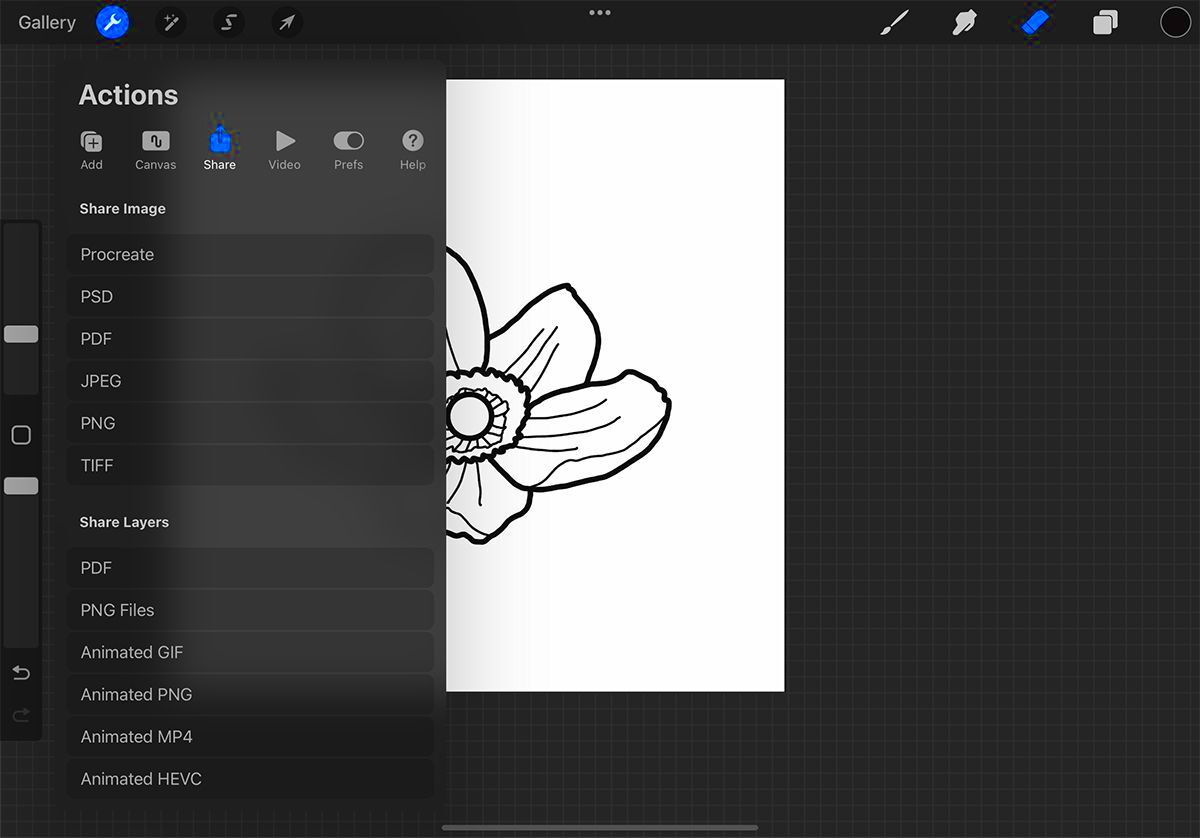
- Open the Actions Menu: Tap the wrench icon in the upper left corner to access the Actions menu.
- Select "Share": From the Actions menu, choose the "Share" option. This will give you several export formats to choose from.
- Choose Your Format: For vector graphics, select "SVG" or "PDF" for best results. These formats preserve the vector quality of your image.
- Adjust Export Settings: If prompted, adjust any export settings to suit your needs, such as size or resolution.
- Save or Share: After making your selections, save the file to your device or share it directly via email or other apps.
In order to ensure that the quality of your vectorized image is maintained, make sure that it is exported in the right manner. Let’s now determine some of the requirements for printing or sharing. Congratulations on your newly vectorized artwork!
Also Read This: Boost Your YouTube Upload Speed with These Expert Tips
Common Mistakes to Avoid When Vectorizing
To perfect a skill like vectorizing an image, it demands time and effort to learn. As you learn, you will easily fall into the trap of making mistakes. Being cognizant of common flaws can help one achieve better results. Such are the blunders that one must avoid:
- Using Low-Quality Images: Starting with a low-resolution image can lead to poor results. Always choose high-quality images for vectorization.
- Skipping the Tracing Step: Some people try to skip tracing or use automatic tracing tools. While these can be helpful, they often miss finer details. Manual tracing gives you more control.
- Ignoring Layers: Not utilizing layers can lead to a messy workflow. Use layers to keep different parts of your design organized and editable.
- Overcomplicating Shapes: Adding too many details can clutter your vector image. Stick to the essentials and simplify where possible.
- Neglecting Color Adjustments: Colors can look different once vectorized. Don’t forget to adjust and refine your colors after vectorization.
- Not Saving Your Work: Forgetting to save can lead to losing hours of work. Regularly save your progress to avoid any disappointments.
This is the way to get yourself ready for success in vectorizing images using Procreate by avoiding these usual mistakes. Be patient and don’t hesitate to play around.
Also Read This: Using Edited iStock Pictures for Advertising Legal and Creative Guidelines
Frequently Asked Questions
When you begin vectorization in Procreate, it is natural to have questions. To make things easier for you, here are some questions we get asked most frequently about vectorization:
- Can I vectorize any image? While you can attempt to vectorize most images, simpler and high-contrast images yield better results.
- What file formats can I export my vector image in? You can export your vector image in formats like SVG or PDF, which maintain the vector quality.
- Do I need any special tools for vectorization? Procreate has all the tools you need for vectorization, so you don’t need additional software.
- How can I improve my vectorization skills? Practice is key! The more you experiment with different images and techniques, the better you’ll become.
- Is vectorization suitable for all types of art? Vectorization works best for illustrations, logos, and graphic designs rather than complex photographic images.
Sometime this communication would solve popular worries. It is important to remember that everyone has questions when they are learning something for the first time, therefore do not feel shy to ask!
Conclusion and Final Thoughts
Working with Procreate to Vectorize an Image, thus Breaking Open a World of Creative Possibilities. It is able to enhance your artistic skills when you master vectorization. Keep this in mind; practice has the key to perfection; do experimentations and improve your methods.
While beginning vectorization, do not forget the following points:
- Choose high-quality images for the best results.
- Take your time with tracing and refining your vector shapes.
- Utilize layers effectively to maintain organization.
- Avoid common mistakes to streamline your workflow.
Know these things will enable you to vectorize lovely images. Relish in this and have your creativity go wild!
 admin
admin


