Audacity is a fantastic, free, and open-source audio editing software that’s perfect for beginners and seasoned pros alike. Whether you want to record, edit, or mix audio, Audacity has got you covered. It's available on multiple platforms, including Windows, macOS, and Linux, making it accessible for everyone.
One of the great things about Audacity is its user-friendly interface. With a little exploration, you'll find features like:
- Multi-track editing: Overlay different audio tracks.
- Effects: Add reverb, bass boost, and other effects to enhance your sound.
- Support for various formats: Import and export in formats like WAV, MP3, and more.
In this blog post, we’ll delve into how to utilize Audacity specifically for recording audio from YouTube videos, allowing you to create podcasts, remixes, or simply save your favorite tracks for offline enjoyment.
Why Record Audio from YouTube Videos?
YouTube is a treasure trove of audio content. From music tracks and podcasts to sound effects and lectures, the platform hosts an incredible variety of sounds that we might want to capture. Here are a few reasons why you might want to record audio from YouTube videos:
- Access to Rare Content: Some audio tracks or soundbites may not be available for download elsewhere. Recording from YouTube allows you to save those gems.
- Creating Personal Mixes: Want to compile your favorite songs or sound bites into one mix? Recording audio from YouTube lets you create a personalized playlist.
- Educational Purposes: If you’re a student or educator, you might find lectures, tutorials, or discussions that you want to save for future reference or share with others.
- Offline Listening: Sometimes, you want to enjoy content without using data or being online. Recording audio from YouTube means you can listen whenever you like.
However, it’s essential to remember copyright issues. Ensure you have the right to use the audio you’re recording, especially if you plan to share it or use it commercially. Always respect the original content creators!
Overall, recording audio from YouTube videos can enhance your listening experience, allowing for greater flexibility and control over the content you consume. Next, we’ll dive into the step-by-step process of how you can achieve this using Audacity.
Also Read This: What Happened to Precision Transmission on YouTube? Updates and Insights
3. Setting Up Audacity for Recording
Alright, let’s roll up our sleeves and dive into setting up Audacity for recording audio from YouTube videos! First things first, if you haven’t already, make sure you have Audacity installed on your computer. You can download it from the official Audacity website. Once it’s installed, you’re just a few tweaks away from capturing that audio.
Here’s what you need to do:
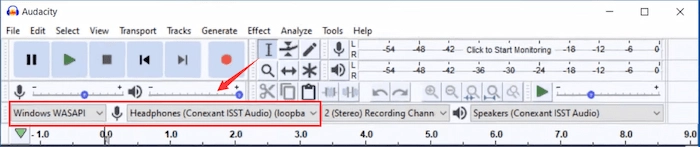
- Set Your Audio Host: Open Audacity and head over to the drop-down menu on the top left, where it says “Host.” You’ll want to select “Windows WASAPI” (if you’re on Windows) or the appropriate option for your OS. This setting allows Audacity to capture system audio, which is what you need.
- Choose the Right Recording Device: Next, right beside the Host, you’ll see a drop-down for “Mic.” Here, select your sound output device. If you’re using speakers, choose the ones playing the audio. If you’re using headphones, select that option. This tells Audacity where to listen from.
- Adjust the Input Level: Look for the microphone icon in the toolbar. It’s important to adjust the input level to avoid distortion. A good rule of thumb is to keep the audio levels between -12dB and -6dB when you play the audio. This ensures you capture clear sound without peaking.
Now that your settings are all set, it’s a good idea to do a quick test recording. Click the Record button, play a segment from a YouTube video, and then stop the recording. Play it back to check if the audio quality meets your expectations. If it doesn’t, tweak the input levels again until you’re satisfied!
One last tip: it’s beneficial to ensure your computer’s volume is at a comfortable level. Too loud, and you risk distorting the audio; too quiet, and you’ll struggle to hear it in your recording. Finding that sweet spot is key!
Also Read This: How to Change Your Email for YouTube: A Step-by-Step Guide for Account Settings
4. Step-by-Step Guide to Recording Audio
Now that we’ve got Audacity all set up, it’s time to dive into the nitty-gritty of recording audio from YouTube videos. Here’s a simple step-by-step guide to help you along the way:
- Open YouTube: Start by navigating to the YouTube video you want to record. Play it for a moment to make sure it’s the right one.
- Prepare Audacity: With Audacity open and your settings configured, ensure you’re ready for action! Double-check that you've set the host to “Windows WASAPI” and selected the correct audio device.
- Hit Record: In Audacity, click the Record button (the circular red button). This starts capturing audio from your selected input device.
- Play the Video: Immediately go back to your YouTube video and hit Play. Audacity will now start recording the audio from the video. Enjoy the show while it records!
- Stop Recording: Once the segment you want is finished, go back to Audacity and click the Stop button (the square brown button). This will end the recording session.
- Playback and Edit: Before you save, play back the recording to ensure it’s captured correctly. If needed, you can trim any unwanted parts using the selection tool and delete or edit the sections as you like.
- Export Your Audio: Finally, if you’re happy with the recording, go to File > Export > Export as MP3 (or whatever format you prefer). Name your file and choose where to save it. Click Save, and you’re done!
And there you have it! You’ve successfully recorded audio from a YouTube video using Audacity. Easy, right? Now you can use that audio for your projects, personal use, or whatever creative endeavor you have in mind!
Also Read This: How to Upload on YouTube from iPhone: A Quick and Easy Method
5. Editing Your Recorded Audio in Audacity
Once you've successfully recorded the audio from your YouTube video, it’s time to dive into the editing process with Audacity. Editing can significantly enhance the quality of your audio and ensure it meets your needs. Here’s a step-by-step guide to help you navigate through this process:
- Import Your Recording: Open Audacity and import your audio file by clicking File > Import > Audio. Navigate to your recorded file and select it.
- Listening and Marking: Play through your recording. As you listen, make notes of any sections that need trimming or adjustments. Mark these spots by highlighting them with your mouse.
- Trimming Unwanted Sections: To remove sections, simply select the area you want to cut out and press Delete. This is especially useful for cutting off long pauses or mistakes.
- Noise Reduction: If your recording has background noise, you can remove it by selecting a section of silence, going to Effect > Noisereduction, and clicking Get Noise Profile. Then, select the entire track, return to the Noisereduction effect, and adjust the settings to clean up your audio.
- Equalization: To enhance the overall sound, you might want to adjust the equalization. Go to Effect > Equalization and tweak the settings to boost or cut certain frequencies, depending on what sounds best.
- Volume Adjustments: Make sure your audio levels are consistent. You can adjust the volume by selecting sections of the audio and using Effect > Amplify to raise or lower the volume as needed.
- Adding Effects: Audacity offers a variety of effects to enhance your audio. Consider adding a slight reverb for depth or compression to ensure a consistent volume level throughout your recording.
Remember, the editing process is about making your recording sound as polished as possible. Don’t rush it; take your time to ensure everything sounds just right!
Also Read This: Claiming Your YouTube Topic Channel with DistroKid: Full Guide
6. Exporting Your Final Audio File
Once you’re satisfied with your edited audio, it’s time to export it to a format that suits your needs. Audacity makes this process straightforward, so let’s walk through it step-by-step:
- Select Your Track: If you have multiple tracks in your project, ensure the one you want to export is selected. Click on the track to highlight it.
- Go to Export Options: Navigate to File > Export. Here, you’ll see various options, including Export as MP3, Export as WAV, and more. Choose the format that best fits your needs.
- Configure Your Settings: After selecting your export format, a dialog box will appear. Here, you can set your audio quality. For MP3, a bitrate of 192 kbps is a good balance between size and quality, while WAV files maintain higher quality but take up more space.
- Name Your File: Choose a descriptive name for your audio file. This will help you locate it easily later. Select your desired location on your computer for saving the file.
- Click Export: Once everything is set, hit the Export button. Depending on the length of your audio, this might take a moment.
- Metadata Entry: Audacity will prompt you to enter metadata like title, artist, and album. Filling this out can help organize your files if you're planning to share or publish your audio.
- Finalization: After you’ve entered the metadata, click OK. Your file will be processed and saved in the chosen format!
And voilà! You’ve successfully exported your audio. Now you can use it for podcasts, presentations, or any other creative projects you have in mind. Enjoy your polished audio experience!
Also Read This: How to Buy a Movie License for YouTube and Legally Monetize Your Content
7. Tips for Quality Audio Recording
Recording audio from YouTube videos can be a straightforward process with the right approach. However, ensuring high-quality audio requires a few extra steps. Here are some practical tips to elevate your recording game:
- Choose the Right Environment: Select a quiet space free from background noise. Turn off fans, air conditioning, or any electronics that might introduce unwanted sounds.
- Use Good Headphones: Invest in a decent pair of headphones while recording. This helps you monitor audio quality in real-time and catch any potential issues as they arise.
- Adjust Volume Levels: Before hitting record, make sure the audio levels are set appropriately. Aim for a level that peaks around -6 dB to -3 dB to avoid distortion.
- Test Recordings: Do a short test recording first. This will help you check the audio quality and make any necessary adjustments before the actual recording.
- Use Noise Reduction Tools: After recording, utilize Audacity’s noise reduction features to clean up any unwanted background sounds. Highlight a section of silence where no audio plays, go to Effect, then select Noise Reduction to sample and reduce noise.
- Export in High Quality: When you finish editing, export your audio in a high-quality format like WAV or FLAC. This ensures that the final product maintains its integrity and sounds great on any device.
By following these tips, you'll ensure that your audio recordings from YouTube videos are crystal clear and ready for any project. Remember, a little preparation goes a long way toward achieving professional-sounding results!
8. Conclusion and Best Practices
Recording audio from YouTube using Audacity is a fantastic skill to have, whether for creating podcasts, remixing music, or simply saving lectures for later use. As we wrap up, here are some best practices to keep in mind:
- Respect Copyright: Always ensure that you have the right to use the audio you are recording. Check the video’s copyright status before proceeding.
- Stay Organized: Create a specific folder on your computer to store all recorded audio files. This makes it easier to find and manage your projects later.
- Label Files Clearly: When saving your recordings, use clear and descriptive file names. Include the date and content type to avoid confusion.
- Backup Your Projects: Regularly back up your recorded audio files and any Audacity projects. This can prevent data loss and save you from potential headaches.
- Keep Learning: Audacity is packed with features, so don't hesitate to explore different effects and tools. The more you practice, the better your recordings will become.
In conclusion, with the right tools, techniques, and respect for copyright, you can effectively record audio from YouTube videos using Audacity. It’s all about finding your rhythm and developing a workflow that suits you. Happy recording!
 admin
admin