Have you ever wondered how precision measurements are made in science and engineering? Enter the vernier caliper, a handy tool that combines simplicity with accuracy. Whether you’re a student, a DIY enthusiast, or a professional, understanding how to use a vernier caliper can enhance your measuring skills. In this post, we'll explore what a vernier caliper is, its components, and how to use it effectively. Let’s dive in!
What is a Vernier Caliper?
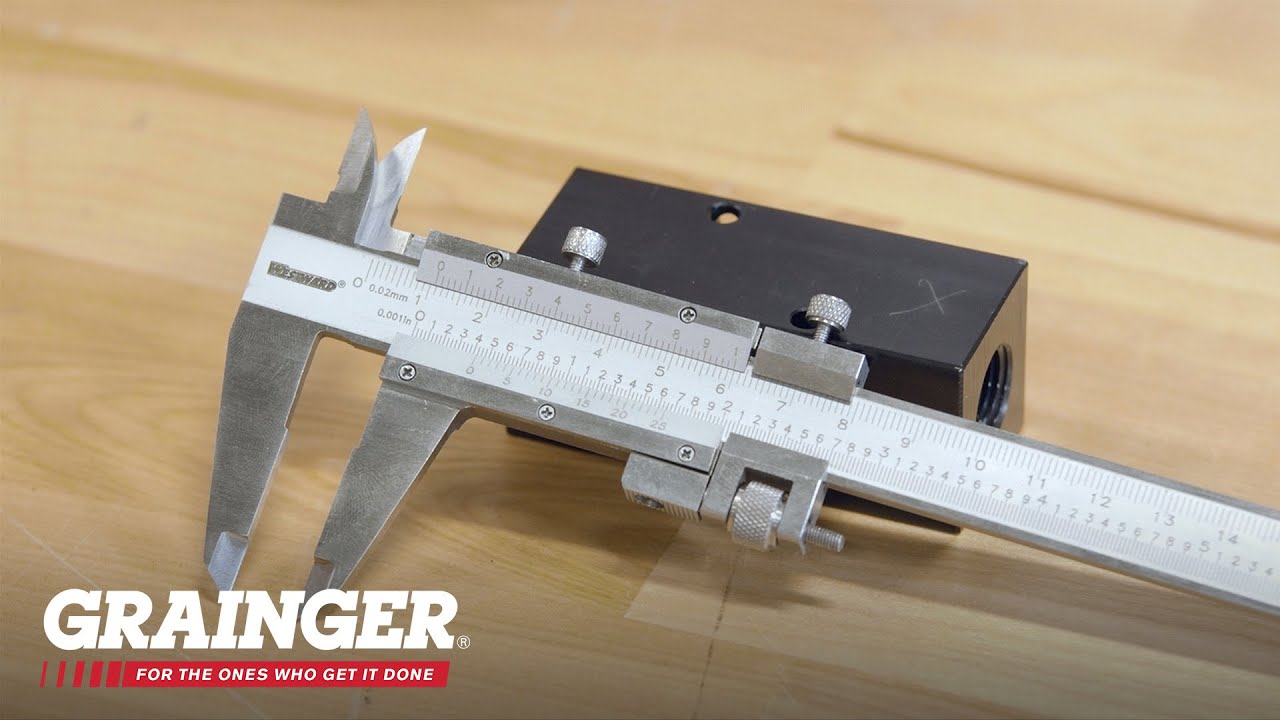
A vernier caliper is an instrument used for measuring dimensions with high accuracy. It can measure internal and external dimensions, as well as depths, making it a versatile tool in various fields such as engineering, manufacturing, and woodworking.
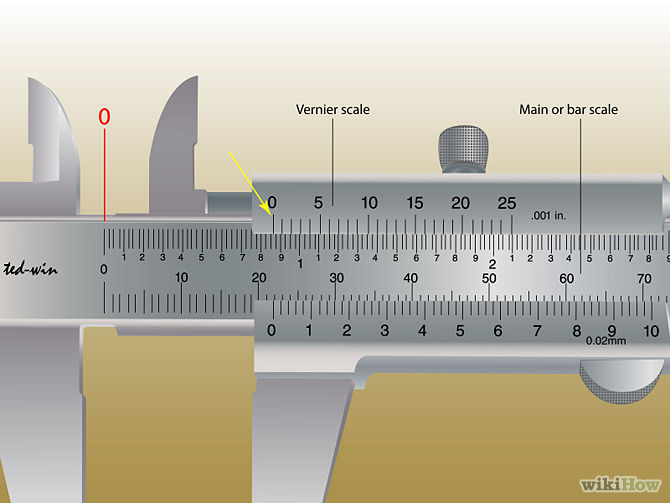
The caliper consists of two main parts: the main scale and the vernier scale. The main scale is usually marked in millimeters or inches, while the vernier scale allows for more precise readings. This design is what makes the vernier caliper stand out from regular rulers.
Here’s a breakdown of its key components:
- Main Scale: The stationary part, typically marked in units of millimeters or inches.
- Vernier Scale: A sliding scale that allows you to read measurements more accurately than the main scale alone.
- Jaws: The movable parts that grip the object being measured. There are two jaws—one for external measurements and one for internal measurements.
- Depth Probe: A thin rod that extends from the bottom, used to measure the depth of holes or slots.
Using a vernier caliper can seem daunting at first, but once you get the hang of it, you'll appreciate its precision. The typical accuracy ranges from 0.02 mm to 0.05 mm, making it much more reliable than a standard ruler when measuring small objects.
To use a vernier caliper, start by sliding the jaws apart. Place the object between the jaws, then gently close them until they touch the object. Next, read the measurement from the main scale and the vernier scale:
- Look at the main scale to find the last full reading before the zero on the vernier scale. This value is your main reading.
- Check the vernier scale to see which line aligns best with any line on the main scale. This is your additional measurement.
For example, if the main scale reads 12 mm and the vernier scale indicates an additional 0.04 mm, your total measurement is 12.04 mm.
In summary, a vernier caliper is a powerful tool for anyone needing precise measurements. With practice, you can master its use and ensure your projects are spot on!
Also Read This: How to Upload an Image on Google A Simple Guide for Uploading Photos on Dailymotion
3. How to Prepare for Measurement
Before diving into the world of precise measurements with a vernier caliper, it’s crucial to ensure you’re fully prepared. Think of this like gearing up for a mini adventure—having everything in place makes the journey smoother!
1. Gather Your Tools: Besides the vernier caliper, make sure you have the following:
- A clean, flat surface for measuring
- A ruler or tape measure for initial rough measurements
- A piece of paper for notes
2. Clean the Instrument: Dirt and debris can affect your readings. Wipe down your vernier caliper with a soft cloth to ensure accuracy. This step is often overlooked, but it’s essential! A quick clean can save you from headaches later.
3. Understand Your Material: The object you’re measuring should be stable and not slippery. If it’s too shiny, consider placing a non-reflective tape on it to avoid any errors caused by light interference.
4. Check the Zeroing: Before you take any measurements, close the jaws of the caliper gently. The reading should ideally be zero. If it’s not, you need to calibrate your instrument. Calibration is like tuning a musical instrument—it ensures everything is in harmony!
Once you’ve completed these steps, you're all set for an accurate measurement. It’s like prepping for a race; the better you prepare, the smoother the process will be!
Also Read This: Ways to Stop Annoying Ads on Chrome While Watching Dailymotion
4. Step-by-Step Guide to Using a Vernier Caliper

Now that you’re all set, let’s walk through the process of using a vernier caliper step by step. Think of this as your trusty roadmap to getting those ideal measurements.
Step 1: Position the Caliper
Start by placing the object you want to measure between the jaws of the caliper. For external measurements, use the larger jaws. For internal measurements, flip it to the smaller ones. It’s like choosing the right tool for a job!
Step 2: Close the Jaws
Gently close the jaws of the caliper around the object. You want a snug fit but be careful not to apply excessive pressure; we don’t want to crush anything. It’s a delicate dance!
Step 3: Read the Main Scale
Look at the main scale (the fixed one) first. Note the value just before the zero line of the sliding scale. This gives you the whole number of millimeters or inches. For example, if it reads “4,” you’re starting with 4 mm!
Step 4: Read the Vernier Scale
Next, look at the sliding scale (the part that moves). Find the line on the vernier scale that lines up exactly with any line on the main scale. This is your decimal or fractional part of the measurement. For instance, if it lines up with “0.2,” you’re looking at a total of 4.2 mm!
Step 5: Combine the Measurements
Now, simply add the main scale reading and the vernier scale reading together. So, 4 mm (main scale) + 0.2 mm (vernier scale) gives you a total of 4.2 mm!
Step 6: Record Your Results
Don’t forget to jot down your measurement! This is essential, especially if you’re working on a project or need to compare measurements later. A quick note on your paper will save you time!
And there you have it—a simple yet effective guide to using a vernier caliper! It’s like riding a bike; once you get the hang of it, you’ll wonder how you ever measured without it!
Also Read This: How to Watch Dailymotion Videos Effectively
5. Common Mistakes to Avoid
Using a vernier caliper can seem straightforward, but there are several common pitfalls that can lead to inaccurate measurements. Let’s explore these mistakes so you can ensure your measurements are spot on!
- Not Zeroing the Caliper: One of the biggest mistakes is not zeroing the caliper before taking measurements. Always check that the jaws are closed and the reading is at zero. If it's not, adjust the caliper accordingly.
- Incorrectly Reading the Scale: Misreading the scale is easy to do, especially if you're in a hurry. Take your time to ensure you're reading the main scale and the vernier scale correctly. The line up on the zero of the vernier scale with the main scale is crucial!
- Pushing Too Hard: Applying excessive force when measuring can distort the object and lead to erroneous readings. Gently close the jaws around the object; a light grip is often sufficient.
- Ignoring Parallax Error: Parallax error occurs when you’re not looking directly at the measurement scale. Always ensure your eyes are level with the scale to avoid this common mistake.
- Forgetting to Account for the Object's Shape: If you’re measuring something that isn’t perfectly cylindrical or flat, you might not get an accurate reading. Always consider the geometry of the object.
By avoiding these mistakes, you’ll be on your way to mastering the vernier caliper like a pro! Remember, practice makes perfect, so don’t hesitate to take your time while you’re learning.
6. Practical Applications of Vernier Calipers
Vernier calipers are incredibly versatile tools used in various fields. Understanding their practical applications can help you appreciate their importance and utility in everyday tasks. Here are some fantastic uses:
- Engineering and Manufacturing: In these fields, precision is paramount. Vernier calipers are used to measure parts and components accurately, ensuring they fit together perfectly. For instance, they can measure the thickness of a metal sheet or the diameter of a shaft.
- Woodworking: Woodworkers use vernier calipers to achieve precise dimensions, which is essential for joinery and fitting pieces together seamlessly. Whether it’s measuring the depth of a groove or the thickness of a plank, accuracy is key!
- Jewelry Making: Jewelers rely on vernier calipers to measure gemstones and metals, ensuring that each piece is crafted to perfection. Imagine crafting a ring where every millimeter counts!
- Education: In science classes, students use vernier calipers to measure various materials and learn about precision measurement. It’s a hands-on way to understand the importance of accuracy in science and engineering.
- Automotive Repairs: Mechanics often use vernier calipers to measure engine components or brake pads, ensuring everything functions correctly. A small miscalculation could lead to significant issues, making precision critical!
In conclusion, mastering the use of a vernier caliper unlocks a world of precision measurement across various fields. Whether you’re a hobbyist or a professional, understanding its practical applications can enhance your skills and project outcomes.
 admin
admin


