Are you ready to share your creativity with the world? Uploading videos to YouTube from your iPhone is easier than ever! Whether you’re an aspiring vlogger, a business owner showcasing your products, or just want to share fun moments with family and friends, YouTube is a fantastic platform to reach a wide audience. In this post, we’ll guide you through the simple steps needed to upload your videos directly from your iPhone. Let’s get started!
Preparing Your Video for Upload
Before diving into the upload process, it’s essential to prepare your video properly. A little preparation goes a long way in ensuring your content looks and sounds its best. Here’s a straightforward guide to help you get your video ready for YouTube:
- 1. Shoot in High Quality: Make sure you’re filming in the highest resolution possible. Most modern iPhones can shoot in 1080p or even 4K. Just go to your camera settings and select the desired resolution to capture clearer, more detailed videos.
- 2. Edit Your Video: Use iMovie or another video editing app to trim unnecessary parts, add transitions, or enhance colors. This step helps give your video a professional touch. Cut out any mistakes and add any fun clips—editing is where you can really let your creativity shine!
- 3. Optimize for Upload: Consider the format of your video. YouTube accepts multiple file formats, including MP4, MOV, and AVI. However, MP4 is preferable for its balance of quality and file size. Make sure to compress your video if it’s too large to ensure faster uploads without sacrificing quality.
- 4. Choose an Engaging Thumbnail: Your video thumbnail is the first impression viewers get, so make it count! If you’re using iMovie or another editing app, you can take a screenshot of an interesting frame from your video, edit it, and save it as a custom thumbnail. Make sure it's visually appealing and reflects the content of your video.
- 5. Write a Compelling Title and Description: Plan the title and description of your video before you upload it. The title should be catchy and relevant to the content to help viewers understand what the video is about. The description is a perfect place to include keywords that help with searchability, so think about what people might search for!
By taking these steps to prepare your video, you're setting yourself up for a much smoother uploading experience and potentially reaching a larger audience. Remember, quality and preparation can significantly impact the performance of your video on platforms like YouTube!
Also Read This: How to Share YouTube Videos to Instagram and Reach a Wider Audience
3. Using the YouTube App to Upload Videos
Uploading videos to YouTube directly from your iPhone is super straightforward, especially with the dedicated YouTube app. If you don’t already have the app, you can grab it for free from the App Store. Once you’re all set up, here’s how to get your video live in just a few minutes!
- Open the YouTube App: Launch the app and sign in with your Google account. If you don’t have an account yet, you can easily create one right from the app.
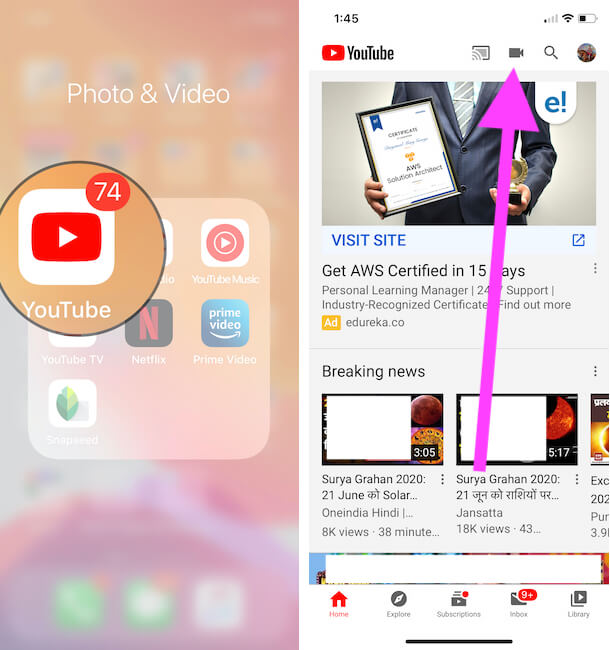
- Tap the Upload Icon: Look for the camera icon (it’s usually at the bottom of your screen). Tap it to select the video you want to upload. You can either record a new video or choose one from your existing library.
- Select Your Video: Once you tap the camera icon, you’ll be presented with options like “Record” or “Library.” Choose the one that fits your needs. If you’re picking a video from your library, simply scroll through and tap on the video you wish to upload.
- Edit Your Video: After selecting your video, you have the chance to make edits. You can trim the video length, apply filters, add music, or even include text overlays. Play around with these features to really enhance your video!
- Add Details: Once your edits are done, it’s time to add some crucial details. Enter a captivating title, write a good description, and add relevant tags. Pro Tip: Use keywords that people are likely to search for to increase your chances of being discovered!
- Choose Privacy Settings: Decide whether you want your video to be public, unlisted, or private. Public means anyone can find it; unlisted means only those with the link can see it, and private limits it to you and selected users.
- Upload Your Video: Ready to go? Hit “Upload,” and just sit back! Depending on your video length and internet connection, the upload time may vary. You’ll receive a notification once it’s live.
There you have it! Using the YouTube app is a quick and efficient way to share your creative content with the world!
Also Read This: Which YouTube Channel Offers Everything You Need to Learn About Taekwondo?
4. Uploading Videos through the Safari Browser
Not everyone prefers using apps, and that’s completely okay! If you prefer to upload videos through Safari on your iPhone, you can still easily get your content onto YouTube without a hitch. Here’s how to do it:
- Open Safari: Launch the Safari browser on your iPhone and navigate to the YouTube website. Make sure to log in to your account if you haven’t already.
- Request Desktop Site: To get the full upload experience, you’ll need to request the desktop version of the site. Tap the “aA” icon in the URL bar, then select “Request Desktop Website.” This will give you access to all upload features.
- Find the Upload Button: Once the desktop version loads, look for the camera icon at the top right corner. Click on it, and you’ll see the option to upload a video.
- Select Your Video: Tap on “Upload video” and then choose “Select files.” This will prompt your iPhone to open your photo library. Select the video you’d like to upload.
- Fill in Your Video Information: After selecting your video, you’ll be prompted to enter details like the title, description, and tags. Take your time here: the better you can convey what your video is about, the more likely people will watch it!
- Set Privacy Options: Just like in the app, choose whether your video will be public, unlisted, or private. Remember, public videos reach more viewers!
- Start the Upload Process: Finally, hit “Upload,” and your video will begin uploading. You can monitor the upload progress on the screen!
And that’s a wrap! Uploading through Safari is a great alternative for those who prefer working in a browser. Now, go ahead and share your creativity with the world!
Also Read This: What Is the Most Viewed Livestream on YouTube? A Look at Record-Breaking Events
5. Additional Tips for Successful Uploads
Uploading videos to YouTube can be a thrilling experience, especially when you see your content come to life. To enhance the overall quality of your uploads, consider these additional tips:
- Optimize Your Video Title and Description: Use relevant keywords in your titles and descriptions. This helps your video become more discoverable. Think about what potential viewers might type into the search bar when looking for content similar to yours.
- Create Eye-catching Thumbnails: A thumbnail is the first impression of your video. Use bright colors, clear text, and images that summarize the video content. You can easily create custom thumbnails using apps like Canva or Adobe Spark.
- Tag Your Videos: Tags help categorize your video, making it easier for people to find it. Be strategic—use a mix of broad and specific tags related to your video's content.
- Utilize Playlists: Organize your videos into playlists. This not only keeps your content structured but encourages viewers to watch multiple videos in one go.
- Engage with Your Audience: Respond to comments and engage with your viewers. This builds a community around your channel, leading to increased loyalty and more views.
- Check your Privacy Settings: Before you upload, ensure that your video is set to the appropriate privacy level (Public, Unlisted, or Private) based on who you want to view it.
Remember, uploading to YouTube isn't just about putting a video out there; it's about sharing your story or message with an audience. With these tips, you can make sure your videos stand out and reach the viewers you aim to connect with.
Also Read This: Learn How to Burn CDs with Your Favorite YouTube Videos
6. Common Issues When Uploading Videos and How to Fix Them
Even with the best intentions, sometimes things don't go as planned when uploading videos to YouTube. Here are a few common issues you might encounter, along with easy fixes to help you out:
- Video Fails to Upload: This can happen due to poor internet connection. Make sure you're connected to a stable Wi-Fi network and try again. If the problem persists, restart the YouTube app or your iPhone.
- Unsupported File Format: Ensure your video is in a compatible format (like MP4 or MOV). If it isn’t, use a video converter app to change it to a suitable format.
- Longer Processing Times: Sometimes, large video files take longer to process. You might just need to give it some time. However, if processing seems stuck, try re-uploading the video.
- Low-Quality Upload: If you notice that the upload resolution is lower than expected, double-check your settings before uploading. Ensure you’ve selected the highest quality settings in the app.
- Unable to Add Music or Effects: YouTube has specific rules regarding copyrighted content. If you encounter issues adding music or effects, make sure they’re from YouTube’s library or that you have the right to use them.
- Privacy Issues: If your video is supposed to be public but isn’t visible, check your privacy settings in the YouTube app. Ensure it is set to 'Public' before finalizing your upload.
Having these solutions at your fingertips can save you a lot of frustration. Remember, every problem has a fix—just stay calm and keep experimenting! Happy uploading!
Conclusion: Share Your Videos with the World
Uploading videos to YouTube from your iPhone is a straightforward process that allows you to reach an expansive audience. Once you have followed the steps to upload your content, it’s time to consider how you will share your videos effectively.
Here are some strategies to enhance your video sharing:
- Social Media Promotion: Share your video link on platforms like Facebook, Twitter, and Instagram to reach your friends and followers.
- Engage with Your Audience: Encourage viewers to leave comments and ask questions. This interaction can boost your video's visibility.
- Utilize Keywords: Use relevant keywords in your video title and description to improve searchability on YouTube.
- Create Eye-catching Thumbnails: Design attractive thumbnails that accurately represent your content, as they can significantly increase click rates.
- Collaborate with Other Creators: Partnering with other YouTubers can help introduce your channel to their audience.
For best results, consider timing your posts for maximum reach, and don't forget to analyze your video performance through YouTube Analytics to refine your sharing strategies in the future.
By embracing these tactics and consistently sharing your videos, you can effectively connect with your audience and share your creativity, knowledge, or experiences with the world!
 admin
admin


