Are you ready to share your creativity with the world? Uploading videos to YouTube from your iPhone is easier than you might think! In this guide, we’ll walk you through the process step-by-step, ensuring that you can showcase your content without any hassle. Whether it’s a travel vlog, a cooking tutorial, or just some fun moments with friends, let's get started on making your video upload experience smooth and enjoyable!
Preparing Your Video for Upload
Before you hit that upload button, it’s essential to ensure your video is ready for the spotlight. Here are some key steps to prepare your video:
- Choose the Right Format: YouTube supports several video formats, but the most common and recommended one is MP4. Make sure your video is in this format for the best compatibility.
- Edit Your Video: Consider using a video editing app on your iPhone, such as iMovie or InShot. You can trim clips, add music, effects, or even text overlays to make your video more engaging.
- Optimize Video Quality: Go to your iPhone's camera settings and select the highest resolution for recording (typically 1080p or even 4K). High-quality videos attract more viewers!
- Add Thumbnails: While you can choose a thumbnail during the upload process, preparing one in advance can help your video stand out. Use apps like Canva to create eye-catching thumbnails that reflect your video's content.
Now, let’s dive deeper into each preparation step:
Choosing the Right Format
When you're ready to upload, you want to avoid any technical hiccups. MP4 is the gold standard for YouTube videos as it balances quality with file size. If you recorded in a different format, you can use conversion apps available on the App Store to convert your video into MP4.
Editing Your Video
Edit your video to enhance its appeal. Don't worry if you’re new to editing; most apps have user-friendly interfaces with tutorials. For instance, in iMovie, you can easily cut scenes, add filters, and even incorporate background music to set the right mood.
Optimizing Video Quality
Always aim for the best quality your iPhone can deliver. If you’re shooting a travel vlog, ensure your lighting is good, and avoid shaky footage. If your video doesn’t look great, viewers might stop watching before they even get to the good parts!
Adding Thumbnails
A captivating thumbnail is crucial—it’s the first thing potential viewers see. Design a thumbnail that includes bright colors, clear text, and an intriguing image. Thumbnails that stand out can dramatically increase your click-through rates.
By taking these steps to prepare your video, you’ll set yourself up for success on YouTube. Let’s move on to the actual upload process, where your hard work will finally be shared with the world!
Also Read This: How to Cancel Your YouTube Premium Subscription: A Step-by-Step Guide
3. Using the YouTube App to Upload
Uploading videos to YouTube has never been easier, especially with the YouTube app right on your iPhone! It's a straightforward process that allows you to share your content with the world in just a few taps. Before we dive into the details, ensure that you have the app installed on your iPhone. If you haven't downloaded it yet, head over to the App Store, search for "
Once you've got the app, you'll notice that it's designed to be user-friendly. The interface is intuitive, making it accessible for everyone, whether you're a seasoned YouTuber or just starting. Now, let’s get into why using the YouTube app can elevate your uploading experience:
- Convenience: You're already on your phone, so why not make the most of it? The app allows you to upload videos directly, converting your spontaneous moments into shareable content right away.
- Editing Tools: The app offers basic editing features, like trimming, adding music, and applying filters, which can enhance your video before it goes live.
- Notifications: Once uploaded, you can easily share your video across platforms and stay updated with comments and interactions through notifications.
So, whether you're vlogging your travels, sharing a cooking tutorial, or posting a quick update, the YouTube app is a reliable companion for video uploads. Now that you see the perks, let’s get to the nitty-gritty with the step-by-step upload instructions!
Also Read This: Step-by-Step Instructions for Using YouTube ReVanced Like a Pro
4. Step-by-Step Upload Instructions
Ready to upload your first video? Here’s a simple, step-by-step guide to help you navigate the process smoothly:
- Open the YouTube App: Tap on the YouTube icon on your iPhone to launch the app.
- Sign In: If you’re not already signed in, tap on the profile icon at the top right corner and log into your YouTube account.
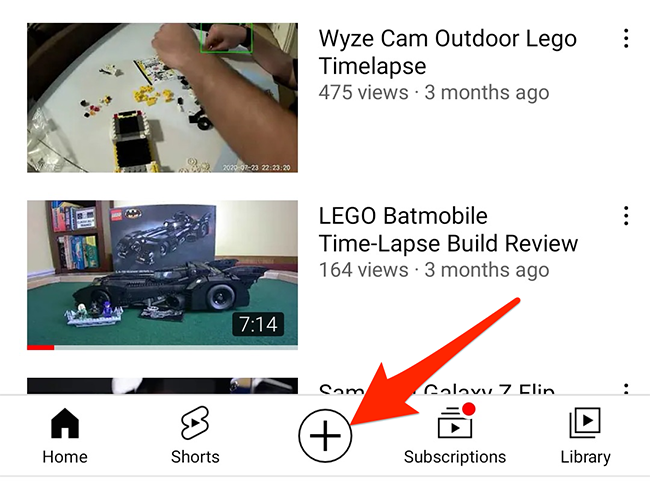
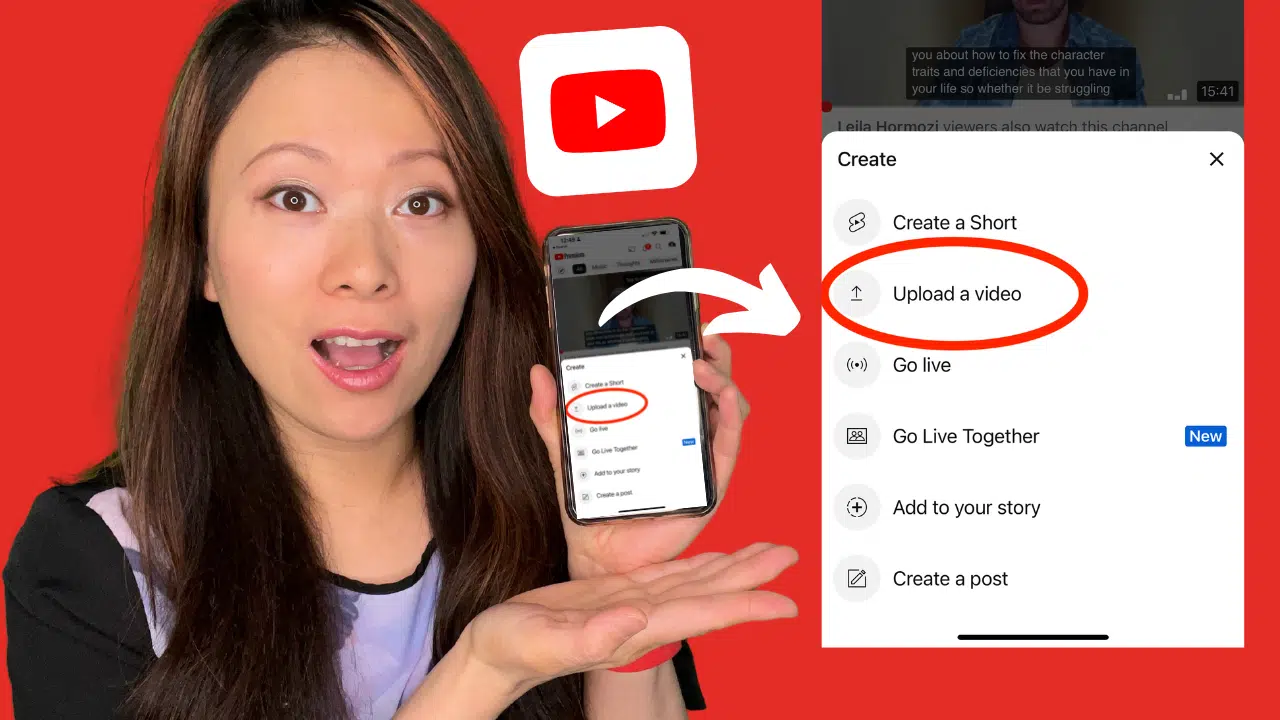
- Access the Upload Feature: On the main screen, look for the camera icon (usually at the bottom of the screen). Tap it to start the upload process.
- Select Your Video: You’ll be prompted to choose a video from your camera roll. Find the video you want to upload and tap on it.
- Edit Your Video (Optional): Here’s where you can trim clips, add music, or apply filters. Take your time to make it shine!
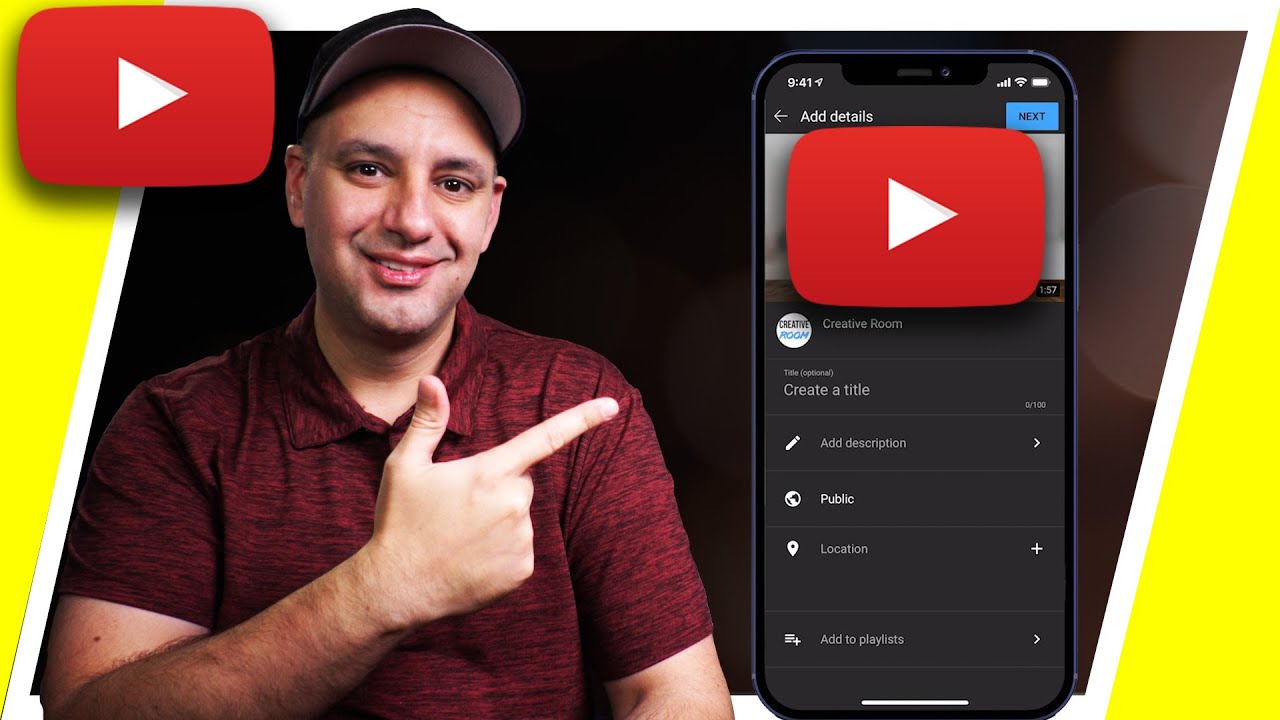
- Add Title and Description: A catchy title can draw viewers in! Write a descriptive title that reflects your video’s content and don’t forget to add a description. This is a great space to provide context or links.
- Choose Privacy Settings: Decide whether you want your video to be public, unlisted, or private. Public means anyone can see it, unlisted allows only those with the link to view it, and private keeps it just for you.
- Upload: Once everything looks good, hit the “Upload” button. You might see a progress bar as your video is being processed. This can take a few moments depending on file size but hang tight!
- Share Your Video: After the upload is complete, you’ll see options to share your video on social media or copy the link. Spread the word!
And there you have it! You’ve officially uploaded your video to YouTube using your iPhone. With these steps, you're not just sharing content; you're becoming part of a global community of creators. Happy uploading!
Also Read This: Is YouTube Down Today? How to Check If YouTube is Facing Issues
5. Editing Video Details After Upload
Congratulations! You've successfully uploaded your video to YouTube from your iPhone. But wait, there’s more! The real magic happens when you edit the video details. This step is crucial for attracting viewers and optimizing your content. Let’s walk through how to spruce up your video details.
First, open the YouTube app and navigate to your channel. Click on the video you want to edit. You’ll see an icon that looks like a pencil—tap it! This will take you to the editing screen where you can modify the following:
- Title: Create a catchy title that reflects your video's content. A good title not only grabs attention but also helps with searchability. For example, instead of "My Trip," try "Exploring the Hidden Gems of Bali - My Adventure!"
- Description: Write a detailed description that summarizes the video. Use keywords relevant to your content! For instance, if your video is about cooking, include words like "recipe," "cooking tips," and "easy meals.” This helps YouTube understand your video better.
- Tags: Tags are essential for discoverability. Add tags related to your video’s theme or topic. For example, if your video is about fitness, you might include tags like "workout," "fitness motivation," and "healthy lifestyle."
- Thumbnail: Select or upload a custom thumbnail that stands out. Thumbnails are like mini billboards; they should be visually appealing and relevant to the content. Use bright images and bold text to attract clicks!
Once you've made your edits, don’t forget to hit that Save button! Your video details are now updated, making your content even more appealing to viewers.
6. Tips for Optimizing Your Video for YouTube
Now that your video is uploaded and edited, let’s dive into some tips for optimizing it! YouTube is a busy platform, and you want your content to stand out. Here’s how you can boost your video’s performance:
- Engaging Intro: Capture your audience's attention within the first few seconds. Start with a hook that teases what’s coming up in the video. A strong intro can significantly reduce viewer drop-off rates.
- Call to Action: Encourage viewers to like, comment, or subscribe. You can say something like, "If you enjoyed this video, please give it a thumbs up and subscribe for more content!" Remind them throughout the video in a natural way.
- Utilize End Screens and Cards: These features allow you to promote other videos or playlists at the end of your video. It keeps viewers engaged with your content and encourages them to explore more of your channel.
- Consistency is Key: Regular uploads help build an audience. Set a schedule (weekly, bi-weekly, etc.) and stick to it. Your subscribers will know when to expect new content, which keeps them coming back!
- Engage with Your Audience: Respond to comments on your videos. This interaction makes viewers feel valued and can encourage them to return for more. Plus, it helps in building a community around your channel!
By implementing these tips, you’ll improve your video’s visibility and engagement on YouTube. Remember, it’s all about connecting with your audience and providing them with valuable content. Happy uploading!
 admin
admin


