Uploading videos to YouTube from your iPad can feel daunting, especially if you're new to the platform. However, it's a straightforward process once you get the hang of it! YouTube is a fantastic medium for sharing your creativity, whether you're vlogging, making tutorials, or showcasing your hobbies. This guide will walk you through the essentials of uploading your videos smoothly, ensuring you can share your content with the world in just a few taps.
Preparing Your Video for Upload
Before diving into the upload process, it’s crucial to prepare your video properly. Getting your content camera-ready not only makes the upload smoother but also ensures that your audience enjoys the best viewing experience. Here’s what you need to keep in mind:
- Editing your video: Use a video editing app on your iPad to enhance your footage. Consider adding transitions, music, or text overlays. Popular apps for this include iMovie, LumaFusion, or even Adobe Premiere Rush. Take your time to trim any unnecessary parts, adjust colors, and fine-tune audio levels.
- Choosing the right format: YouTube supports various video formats, but the most common ones are MP4, MOV, and AVI. Ensure your video is in a compatible format to prevent any issues during the upload process.
- Resolution matters: Aim for a minimum video resolution of 720p. However, if you have the option, 1080p or even 4K is preferred for sharper visuals. It improves viewer engagement and looks more professional.
- File size considerations: Keep in mind that larger files may take longer to upload. YouTube allows uploads of up to 256 GB, but it’s often best to find a balance between quality and file size, especially if you’re on a slow internet connection.
- Your thumbnail: Create an eye-catching thumbnail image that represents your video. YouTube uses this image to attract viewers, so opt for clear visuals and bold text. You can use tools like Canva or Photoshop to design an appealing thumbnail directly on your iPad.
- Writing a compelling description: Think about your video description, which will help viewers understand what your content offers. Incorporate keywords related to your video to help with searchability on YouTube. Summarize what viewers can expect and include any relevant links.
- Tagging wisely: Use relevant tags to help YouTube categorize your video. This not only improves discoverability but helps reach your target audience. Think of tags that are directly related to the content and that potential viewers might search for.
Once you have your video polished and ready, you're all set for the uploading process! With these preparations, you’ll not only make a great first impression but also engage more effectively with your audience. Stick around for the next steps where we’ll guide you through the actual process of uploading videos right from your iPad!
Also Read This: How to Watch Pac-12 Sports on YouTube TV
3. Installing the YouTube App on Your iPad
When it comes to uploading videos to YouTube from your iPad, the very first step is to make sure you have the YouTube app installed. Fortunately, downloading and installing apps on your iPad is a breeze! Here’s how you can get the
- Open the App Store: Locate the App Store icon on your iPad’s home screen. It’s usually a blue icon with a white letter “A” in a circle.
- Search for YouTube: Tap on the search bar at the top of the screen and type “YouTube.” The app should pop up in the search results.
- Download the App: Tap the “Get” button next to the YouTube app icon. If it asks for your Apple ID password or Face ID, go ahead and authenticate. The app will begin downloading to your iPad.
- Open the App: Once installed, you can find the YouTube app on your home screen. Tap to open it!
And just like that, you have the YouTube app installed on your iPad. It’s sleek, user-friendly, and specifically designed for mobile devices, so you'll have a great experience uploading and managing your videos right from your device.
Also Read This: Income Analysis: How Much Per 10,000 Views on YouTube?
4. Signing In to Your YouTube Account

Now that you have the YouTube app on your iPad, it's time to get you signed in to your account. This step is crucial because it allows you to upload videos, manage your channel, and interact with your audience. Here’s how you can sign in:
- Open the YouTube App: Tap on the YouTube icon on your home screen to launch the app.
- Tap on the Profile Icon: Look at the top right corner of the screen; you’ll see a circular icon. This is where your profile will be. Tap on it!
- Select “Sign In”: If you’re not already signed in, you will see the option to “Sign in”. Tap on that.
- Choose Your Google Account: You will be prompted to select an account. If you already have a Google account linked, select it. If not, tap “Add account” to enter your credentials.
- Enter Your Credentials: Type in your email and password associated with your YouTube account or Google account. If you have two-factor authentication enabled, follow the prompts to verify your identity.
Once you’re signed in, you’ll be taken back to the YouTube homepage, and you’re all set to start uploading your videos! If you have any trouble signing in, double-check your credentials, or check if you have a stable internet connection.
And there you have it! With the app installed and your account signed in, you’re ready to dive into creating and sharing amazing content with the world. Exciting, right?
Also Read This: Is YouTube Premium’s Price Going Up? Changes You Need to Know
5. Steps to Upload a Video from Your iPad
Uploading a video to YouTube from your iPad is a breeze once you know the steps! Whether you're a seasoned creator or just starting, this guide will walk you through the entire process, ensuring you get your content online effortlessly.
Here’s how to do it:
- Open the YouTube App: Launch the YouTube app on your iPad. If you haven't already, make sure you’re signed in to your Google account.
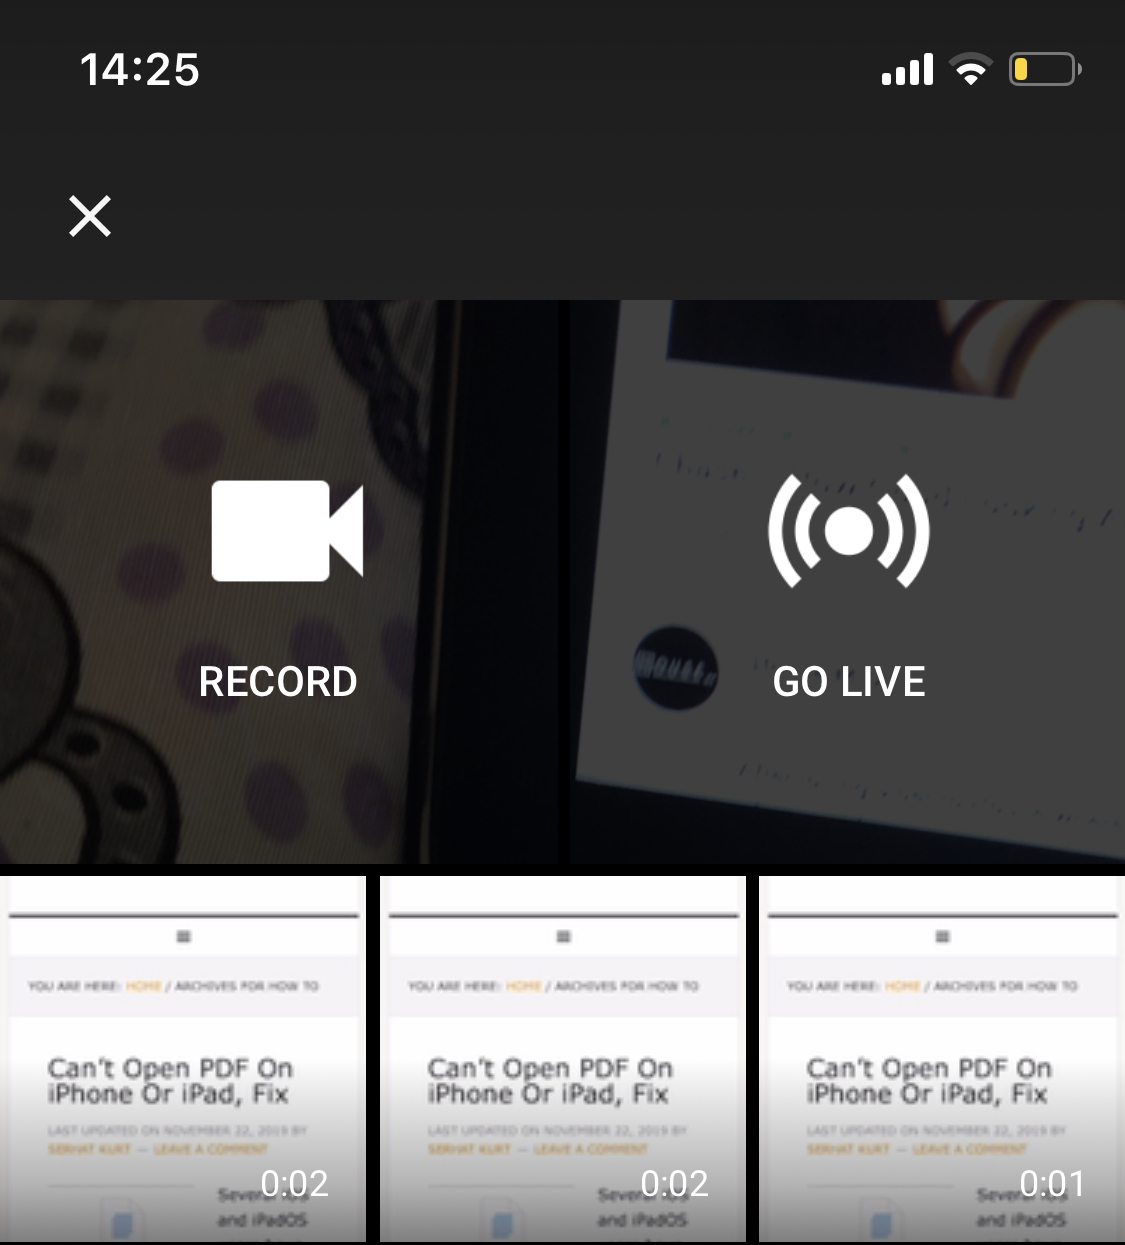
- Tap the Create Button: Look for the plus (+) icon or the create button at the bottom of the screen. This is your portal to uploading content.
- Select Upload Video: Once you tap the create button, you’ll see various options. Choose Upload a video to proceed.
- Choose Your Video: The app will prompt you to select a video from your photo library. Browse through your videos and select the one you want to upload. You can also record a new video using your iPad camera by tapping on the Record button.
- Video Processing: After selecting your video, it will start processing. This might take a moment, depending on the size of the video.
- Set Your Privacy Settings: Next, you’ll be prompted to choose your video’s privacy settings. You can select from Public, Unlisted, or Private. Make sure to pick the right one based on who you want to see your video.
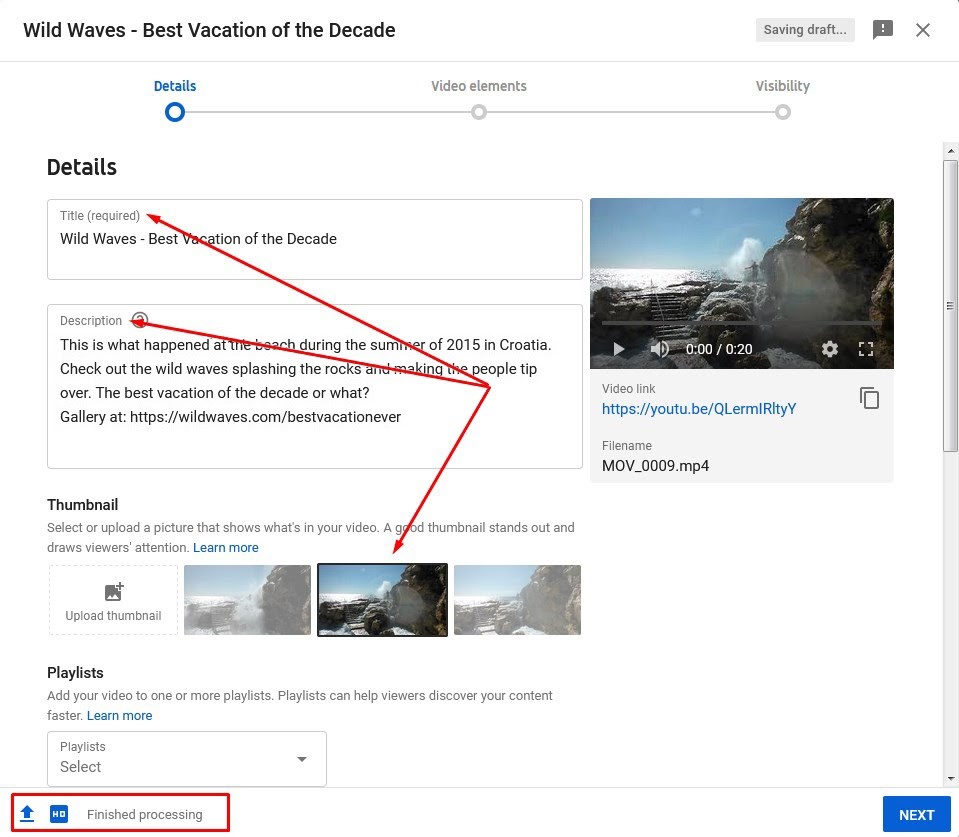
- Add a Title and Description: Here comes the fun part! Add an engaging title and a description that gives viewers an idea of what your video is about. A good title can help attract more viewers!
- Select a Thumbnail: Choose a thumbnail for your video. You can pick one from the auto-generated options or upload a custom image from your iPad. A catchy thumbnail can significantly increase your click-through rate!
- Add Tags and Category: Tags help categorize your video. Add relevant keywords that describe your content to help it surface in search results. Don’t forget to select an appropriate category for your video!
- Advanced Settings (Optional): If you wish to add subtitles, age restrictions, or enable monetization, tap on Advanced Settings. This is more of a pro-level option, but it's good to know it's there!
- Finally, Tap Upload: Once everything looks good, hit the Upload button at the top right corner. Your video will start uploading, and you’ll receive a notification when it’s done.
And voilà! You’ve successfully uploaded a video to YouTube from your iPad. Remember, if you make a mistake or want to change something later, you can always edit details on YouTube’s web interface afterwards. Now, let’s move on to the next step: editing your video details!
Also Read This: How to Upload Longer Videos on YouTube Without Losing Quality
6. Editing Video Details Before Publishing
Before hitting that publish button, it’s vital to review and edit your video details to ensure everything is just right. Well-polished video information can make a big difference in how well your content resonates with your audience. Here are some tips on what to check and tweak:
This step lets you add some finishing touches to your video.
- Review Your Title: Make sure your title is catchy and descriptive. It should give a clear idea of what your video covers. Think of it as the first impression your viewers will have!
- Enhance the Description: This is your chance to elaborate on what the video entails. Include relevant links, timestamps for different segments, and any call-to-actions you want your viewers to follow. A well-crafted description can improve your video’s visibility in searches!
- Thumbnail Selection: If you haven’t already chosen a thumbnail, now is the time! A standout thumbnail can make a significant difference in click-through rates. If you're not happy with the auto-generated options, consider creating a custom thumbnail that reflects your video's theme.
- Tags and Keywords: Double-check your tags. Using relevant keywords will help your video get discovered more easily. Think about what people might search for when looking for content like yours.
- Check Privacy Settings Again: Confirm your privacy setting is set to your preference. If you want it to be public right away, ensure that’s selected. Mistakes here can mean your content isn’t seen by your intended audience!
- Location and Recording Date: If applicable, add the location where your video was filmed and the date of recording. This can add context to your video and engage viewers who may be interested in specific locations.
- Subtitles and Accessibility: Consider adding subtitles. This not only helps non-native speakers but also those who are hearing impaired. Accessibility can increase your audience reach significantly!
- Finalizing the Upload: Once everything is set up and looks good, make sure to hit that final Publish button! Celebrate your accomplishment as your video goes live!
Editing your video details before publishing is essential for maximizing engagement and ensuring your audience gets the best possible experience. Now you’re all set to start sharing your creativity with the world! Happy uploading!
Also Read This: How to Allowlist YouTube: Ensuring Safe and Uninterrupted Access
7. Publishing Your Video and Sharing Options
Once you've finished uploading your video to YouTube from your iPad, the next exciting step is publishing it! This is where your content gets to meet the world. Let’s walk through the process, including how to customize your sharing options.
After your video upload is complete, you’ll see a preview screen. Here, you have a few important settings to consider:
- Title: Make sure your title is catchy and relevant. This helps your video stand out in searches!
- Description: Fill in a clear and informative description of your video. Include keywords related to your content to improve visibility.
- Thumbnail: Choose an appealing thumbnail that captures the essence of your video. YouTube allows you to upload a custom thumbnail, which can significantly increase click-through rates.
- Tags: Use tags to categorize your video. Think about the keywords your audience might use to find your content.
### Privacy Settings
Before hitting that “Publish” button, it’s crucial to select your privacy settings. You have three options:
- Public: Everyone can see your video right away. This is great if you want to reach a large audience.
- Unlisted: Only people with the link can view your video. This is useful if you're sharing it privately or want to get feedback before making it public.
- Private: Only you and the users you select can see this video. Ideal for personal projects or sensitive content.
### Sharing Your Video
Once published, you can share your video effortlessly. YouTube provides various sharing options:
- Direct Link: You can copy the video link and share it on social media, email, or anywhere else!
- Social Media Integration: Share directly to platforms like Facebook, Twitter, or Instagram right from YouTube.
- Embed Code: If you want to share your video on a blog or website, you can use the embed code provided.
Don't forget to engage with your audience in the comments! Encourage viewers to leave their thoughts or questions, and always respond promptly. This interaction can help build your community.
Also Read This: What Is YouTube Live Stream Embedding? A Simple Explanation for Beginners
8. Troubleshooting Common Upload Issues
While uploading videos from your iPad, you might encounter some hiccups. But don’t worry! Most issues have simple fixes. Here’s a list of common problems and how to resolve them.
### 1. Upload Stuck or Fails
If your video upload keeps getting stuck or fails:
- Check your Internet connection. A poor connection can interrupt the upload process. Switching to Wi-Fi can often help.
- Try restarting the YouTube app or even your iPad. Sometimes, a simple restart clears up connectivity issues.
### 2. Video Format Not Supported
YouTube supports various formats, but if your video isn't uploading, check if it's in the right format. Commonly accepted formats include:
- MP4
- AVI
- WMV
If it’s not in one of these formats, consider using a video conversion app to change your file format before re-uploading.
### 3. Uploading Takes Too Long
Long upload times can be frustrating. Try these tips:
- Reduce the video resolution if possible. Lowering the quality can decrease upload time without sacrificing too much video quality.
- Upload during off-peak hours. Weekends and evenings might be congested; try early mornings instead.
### 4. Account Limitations
If you’ve hit a limit on uploads (like a daily maximum or channel size), you’ll need to wait until the limit resets. Consider prioritizing your content before uploading again.
Always ensure your YouTube app and iPad software are up to date to avoid glitches and ensure optimal performance. With these tips in hand, you can handle almost any upload issue that comes your way!
Conclusion and Tips for Successful Uploads
Uploading videos to YouTube from your iPad can be a straightforward process with the right knowledge and tools. Here are some essential tips to ensure your uploads are successful:
- Choose the Right Format: Ensure your video is in a compatible format, such as MP4, MOV, or AVI. This will save you from any conversion issues during the upload.
- Optimize Your Video: Before uploading, consider editing your video for clarity and engagement. Use apps like iMovie or Adobe Premiere Rush on your iPad to trim excess footage and add titles or effects.
- High-Quality Content: Aim to produce high-quality videos. Clear audio, concise information, and engaging visuals improve viewer retention.
- Add Thumbnails: Custom thumbnails attract more viewers. Choose a compelling image that reflects your video's content.
- Write Effective Descriptions: Include relevant keywords in your video description to enhance searchability, and provide context about the content.
- Utilize Tags: Use relevant tags to categorize your video. This helps YouTube recommend your content to users with similar interests.
- Monitor Engagement: After uploading, keep an eye on how viewers engage with your content. Read comments and adjust future uploads based on feedback.
By following these tips, you'll not only streamline your uploading process but also enhance your overall success on the platform. Remember, consistent, high-quality uploads can significantly increase your channel’s growth and audience engagement.
 admin
admin


