Hey there, aspiring YouTuber! If you’ve got an iPhone and a passion for sharing videos, you’re in the right place. Uploading videos to YouTube from your iPhone is easier than you might think. Whether you want to share travel vlogs, cooking tips, or just your daily shenanigans, this guide will walk you through the process step-by-step. Let’s get started and make your content shine!
Preparing Your Video for Upload
Before you hit that upload button, it’s crucial to ensure your video is ready for prime time. Here’s how to prepare your video effectively:
1. Edit Your Video
Editing is essential! Take a moment to trim unnecessary clips, add transitions, and include music or text overlays. You can use apps like:
- iMovie: A user-friendly option that comes pre-installed on most iPhones.
- InShot: Great for adding effects and filters.
- KineMaster: Offers advanced editing features for more creativity.
2. Choose the Right Format and Resolution
YouTube supports various video formats, but the most common and recommended is MP4. For optimal quality, aim for a resolution of at least 1080p (1920x1080 pixels). You can adjust the settings in your editing app to ensure you’re exporting in the right format.
3. Optimize Video Title and Description
Think about how viewers will find your video. Choose a catchy title that accurately reflects the content. Here’s how to do it:
- Be Descriptive: Include keywords that relate to your video.
- Keep It Short: Aim for 60 characters or less for better visibility.
For the description, provide a brief summary of what viewers can expect. Include relevant hashtags and links if applicable!
4. Create an Eye-Catching Thumbnail
Your thumbnail is the first impression! Use apps like Canva or Adobe Spark to design a custom thumbnail that stands out. Here are some tips:
- Use bright colors and readable fonts.
- Incorporate engaging images that represent your video.
5. Check Audio Quality
Good audio quality can make or break your video. If your video includes voice-overs or background music, ensure they’re clear and balanced. You can use a simple app like GarageBand to enhance your audio before uploading.
Once you’ve followed these steps, you’ll have a polished video ready for upload to YouTube! With everything in place, you’re one step closer to sharing your creativity with the world. Next up, we’ll guide you through the actual upload process from your iPhone!
Also Read This: Can You Fast Forward on YouTube TV? How to Skip Ahead While Watching on YouTube TV
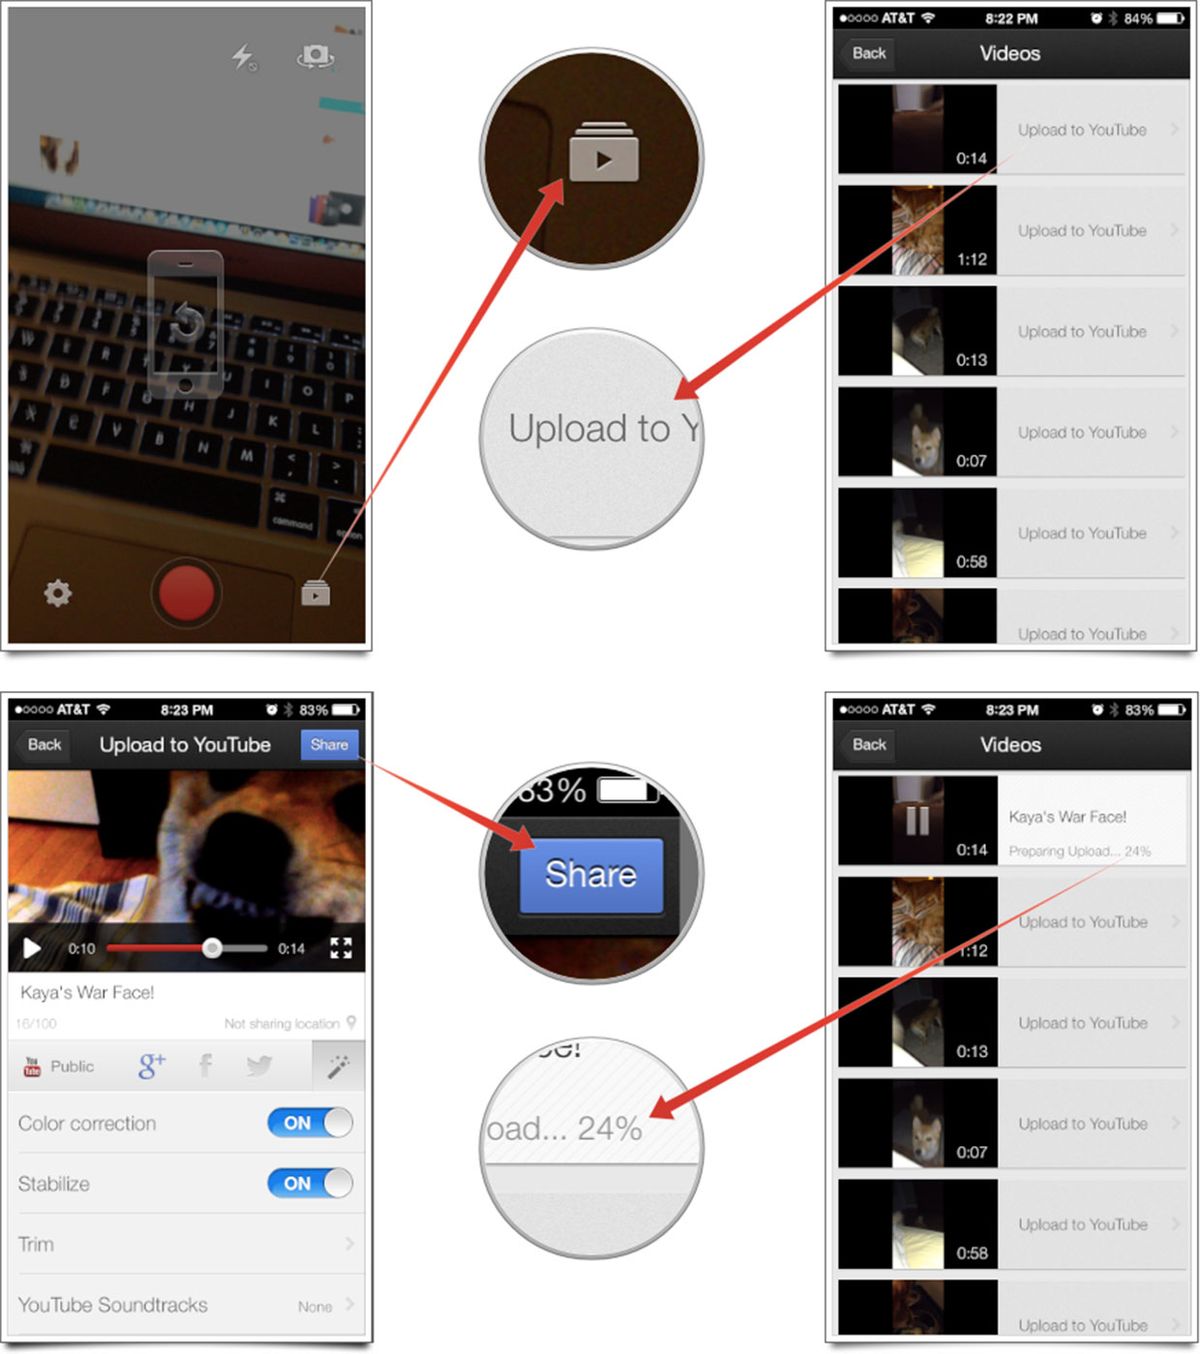
3. Step-by-Step Instructions to Upload from Your iPhone
Uploading videos to YouTube from your iPhone is a straightforward process, and it can be done in just a few taps! Let’s walk through the steps together.
Step 1: Prepare Your Video
Before you start the upload process, make sure your video is ready! You can either record a new video using the Camera app or choose an existing one from your Photos gallery. If you need to edit, consider using iMovie or any video editing app to trim, add effects, or enhance your footage.
Step 2: Open the YouTube App
If you haven’t already, download the YouTube app from the App Store. Once installed, open the app and sign in with your Google account if you aren’t logged in yet.
Step 3: Tap the Camera Icon
In the main screen of the app, you’ll see a camera icon (it looks like a video camera) at the top right corner. Tap on that icon to initiate the upload process.
Step 4: Select Your Video
You’ll be presented with options to capture a new video or select one from your library. Tap on “Library” to choose an existing video. Once you find the video you want, tap on it to select.
Step 5: Add Your Video Details
- Title: Give your video a catchy title that reflects its content.
- Description: Write a brief description to help viewers understand what your video is about. Include relevant keywords!
- Thumbnail: Choose a thumbnail that stands out; you can select one from the video or upload a custom image.
- Privacy Settings: Decide if you want your video to be Public, Unlisted, or Private.
Step 6: Additional Settings
Explore other settings, such as adding video tags or enabling monetization if applicable. You might also want to add the video to a playlist if it fits into a series.
Step 7: Upload Your Video
Once you’ve filled in all necessary details, hit the “Upload” button. Your video will start uploading, and you can see the progress bar. Depending on your video size and internet speed, this could take a few minutes.
Step 8: Share Your Video
Once uploaded, share your video link on social media platforms or with friends! You can do this directly from the YouTube app by tapping the Share button.
Also Read This: How to Cut Your Own Hair for Men – YouTube Tutorial: A Step-by-Step Guide for Beginners
4. Optimizing Video Settings for YouTube
Now that you’ve successfully uploaded your video, let’s talk about optimizing it for better visibility and engagement on YouTube. Optimization is key to ensuring your video reaches the right audience!
1. Title Optimization
Your title should be both engaging and descriptive. Use relevant keywords that people might search for. For instance, if your video is about cooking pasta, a title like “How to Cook Perfect Pasta Every Time” works better than just “Cooking Pasta.”
2. Crafting the Perfect Description
The description section allows you to provide context about your video. Make sure to:
- Include key information and relevant keywords.
- Add links to your social media or related videos.
- Encourage viewers to like, comment, and subscribe!
3. Tagging Your Video
Tags help YouTube understand the content of your video. Use a mixture of broad and specific tags. For example:
- Broad tags: “Cooking, Recipes”
- Specific tags: “Pasta, Italian Cooking”
4. Custom Thumbnails
A visually appealing thumbnail can significantly increase your click-through rate. Create a custom thumbnail that represents your video’s content. Use bold text and bright colors to make it pop!
5. End Screens and Cards
Utilizing end screens and cards can guide viewers to more of your content after they finish watching. This not only keeps them engaged but also increases your channel’s view time.
6. Playlists
If your video fits into a series, add it to a playlist! This helps organize your content and encourages binge-watching, which boosts your video's performance.
By following these optimization tips, you’ll enhance your video’s discoverability on YouTube, attracting more viewers and engagement. Happy uploading!
Also Read This: Why Does YouTube Suck Now? Criticism of Recent Changes and Updates
5. Common Issues and Troubleshooting Tips
Uploading videos to YouTube from your iPhone is usually a seamless process, but sometimes things can go awry. Here are some common issues you might encounter and tips on how to fix them.
- Slow Upload Speeds: If your video is taking forever to upload, it might be due to a slow internet connection. Try switching to a Wi-Fi network instead of using cellular data. If you’re on Wi-Fi, check your router or try resetting it.
- Video Format Issues: YouTube supports various formats, but if your video isn’t uploading, it might not be compatible. Make sure your video is in a supported format like MP4. You can use apps like iMovie or third-party converters to change the format.
- Insufficient Storage Space: Sometimes, you might run out of storage space on your iPhone, which can halt the uploading process. Check your storage settings and remove unnecessary files or apps to free up space.
- App Crashes: If the YouTube app crashes while uploading, try restarting your iPhone. If that doesn’t work, ensure your app is updated to the latest version. You can also try reinstalling the app.
- Failed Uploads: Occasionally, uploads can fail entirely. If this happens, check your internet connection and try again. If the problem persists, consider changing your upload settings or reducing the video quality for faster uploads.
By being aware of these common issues, you can troubleshoot effectively and make your uploading experience smoother. Don’t let small hiccups discourage you—most problems can be fixed with just a little patience and some troubleshooting!
6. Promoting Your Video After Uploading
Congratulations! You've successfully uploaded your video to YouTube. Now comes the fun part—promoting it! Effective promotion can significantly increase your video’s visibility and engagement.
Here are some tried-and-true strategies:
- Optimize Your Title and Description: Make sure your video title is catchy and contains relevant keywords. Your description should provide a brief overview of what viewers can expect and include links to your social media or website.
- Create Eye-Catching Thumbnails: Thumbnails are the first thing viewers notice. Use vibrant colors, clear images, and bold text to create an attractive thumbnail that stands out in search results.
- Share on Social Media: Don’t just rely on YouTube to promote your video. Share it on platforms like Instagram, Facebook, Twitter, and TikTok. Tailor your message for each platform to engage your audience effectively.
- Engage with Your Audience: Respond to comments on your video and engage with viewers. This can build a loyal community and encourage more people to check out your content.
- Collaborate with Other Creators: Partnering with other YouTubers or influencers can expand your reach. Consider collaborating on videos or guest appearances to tap into each other’s audiences.
- Utilize YouTube Cards and End Screens: These features help promote other videos or playlists at the end of your video. It encourages viewers to keep watching your content, increasing views and subscriber count.
Remember, promoting your video is an ongoing process. Keep the momentum going by regularly sharing your content and interacting with your audience. With dedication and creativity, you can grow your channel and make your videos shine!
 admin
admin


