Have you ever thought about turning your photography or design skills into a source of income? Uploading images to Adobe Stock is an excellent way to do just that! Not only can you showcase your creativity, but you can also earn money every time someone downloads your work. In this guide, we’ll walk you through the steps to upload your images effectively and build a portfolio that stands out in the competitive world of stock photography.
Creating a Quality Portfolio
Building a quality portfolio is essential when it comes to making money on Adobe Stock. Here are some key considerations to keep in mind:
- Understand Your Niche: Focus on a specific area like landscapes, food photography, or abstract designs. Specializing can help you attract a dedicated audience.
- High-Resolution Images: Ensure your images are high quality. Adobe Stock requires a minimum resolution of 4 MP. Use a good camera and edit your images to perfection.
- Diverse Content: While it’s great to have a niche, diversity can help too. Offer a range of images that encompass different styles and themes. This could include:
- Close-ups and details
- Wide-angle shots
- People in candid or posed situations
- Trendy Topics: Stay updated on current trends and seasonal themes. For example, if summer is approaching, consider uploading images related to beach activities or outdoor gatherings.
- Consistent Style: Having a recognizable style can help your portfolio feel cohesive. Whether it’s a specific color palette or a recurring subject, consistency can make your work memorable.
- Keyword Optimization: When uploading, use relevant keywords to ensure your images are discoverable. Think about what potential buyers might search for.
By focusing on quality and creativity, you'll be well on your way to creating a portfolio that not only attracts buyers but also represents your unique artistic vision!
Also Read This: Using Adobe Stock Images on YouTube: Guidelines for Incorporating Copyrighted Content
3. Understanding Adobe Stock Guidelines

Before diving into uploading your images to Adobe Stock, it's essential to familiarize yourself with their guidelines. Understanding these rules not only maximizes your chances of acceptance but also helps you avoid common pitfalls. Here’s what you need to keep in mind:
- Quality Standards: Adobe Stock has high expectations for image quality. Your images should be sharp, well-composed, and free of any noise. Aim for a resolution of at least 4 MP for photos and 1920x1080 for videos.
- Content Restrictions: Ensure your images avoid sensitive content, such as violence or hate speech. Also, refrain from submitting excessively edited images that could mislead buyers.
- Model Releases: If your images include recognizable people, you need a model release form. This document gives you permission to use their likeness commercially.
- Property Releases: For images featuring private properties, obtain a property release to avoid legal issues.
- Keywording: Properly keyword your images to enhance discoverability. Use relevant and specific keywords that accurately describe your content.
By adhering to these guidelines, you’ll not only improve your chances of acceptance but also cater to buyers' needs, making your images more marketable. Remember, quality over quantity is the mantra here!
Also Read This: Licensing an Image: A How-To Guide
4. Steps to Upload Your Images
Now that you understand the guidelines, let’s get to the fun part: uploading your images to Adobe Stock! Follow these simple steps to get started:
- Create an Adobe Account: If you don’t have one yet, sign up for an Adobe account. It’s free and gives you access to Adobe Stock.
- Access Contributor Portal: Navigate to the Adobe Stock Contributor Portal. This is your go-to place for managing uploads and tracking your sales.
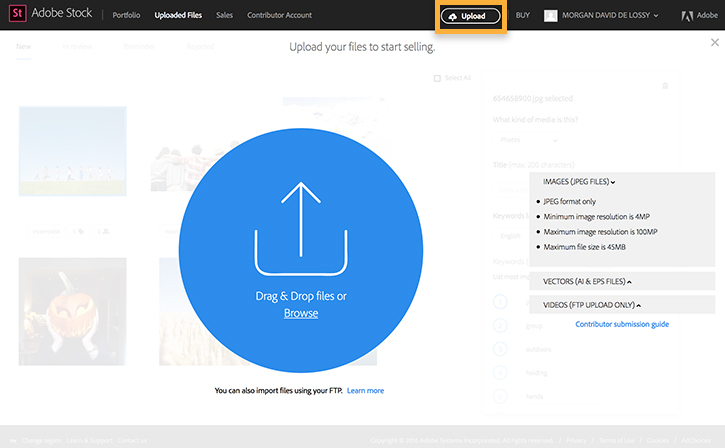
- Upload Your Images: Click on the “Upload” button. You can select multiple images at once, making it easy to upload your portfolio.
- Add Keywords: Once uploaded, add relevant keywords for each image. This step is crucial for ensuring your images appear in search results.
- Submit for Review: After adding keywords and checking your images, submit them for review. Adobe’s team will evaluate them based on their guidelines.
- Track Your Progress: Keep an eye on your uploads in the Contributor Portal. You’ll be notified once your images are approved or if any adjustments are needed.
And that’s it! With these straightforward steps, you’re now on your way to becoming a contributor on Adobe Stock, sharing your creativity and earning money from your images!
Also Read This: What Constitutes Commercial Use as Defined by Getty Images?
5. Optimizing Your Metadata
When it comes to selling your images on Adobe Stock, metadata is your best friend. Think of it as the bridge connecting your stunning visuals to potential buyers. Properly optimizing your metadata can significantly increase your chances of making sales. Here’s how to do it:
- Keywords: Choose relevant keywords that accurately describe your image. Use specific terms, but also think about broader categories. For example, if your image is of a sunset over a beach, keywords like “sunset,” “beach,” “nature,” and “vacation” can help.
- Title: Craft a catchy and descriptive title. It should be concise yet informative. Instead of simply naming it “Sunset,” try “Vibrant Sunset Over Serene Beach.” This makes it more appealing and searchable.
- Description: Write a detailed description of your image. Include what’s happening in the photo, the mood it conveys, and its potential uses. A good description could be: “A captivating vibrant sunset over a serene beach, perfect for travel blogs and relaxation themes.”
- Categories: Choose the right categories for your images. Adobe Stock allows you to categorize your work, making it easier for buyers to find them.
Remember, optimizing metadata is not just a one-time task. Keep refining it based on trends and buyer behavior. The better your metadata, the higher your images will rank in searches, leading to more visibility and sales!
Also Read This: Remove ShareChat Logo from Video in Less Than a Minute with This Method
6. Tracking Your Sales and Earnings
Once you've uploaded your images to Adobe Stock, it’s essential to keep an eye on your sales and earnings. This not only helps you understand what works but also allows you to strategize for future uploads. Here’s how you can monitor your performance:
- Sales Dashboard: Adobe Stock provides a comprehensive sales dashboard. Here, you can see your total earnings, the number of licenses sold, and which images are performing best.
- Monthly Reports: Adobe sends out monthly earnings reports. These reports give you insights into your sales trends and can help you identify peak months for certain types of images.
- Analyze Trends: Look for patterns in your sales. Are certain themes or subjects selling better? Use this information to guide your future shoots.
- Feedback and Ratings: Pay attention to any feedback or ratings from buyers. This can provide valuable insights into what buyers appreciate about your work.
By actively tracking your sales and earnings, you can make informed decisions about your portfolio and maximize your income potential. Embrace the process, and let the data guide your creative journey!
How to Upload Adobe Stock Images for Money
Uploading your images to Adobe Stock can be a lucrative way to earn money, especially if you have a talent for photography or graphic design. The process is straightforward, and with the right approach, you can maximize your earnings. Here’s a step-by-step guide to get you started.
Step 1: Create an Adobe Stock Contributor Account
To begin, you need to sign up for an account:
- Visit the Adobe Stock Contributor site.
- Click on “Join” and fill in the required information.
- Accept the contributor agreement.
Step 2: Prepare Your Images
Your images should be high-quality and meet Adobe's technical requirements:
- Minimum resolution: 4 MP.
- File types accepted: JPG, AI, and EPS.
- Images must be original and free from copyright issues.
Step 3: Upload Your Images
Once your account is set up and your images are ready, follow these steps:
- Log in to your Contributor account.
- Click on “Upload” and select your image files.
- Add tags and titles to improve searchability.
Step 4: Submit for Review
After uploading, Adobe will review your images to ensure they meet quality and content standards. This may take a few days.
Step 5: Track Your Earnings
You can monitor the performance of your images through the dashboard on your Contributor account. Understand which images sell well and adjust your strategy accordingly.
Conclusion: By following these steps and consistently uploading high-quality images, you can turn your creative skills into a profitable income stream through Adobe Stock.
 admin
admin


