Turning an image into a link is a simple yet effective technique often used in web design. By adding a clickable link to an image, you can make it interactive and lead users to additional content or resources. This is commonly seen in galleries, product pages, and advertisements where the
For example, when you click on a product image, you might be taken to the product page, or clicking a banner image might redirect you to a promotional offer. This adds functionality to images and enhances the overall user experience. It's not only user-friendly but also a great way to make your site more dynamic and engaging.
Why Should You Turn an Image into a Link?

There are several compelling reasons to turn an image into a link on your website. Here are just a few:
- Improves user experience: Clicking on an image is intuitive for users. It helps them navigate the site easily, especially on e-commerce sites where visuals play a big role in decision-making.
- Boosts engagement: Interactive elements like image links encourage visitors to explore more of your content, increasing time spent on the site and boosting conversions.
- Enhances design: Images are often more eye-catching than text links. Turning an image into a link can draw attention to important content, offers, or products.
- Mobile-friendly: With the growing importance of mobile browsing, turning images into links ensures that mobile users have an easy way to navigate your website.
By adding links to images, you can improve your site’s functionality and make it more interactive. This can lead to better user satisfaction and, ultimately, higher conversion rates.
Steps to Turn an Image into a Link

Turning an image into a link requires just a few steps in HTML. Here's a simple guide to get you started:
- Use the anchor tag (): The anchor tag is used to create hyperlinks. This tag wraps around the image to make it clickable.
- Insert the image tag (
): The
tag is used to display the image on the page. You will need to specify the image source (src) in this tag.
- Combine both tags: Place the tag around the
tag to create the link.
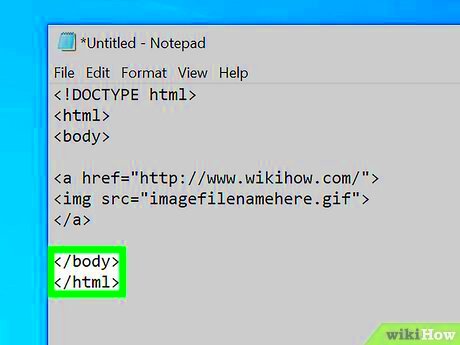
Here's an example of how the HTML code will look:
<a href="https://www.example.com">
  <img src="image.jpg" alt="Example Image">
</a>
This code creates a clickable image that directs users to the link provided in the href attribute. Simply replace "https://www.example.com" with your desired link, and "image.jpg" with the path to your
That's it! With these three steps, you can easily turn any image into a clickable link.
Using the Anchor Tag to Turn an Image into a Link
The anchor tag (<a>) is the main element you need to use when turning an image into a link. In HTML, the anchor tag creates a hyperlink, which you can use to link any content, including images, to another page or URL. When you want an image to act as a clickable link, you simply wrap the image tag (<img>) inside an anchor tag.
Here's a breakdown of how the anchor tag works:
- Anchor tag (
<a>): This is used to define the link destination. The link itself is specified in thehrefattribute. - Image tag (
<img>): This is used to display the image. You include the source of the image in thesrcattribute and an alt description in thealtattribute for accessibility. - Href attribute: This specifies the URL to which the image will link. The URL can be a local path or an external site.
By combining both elements, you create a seamless experience where users can click on an image and be redirected to the linked destination.
Example Code to Turn an Image into a Link
Now that you understand how the anchor tag works, let's look at an example of how to turn an image into a link using HTML.
Here’s a simple code snippet to demonstrate this:
<a href="https://www.example.com">
  <img src="image.jpg" alt="Example Image">
</a>
In this example:
- The anchor tag (
<a>) wraps the image tag (<img>). - The
hrefattribute of the anchor tag specifies the URL ("https://www.example.com") to which the image links. - The
srcattribute of the image tag points to the file path ("image.jpg") of the image you want to display. - The
altattribute provides alternative text for the image, which is important for SEO and accessibility.
When this code is used, clicking on the image will take the user to the URL specified in the href attribute. This makes your image not only visually engaging but also functional.
Common Mistakes to Avoid When Turning an Image into a Link
While turning an image into a link is simple, there are a few common mistakes that can affect the functionality and usability of the link. Let’s go over some of the most frequent issues:
- Forgetting to include the href attribute: Without the
hrefattribute in the anchor tag, the image will not function as a link. Make sure thehrefis properly specified. - Incorrect image source path: If the
srcattribute of the<img>tag contains the wrong file path, the image won’t display. Always double-check the file location. - Not using alt text: The
altattribute is essential for accessibility and SEO. It provides a description of the image for screen readers and search engines. Don’t skip it! - Missing closing tags: In HTML, closing tags are important. Make sure both the anchor tag and image tag are properly closed with
</a>and</img>, respectively. - Not testing across devices: Always test your image links on various devices and browsers. What works on desktop might not be as effective on mobile, especially with smaller screen sizes.
By avoiding these mistakes, you can ensure that your image links work smoothly and provide a better user experience.
Best Practices for Adding Links to Images
When adding links to images, it's important to follow best practices to ensure they’re functional, accessible, and visually appealing. Here are some key tips to keep in mind:
- Use descriptive alt text: Alt text helps improve accessibility by providing a text alternative for screen readers. It’s also important for SEO, as search engines can index the text to better understand the content of your image.
- Ensure image clarity: Make sure the image is clear, high-quality, and relevant to the link destination. A blurry or irrelevant image can confuse users and harm your website’s user experience.
- Provide a clear visual cue: Let users know that the image is clickable. This can be done by adding a hover effect, like changing the image opacity or displaying a cursor pointer when hovering over the image. This visual feedback lets users know that the image is interactive.
- Consider mobile users: Many users browse websites on mobile devices, so it’s important that image links are properly sized and easy to tap on. Test your images on various devices to ensure they work smoothly.
- Don’t overload with too many clickable images: While clickable images can enhance user experience, too many links can overwhelm users. Ensure that each image link has a clear and specific purpose.
By following these best practices, you’ll create image links that are accessible, user-friendly, and effective in driving engagement on your site.
How to Test Your Image Link
Once you've added a link to your image, it's essential to test it to ensure it works as expected. Here's how you can go about testing your image links:
- Click the link: The most obvious test is simply clicking on the image. Ensure that the image redirects you to the correct page or URL when clicked.
- Test across different browsers: Sometimes, image links may work in one browser but not in another. Be sure to test your links in popular browsers like Chrome, Firefox, Safari, and Edge to ensure they function properly across platforms.
- Check for mobile responsiveness: Since mobile traffic is high, test the image link on mobile devices to make sure it’s easily clickable and redirects correctly. Ensure it doesn’t overlap with other content or make the page look cluttered.
- Check alt text: Verify that the alt text appears when the image doesn’t load or when users with screen readers access the page. This ensures accessibility for all users.
- Test image loading speed: Ensure the image loads quickly, as slow loading can frustrate users and lead to higher bounce rates. You can use tools like Google PageSpeed Insights to check image performance.
By thoroughly testing your image links, you can ensure that they work correctly and provide a smooth user experience for all visitors.
FAQ
Here are some frequently asked questions about turning images into links:
- Can I add links to multiple images at once?
Yes, you can add links to multiple images by wrapping each image in its own anchor tag (<a>) and specifying a different URL in thehrefattribute for each one. - What happens if the image link doesn’t work?
If the image link isn’t working, first check that thehrefattribute has the correct URL. Ensure the image path in thesrcattribute is correct and that the image is not broken or missing. - How can I make the image open in a new tab?
To make the linked image open in a new tab, simply add thetarget="_blank"attribute to the anchor tag, like this:<a href="https://www.example.com" target="_blank">. - Can I style my image link?
Yes, you can style your image links using CSS. You can change the appearance of the link or apply hover effects to enhance the user experience. - What if I don’t want the link to be visible?
If you want the link to remain invisible but still functional, you can use CSS to remove the image’s borders or underlines. You can also use JavaScript to modify how the link appears.
These FAQs should help clear up common questions about turning images into links. If you have more specific queries, feel free to explore additional resources or ask for further clarification!
Conclusion
Turning images into links is a simple but powerful technique that enhances the interactivity of your website. By using the anchor tag (<a>) and ensuring that your image links are well-designed, accessible, and functional, you can significantly improve user experience and engagement. From driving traffic to specific pages to boosting product visibility, clickable images offer endless possibilities for improving your website's performance. Just remember to test your links across devices and browsers, use best practices for accessibility, and avoid common mistakes. With these strategies in place, you’ll be able to create seamless, clickable image links that help your website achieve its goals more effectively.


