In Procreate, image tracing is a brilliant technique enabling artists to change photographs or sketches into astonishing digital art. This process affords you an opportunity of making clean lines and shapes while at the same time infusing it with your own distinctively artistic vibe. Tracers are especially useful for beginner nascent painters who want to practice drawing before reaching their desired level or even accomplished artists seeking improvements in their artistry. With tools found only in Procreate, you can create remarkable designs and illustrations quickly. In this part, we shall delve deeply into the workings of image tracing as well as its advantages during your voyage of art creation.
Preparing Your Canvas and Importing the Image
The proper way to prepare the canvas is very important before starting tracing. To prepare: are the steps.
- Create a New Canvas: Open Procreate and tap the "+" icon to create a new canvas. Choose the dimensions that fit your project best.
- Import Your Image: Tap on the "Actions" menu (wrench icon), select "Insert a photo," and choose the image you want to trace from your gallery.
- Adjust the Image Size: Use the corners of the image to resize it to fit your canvas, ensuring it’s not too large or small.
- Lower the Opacity: This step is essential. Tap on the image layer, adjust the opacity to around 30-50%, making it easier to trace over.
It is now time to begin tracing. This setup allows you to concentrate on details without being confused by the primary picture.
Also Read This: How to Make an Image Smaller Using CSS
Choosing the Right Brushes for Tracing
Crucial to obtain the desired effect when outlining is careful selection of brushes. Procreate has various brushes, and here is how one can choose:
- Fine Liner Brush: Perfect for creating smooth, clean lines. It works well for detailed work.
- Brush Pen: This brush mimics traditional ink pens, giving your traces a more organic feel.
- Watercolor Brush: Use this if you want a softer, more blended effect in your tracing.
The brush should be picked from Brush Library and try various brushes to see which one is right for you. Always keep in mind that your goal is to ensure that the tracing appears to be artistic as well as refined.
Also Read This: How to Embed an Image in Adobe Illustrator for Quick Access
Utilizing Layers for Better Control
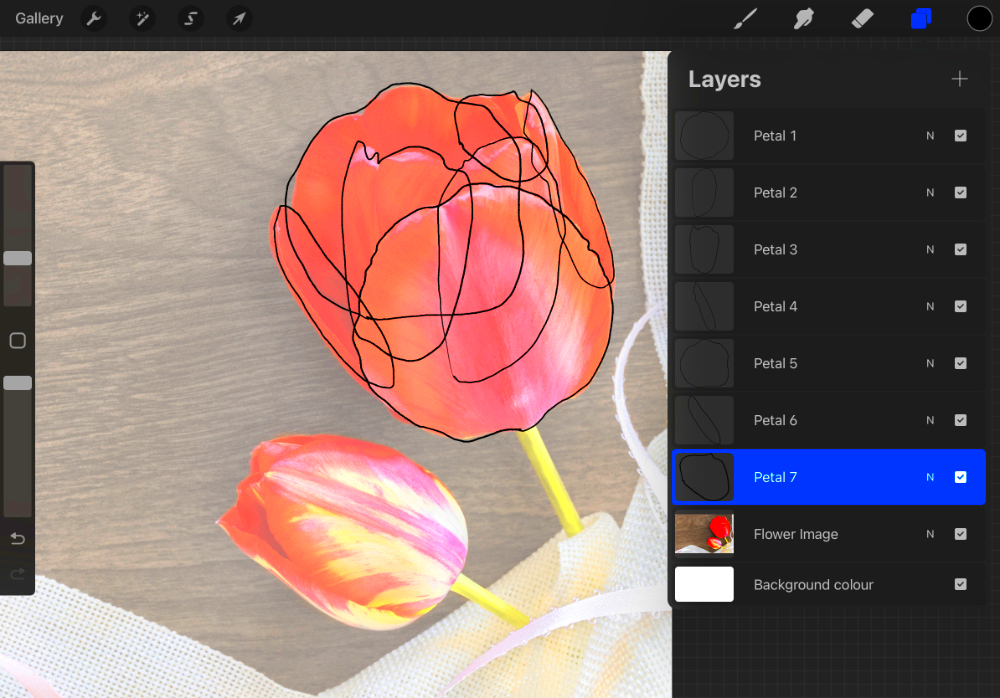
Procreate’s layers are akin to see-through papers placed upon one another allowing for separating your artwork’s components. Effective application of layers can drastically enhance your tracing. Thus, it becomes possible to prioritize each part of your art separately without altering the entire work. This is particularly advantageous when one intends to include colors or perform modifications following outlines. Here is precisely how to optimize use of layers:
- Create a New Layer: Before you start tracing, create a new layer for your trace. Tap the "+" icon in the Layers panel to add a layer.
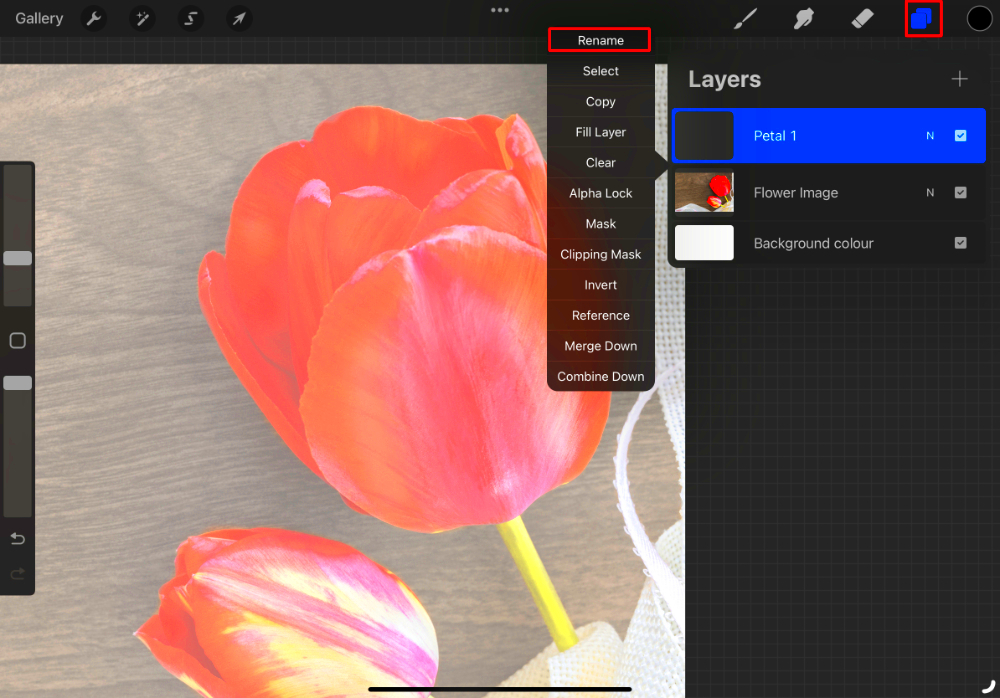
- Layer Organization: Name your layers by tapping on the layer title. For instance, you can name one “Trace” and another “Color.” This keeps your work organized.
- Lock Layers: If you want to prevent accidental changes, lock your layers. Just swipe left on the layer in the Layers panel and tap "Lock."
- Adjust Layer Order: You can rearrange layers by dragging them up or down in the Layers panel. This affects how your artwork appears.
Using layers will give you more control over your tracing, enabling you edit or improve certain sections of your picture effortlessly.
Also Read This: How to Recover Lost Images from an SD Card
Applying Artistic Effects after Tracing
The hour to unleash your artistic creativity arrives once tracing is accomplished. You can convert your traced picture into a work of art via Procreate’s bundles of tools and features. You may try some of these common effects to improve your image:
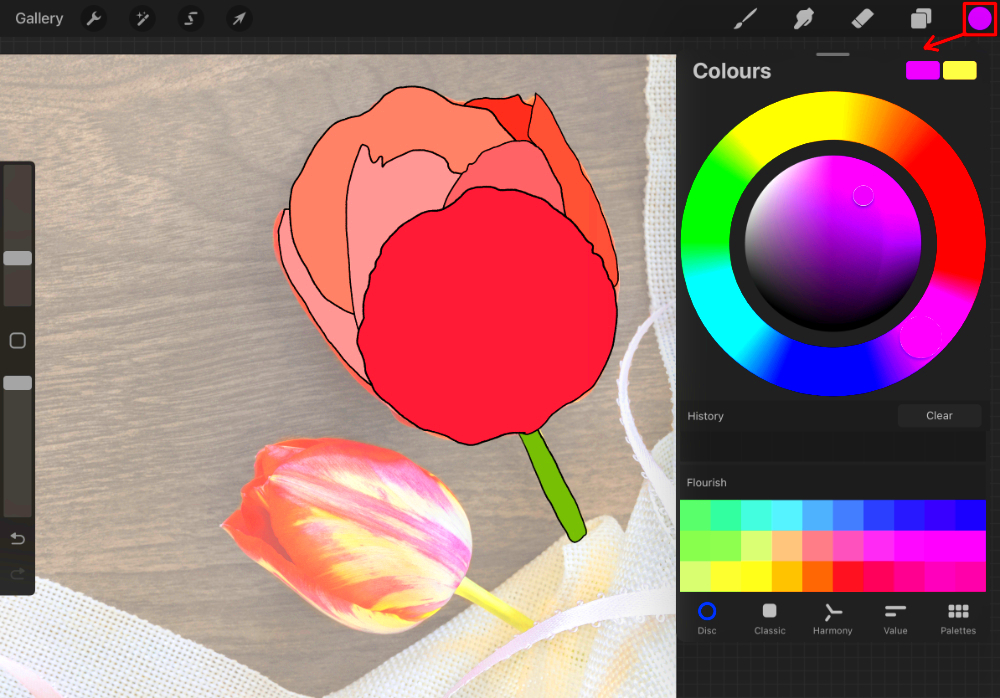
- Color Fill: Use the Color Fill tool to add solid colors to your traced areas. Just drag the color from the top right corner and tap inside the line you want to fill.
- Brush Effects: Experiment with different brushes to add textures or shading. For example, use a textured brush for a more painterly effect.
- Gaussian Blur: This effect can soften edges or backgrounds. Adjust the blur level in the Adjustments menu for the desired look.
- Layer Opacity: Change the opacity of your layers to blend effects smoothly. Lowering the opacity can give a nice, subtle finish.
Application of these effects lead to development of depth and interest in your art making it one of a kind.
Also Read This: How to Apply Eyeliner Step-by-Step for Beginners
Saving and Exporting Your Artwork
Whenever you have concluded your magnum opus, it is essential to save and export it appropriately. Doing so will help keep your work safe and allow you to share it with other people. Here are some of the ways in which this can be done:
- Save Your Work: Tap on the “Actions” menu (wrench icon) and select “Share.” Choose “Procreate” to save your artwork in the native format, which allows for future edits.
- Exporting Formats: You can export your artwork in various formats such as PNG, JPEG, or TIFF. PNG is great for transparent backgrounds, while JPEG is good for general sharing.
- Cloud Storage Options: Consider saving your artwork to cloud services like iCloud, Dropbox, or Google Drive for easy access across devices.
- Social Media Sharing: Procreate makes it easy to share directly to platforms like Instagram or Facebook. Just select the platform when exporting.
If saving and exporting your artwork in the proper way, this will ensure that your artistic expression are preserved forever as well as easily available for sharing or printing!
Also Read This: Managing Multiple YouTube Channels with One Email
Common Mistakes to Avoid While Tracing
Tracing images may be rewarding at times but there some common errors that impact your work’s quality. One way to avoid frustrations and achieve excellent results is by understanding these usual pitfalls. Below are some of the things you should not do:
- Ignoring Image Quality: Using a low-resolution image can lead to blurry lines when tracing. Always choose high-quality images for the best results.
- Not Using Layers: Tracing everything on one layer can make it hard to edit specific areas. Always create separate layers for your trace and colors.
- Rushing the Process: Tracing takes time and patience. Don’t rush through it; instead, take your time to ensure accuracy and detail.
- Using the Wrong Brush: Choosing a brush that doesn’t suit your tracing style can lead to unsatisfactory results. Experiment with different brushes to find the right fit.
- Over-Tracing: While it might be tempting to trace every little detail, sometimes less is more. Focus on capturing the essence of the image instead of every small feature.
These missteps can be avoided, so that you proceed on the path of success when it comes to tracing images, and thus make art which you will be proud of.
Also Read This: How to Insert an Image in Blackboard Discussion
FAQs About Image Tracing in Procreate
You may have some questions when you enter the world of image tracing. Here are explanations for frequently asked questions that can help you:
- What is image tracing? Image tracing is the process of converting a raster image into a vector-like format, allowing you to create clean, detailed artwork.
- Can I trace any image? Yes, but ensure you have the right permissions for copyrighted images if you plan to share or sell your work.
- How do I choose the right brush? Experiment with different brushes in the Brush Library to see which one feels right for your tracing style.
- Is it okay to use reference images? Absolutely! Using reference images can enhance your tracing and help improve your drawing skills.
- Can I edit my traced image later? Yes, by using layers, you can go back and edit any part of your traced image without starting over.
We hope these common questions help dispel some confusion for you while at the same time motivating you to give tracing another spin in Procreate.
Conclusion on Mastering Image Tracing Techniques
In Procreate, tracing images is a powerful tool that can take your creativity to new heights. However, if you really want to reach a new level of artistic mastery, it’s wise to learn how to trace well, use layers effectively and apply artistic effects. In addition, be patient and learn from mistakes made along the way. With time and experience, you will find the style and technique that make your artwork sparkle. Pick up your iPad and open Procreate as you then begin following lines to create amazing pieces of art!
 admin
admin


