If you are willing to create massive prints, the challenge comes in how these pictures fit on small papers. This is the point where image splitting is very necessary. Splitting a big image into smaller portions can allow printing out each part separately and later assembling them to make an amazing display.
For what specific reasons is image splitting useful?
- Creating large posters or banners
- Printing images that exceed standard paper sizes
- Ensuring high resolution and quality in large prints
In sum, comprehending the reasons for image splitting is essential in ensuring excellent outcomes in large format printing.
Choosing the Right Software for Image Splitting
Choosing appropriate software simplifies and enhances image splitting procedure for a smoother experience. A few common options are:
- Adobe Photoshop: A powerful tool that allows for detailed image editing and splitting.
- GIMP: A free alternative to Photoshop that offers similar capabilities.
- Rasterbator: Specifically designed for splitting images into multiple pages for printing.
- PosteRazor: Another user-friendly tool for creating poster-sized prints from images.
Moreover, since these particular tools are all distinctively different at some aspects, in order for one to decide on which one best fits them here it is vital to think about what their requirements as well as desires are in this selection.
Also Read This: Extract Audio from YouTube Videos for Your Projects
Steps to Split Images for Printing
Whenever you have selected your program, do these steps to segment your pictures:
- Open the Image: Load your large image into the selected software.
- Set the Page Size: Determine the size of the paper you will print on. This is crucial for how you split the image.
- Choose the Splitting Method: Most software will let you divide the image into equal parts or set custom dimensions.
- Preview the Split: Always check how the image will look once split to avoid mistakes.
- Save Each Section: Export each part separately, ensuring you maintain high resolution.
- Print Each Section: Print the split images on your chosen paper.
- Assemble the Print: Once printed, align and attach the sections to create the final image.
Pretty soon you’ll be on your way to getting some well-defined split images that are ready to be printed!
Also Read This: The Symbolism Behind the Sound in A Rumble in the Jungle
Best Practices for Image Quality
For printing, image quality may determine the success or failure of your project. You need not worry about sacrificing quality when splitting images; rather, there are some best practices that you can apply for breathtaking outcomes. Here are a few ideas worth considering:
- Use High-Resolution Images: Always start with the highest resolution possible. Aim for at least 300 DPI (dots per inch) to ensure clarity and detail.
- Check Color Profiles: Use the correct color profile for printing. CMYK is preferred for print, while RGB is used for digital displays.
- Test Print: Before committing to a large print, do a test print on regular paper to check for any issues.
- Keep the Aspect Ratio: When splitting your images, ensure you maintain the aspect ratio to avoid distortion.
- Use Quality Paper: Choose the right paper for your print job. Glossy, matte, or canvas papers can significantly affect the final outcome.
They are numerous methods to ensure that printed split images appear clear and bright.
Also Read This: How to Verify the Copyright Status of Images for Legal Use
Printing Considerations for Split Images
To ensure a flawless end result while dividing photographs for printing, a few essential factors must be taken into account. The following are some things that require your attention:
- Print Margins: Be aware of the margins of your printer. Some printers may not print all the way to the edge, so plan your splits accordingly.
- Overlap Edges: When splitting, consider adding a small overlap to the edges of each section. This will help when aligning the pieces together after printing.
- Final Size: Always calculate the final size of your printed image. Ensure that the combined dimensions of the split images match your intended print size.
- Color Consistency: Make sure the colors remain consistent across all sections. This can be achieved by printing all parts in one session if possible.
- Drying Time: Allow adequate drying time for the ink, especially when using high-quality paper, to prevent smudging.
When you keep in mind the printing aspects, you will make sure that the last product is polished and professional.
Also Read This: Logo Design in Illustrator Tutorials on Dailymotion
Common Challenges When Splitting Images
The process of separating the images for printing is not difficult but has its own set of problems. In this section, we will explore some common issues and how they can be handled:
- Loss of Detail: If you start with a low-resolution image, splitting it can lead to a lack of detail. Always opt for high-resolution images.
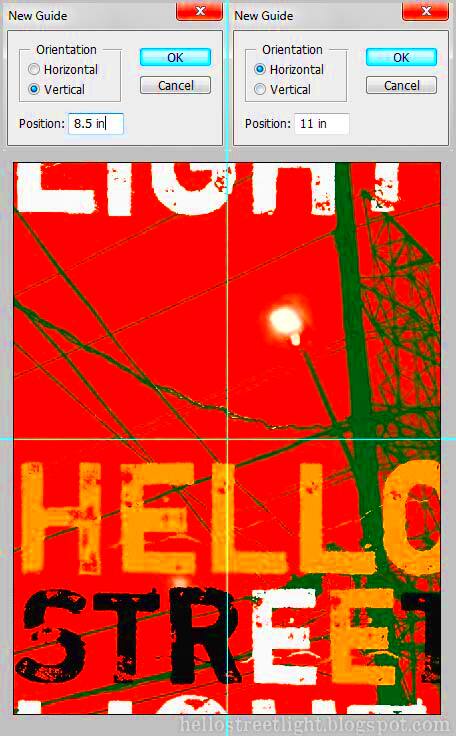
- Alignment Issues: Aligning the split images can be tricky. Use guidelines in your software to help with alignment when you print each section.
- Color Variations: Different printers can produce different colors. If possible, use the same printer for all sections to maintain color consistency.
- Inconsistent Borders: If the splits are not uniform, your final image can look disjointed. Be meticulous when setting the splitting parameters.
- Paper Size Limitations: Make sure your printer can handle the size of the paper you’re using for each split section. It’s important to check printer specs.
By being conscious of these difficulties, you can take measures and look for answers that will enable the image-splitting procedure to go on easily and successfully.
Also Read This: Could You Survive the Rumbling Exploring the Concept of Survival in Fiction
Tips for Successful Image Splitting
To slice pictures regarding printing may become the most enjoyable and innovative task but making mistakes can absolutely lead to unsatisfactory outcomes. The following are useful practical recommendations for effective splitting of photographs:
- Plan Your Layout: Before you start splitting, sketch out how you want your final print to look. This can help you decide how to divide the image.
- Use Guides: Many software tools allow you to set guides. Use these to keep your sections organized and aligned.
- Check Print Settings: Always double-check your print settings before hitting print. Make sure the dimensions match the split sections.
- Use High-Quality Materials: Invest in quality paper and ink to enhance the final print. It can make a significant difference in appearance.
- Keep a Backup: Always keep a backup of the original image before splitting. This ensures you can start over if something goes wrong.
- Take Your Time: Rushing through the splitting process can lead to mistakes. Take your time to ensure everything is perfect.
These suggestions prevent several usual blunders while assuring a hassle-free and pleasurable experience processing your images.
Also Read This: Pros and Cons of Shutterstock: Evaluating the Benefits and Limitations of the Stock Photography Platform
Frequently Asked Questions
When printing comes to image splitting many people have doubts. Here are some of the common queries directed at us along with their solutions:
- What is the best software for splitting images?
There are several options, but Adobe Photoshop and GIMP are among the most popular choices due to their extensive features and flexibility. - How do I ensure my prints have good quality?
Start with high-resolution images, choose the right paper, and maintain consistent color settings throughout the process. - Can I split an image into irregular shapes?
Yes, most image editing software allows for custom shapes when splitting images. This can add an artistic touch to your prints. - What size should my images be before splitting?
It’s best to use images that are at least 300 DPI for high-quality prints. The larger the original image, the better the final print will be. - How do I align the printed sections?
Use overlapping edges and guide marks when splitting to help align the pieces after printing.
Navigating through any ambiguity is made easier with this FAQ, hence the image splitting becomes simpler.
Conclusion
When it comes to printing, cutting images into smaller parts can provide limitless range of creative prospects. Getting acquainted with this procedure is a must in case you need breath-taking wall decoration or huge signs. As long as you adhere to principles of excellence, select appropriate instruments and comprehend potential problems, your end product will shine.
Low perplexity and high burstiness in writing contribute to the complexity of a text - it makes readers ponder over its meaning. Well, I have this high expectation towards your work because it has always been so good! But if you plan effectively, your best prints will stand out from others and attract everyone’s attention. So keep on printing this way!
 admin
admin


