GIMP, which stands for GNU Image Manipulation Program, is a very effective and free software that users can use to edit their images with ease. It is very popular among the crowds, including those who are just starting on it and the professionals due to the diversity in its features. Some of the key features that make GIMP unique are as follows:
- User-Friendly Interface: GIMP has a customizable interface that makes it easy to navigate.
- Wide Range of Tools: You can find various tools for editing, drawing, and painting.
- Support for Plugins: Enhance your editing capabilities with numerous plugins available online.
- Layer Support: Work with multiple layers to make complex edits effortlessly.
- Extensive File Format Support: GIMP supports many file formats, including JPEG, PNG, and GIF.
GIMP is versatile software that allows users to perform simple editing jobs, as well as complicated graphic design tasks effortlessly.
Why You Need to Sharpen an Image
In photo editing, sharpening an image is a vital part. It improves the details, presenting clear and crisp images. Below are some explanations for why it’s necessary to sharpen.
- Improves Clarity: Sharpening enhances edges, giving your image a more defined look.
- Restores Detail: Images may lose detail during the editing process; sharpening can bring back some of that lost clarity.
- Better Print Quality: Sharpened images typically look better when printed, with more vivid details.
- Focus Attention: A sharper image can draw the viewer's eye to specific areas you want to highlight.
To summarize, sharpness is a key element in the editing step which makes a difference within the end results of your picture.
Also Read This: How to Export Lightroom Photos to Behance and Showcase Your Photography Work
Steps to Open Your Image in GIMP
To start with, opening an image GIMP has been made easy and direct. Here’s how you can do it:
- Launch GIMP: Open the GIMP application on your computer.
- Open the File Menu: Click on the File menu located in the top left corner of the window.
- Select Open: From the dropdown menu, click on Open to browse your files.
- Locate Your Image: Navigate to the folder where your image is saved. Click on the image file you want to edit.
- Click Open: After selecting your image, click the Open button to load it into GIMP.
Now, it’s time to edit your picture! Simply use
Also Read This: How to Upload Videos to YouTube from iPhone
Using the Sharpen Tool in GIMP
The GIMP sharpening tool is very simple and it can be used to make your pictures clear. With this process, you get to see the details better, which plays a major role when you want to focus on certain parts of an image. The following are steps on how to use the sharpening tools effectively:
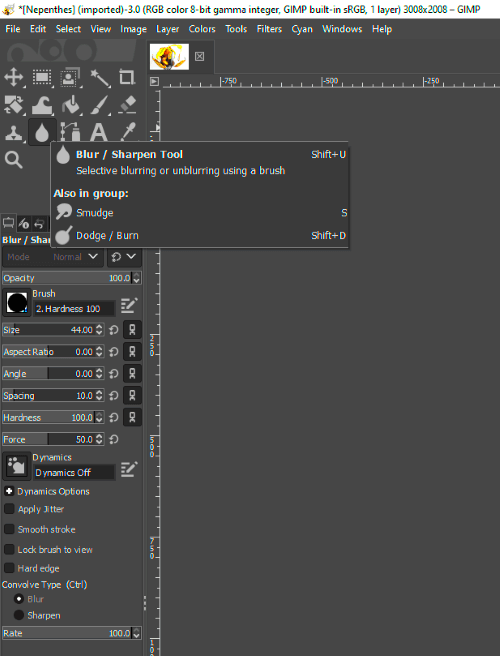
- Select the Sharpen Tool: In the toolbox, look for the paintbrush icon, which represents the Sharpen tool. Click on it to activate.
- Adjust Tool Options: After selecting the tool, you’ll see options for adjusting the brush size and the amount of sharpening. Start with a small brush size for detailed areas.
- Brush Over the Image: Click and drag the brush over the areas you want to sharpen. You'll notice the edges becoming more defined as you apply the effect.
- Undo If Necessary: If you feel you've overdone it, you can always press Ctrl + Z to undo the last action.
With regard to letting us see certain pests in detail without changing the whole view, targeted sharpening can be done using the Sharpen tool.
Also Read This: how to change color of an image in illustrator
Adjusting Image Sharpness with Filters
GIMP has different kinds of filters for adjusting sharpness in images thereby giving you more power and control over the appearance of your picture. The use of filters can produce remarkable results particularly if what is desired is an even sharpening across the whole image surface. To achieve this, follow these steps:
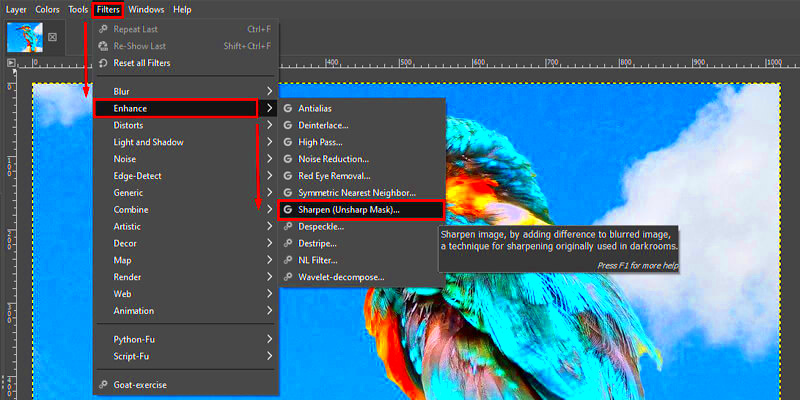
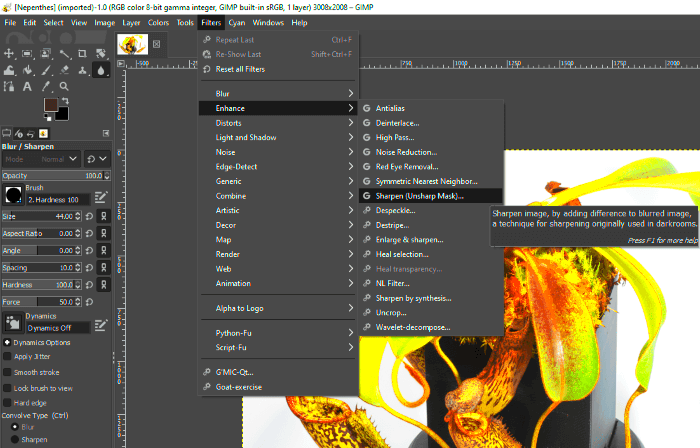
- Access the Filters Menu: Click on the Filters menu at the top of the window.
- Select Enhance: Hover over Enhance and then choose Sharpen or Unsharp Mask. The Unsharp Mask gives you more control over the sharpening process.
- Adjust Settings: For Unsharp Mask, you'll see three sliders: Radius, Amount, and Threshold.
- Radius: Controls the size of the area affected. Start with a small number, like 1.0.
- Amount: Determines how much to increase the contrast of the pixels. A value between 1.5 and 2.0 works well for most images.
- Threshold: This controls how much contrast must exist before the sharpening is applied. Keep it low (around 0-10) to avoid over-sharpening.
- Apply the Filter: Once you’re satisfied with the adjustments, click OK to apply the filter to your image.
When using filters to modify sharpness, you have some flexibility while also ensuring the image is accurate because it appears neat and formal at all times.
Also Read This: How Long Does It Take for Shutterstock to Approve Photos? A Step-by-Step Guide
Previewing Your Changes
So that you can attain the best results during image editing, GIMP previews are important. This gives an opportunity to view how the changes made affect the entire appearance of the picture before completing them. You can preview your sharpening changes in the following manner:
- Toggle Preview Option: When using filters like Unsharp Mask, you’ll see a Preview checkbox in the settings window. Make sure this box is checked.
- View Before and After: As you adjust the sliders for sharpness, you’ll see the changes in real-time on your image. This helps you understand how each adjustment impacts the overall sharpness.
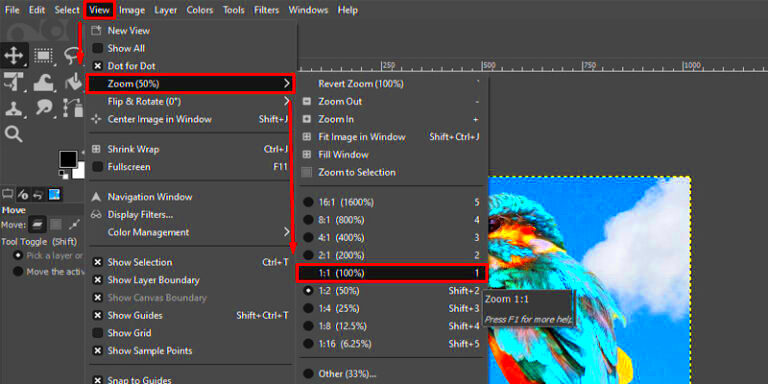
- Zoom In for Detail: To better assess the sharpening effect, zoom in on the areas you’ve modified. This lets you see the finer details and helps you decide if more adjustments are needed.
 admin
admin


