
Image scaling in AutoCAD is a crucial aspect that many users need to master for effective design. When working with images, understanding how to scale them accurately ensures that your designs reflect the true dimensions of your project. AutoCAD allows you to insert images as references, and scaling helps integrate these images seamlessly into your drawings. Proper scaling ensures that every detail of your design is proportionate and correctly positioned.
Importance of Correct Image Scaling
Getting image scaling right is essential for several reasons:
- Accuracy: Correct scaling ensures that images align with other elements in your drawing, which is vital for precision.
- Clarity: Scaled images maintain their quality, which is essential for presentations and detailed views.
- Time Efficiency: Properly scaled images reduce the need for corrections later, saving you time during revisions.
- Professional Appearance: Well-integrated images enhance the overall look of your designs, making them more professional and polished.
In short, accurate scaling enhances the functionality and aesthetics of your drawings, allowing for better communication of ideas and concepts.
Step-by-Step Guide to Scale Images in AutoCAD
Scaling images in AutoCAD can be done in a few simple steps. Here’s how you can do it:
- Insert the Image: Begin by inserting the image into your drawing using the "Insert" tab.
- Select the Image: Click on the image to select it. You'll see handles appear around it.
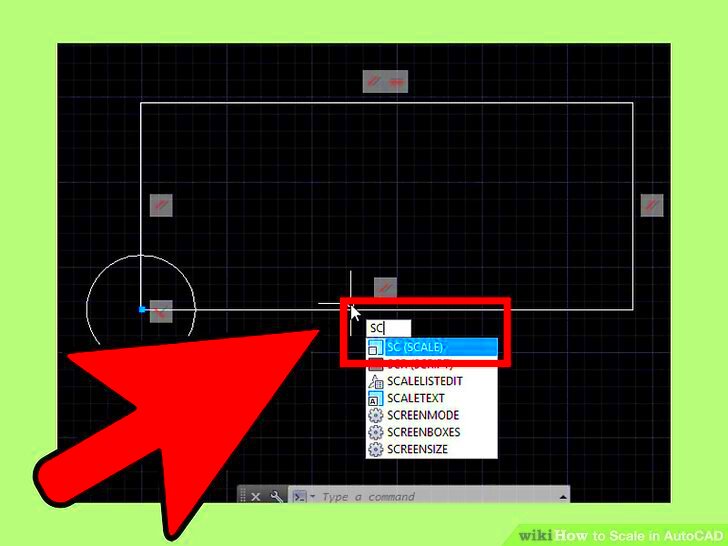
- Use the Scale Command: Type
SCALEin the command line and press Enter. - Specify the Base Point: Click on a point in your drawing that will serve as the base for scaling.
- Enter the Scale Factor: Input a scale factor. For example, entering
2will double the size of the image. - Check the Result: Review the scaled image to ensure it meets your design requirements.
By following these steps, you can scale images accurately, ensuring they fit perfectly within your AutoCAD project.
Tips for Maintaining Image Quality During Scaling
Maintaining image quality while scaling is vital to ensure that your designs look professional and polished. When you scale an image, you want to keep it sharp and clear, avoiding any pixelation or blurriness. Here are some tips to help you maintain image quality:
- Use High-Resolution Images: Always start with the highest resolution images you can find. This gives you more flexibility when scaling up without losing detail.
- Avoid Excessive Scaling: Try not to scale images too large from a small size. If you need a larger image, it’s better to find one that is already at the desired size.
- Keep the Aspect Ratio: When scaling, make sure to maintain the aspect ratio. This prevents your images from looking stretched or squished.
- Check Image Settings: Before inserting an image, check its properties. Some formats, like PNG, maintain quality better than others.
- Use the Correct File Format: Use formats that support high quality, such as TIFF or PNG, when you need clarity and detail.
By following these tips, you can ensure that your images remain crisp and clear, enhancing the overall quality of your AutoCAD designs.
Common Challenges When Scaling Images
Even with the best practices, scaling images in AutoCAD can come with its share of challenges. Being aware of these can help you tackle them effectively:
- Loss of Detail: One of the most common issues is losing detail when enlarging an image. Low-resolution images can become pixelated.
- Misalignment: Sometimes, scaled images may not align correctly with other drawing elements, causing inconsistencies in your design.
- Aspect Ratio Distortion: If the aspect ratio isn’t maintained during scaling, images can appear stretched or compressed.
- File Size Issues: Large images can increase file size significantly, which may slow down your AutoCAD performance.
- Rendering Problems: Occasionally, rendering issues may arise, especially with complex images or when using various layers.
By recognizing these challenges, you can take steps to prevent them and ensure a smoother scaling process.
Using Different Scaling Tools in AutoCAD
AutoCAD offers a variety of scaling tools to help you manage images effectively. Understanding how to use these tools can make your workflow much smoother. Here are some of the main tools available:
- Scale Command: As mentioned earlier, the
SCALEcommand is one of the primary tools for scaling images. It’s straightforward and allows you to set a specific scale factor. - Stretch Command: The
STRETCHcommand lets you stretch selected objects, including images, in a specific direction, which can be helpful for minor adjustments. - Resize Tool: Some versions of AutoCAD come with a resize tool that provides an intuitive way to click and drag to adjust the size of your image directly.
- Properties Palette: The properties palette can be used to manually adjust the width and height of images, allowing for precise control.
- Dynamic Input: This feature allows you to input scale values while the cursor is in motion, making it easier to visualize the changes you are making.
By exploring these tools and understanding their functions, you can achieve better control over image scaling and improve the quality of your designs.
Best Practices for Image Management in AutoCAD
Managing images effectively in AutoCAD is essential for maintaining organization and efficiency in your projects. Proper image management can significantly improve your workflow and ensure your designs stay clear and professional. Here are some best practices to consider:
- Organize Your Images: Create a dedicated folder structure for your images. Use clear naming conventions to make it easy to locate files when you need them.
- Use Image Paths Wisely: Use relative paths instead of absolute paths when linking images. This way, if you move your project folder, AutoCAD will still find the images.
- Regularly Update Images: If you replace or update an image, make sure to check the links in your AutoCAD file. Regular maintenance keeps your projects up to date.
- Limit Image File Size: Large image files can slow down your drawing. Consider compressing images or using lower resolutions when high detail isn't necessary.
- Utilize Layers: Use layers to manage different images and graphics. This allows you to control visibility and keep your workspace tidy.
By following these best practices, you can enhance your efficiency in AutoCAD and keep your projects well-organized and professional.
FAQ About Image Scaling in AutoCAD
Have questions about image scaling in AutoCAD? You’re not alone! Here are some frequently asked questions that can help clarify common concerns:
- How do I know if my image is high enough resolution for scaling?
- Check the pixel dimensions of the image. Ideally, a resolution of 300 DPI or higher is best for scaling purposes.
- What happens if I scale an image too much?
- Scaling an image too much can lead to pixelation and a loss of detail, making it look blurry or unclear.
- Can I scale multiple images at once?
- Yes, you can select multiple images and use the scale command to adjust their size simultaneously.
- Is it better to insert images or use linked references?
- Using linked references is often better for large images, as it keeps your file size smaller and allows for easier updates.
- How can I adjust the scale after inserting the image?
- You can select the image and use the
SCALEcommand to adjust its size even after insertion.
These FAQs cover some common concerns, but feel free to explore more or ask additional questions to enhance your understanding.
Conclusion on Scaling Images Effectively
Scaling images effectively in AutoCAD is vital for achieving precise, high-quality designs. Whether you're a seasoned professional or a beginner, understanding the nuances of image scaling can elevate your work. Remember to consider image quality, utilize the right tools, and follow best practices for managing your images. By paying attention to these aspects, you can ensure that your designs are not only accurate but also visually appealing.
In the end, taking the time to scale your images properly will lead to better project outcomes and a more polished final product. So, the next time you work with images in AutoCAD, keep these tips in mind and watch your designs come to life!
 admin
admin


