If you've ever worked on a presentation or design using Google Slides, you know how useful images can be in enhancing your work. Whether you're creating a slide deck, a report, or just collecting visual content for other projects, saving images from Google Slides can help you keep your visuals handy. However, unlike other programs that allow easy image downloads, Google Slides doesn't offer a direct "Save Image" option. But don’t worry! It’s not too difficult to save images from your slides. In this post, we’ll show you how to grab those images and use them for whatever you need.
Steps to Save an Image from Google Slides

Saving an image from Google Slides may seem tricky at first, but once you get the hang of it, the process becomes second nature. Here’s a simple guide to help you get started:
- Open Your Google Slides Presentation: Go to Google Slides and open the presentation that contains the image you want to save.
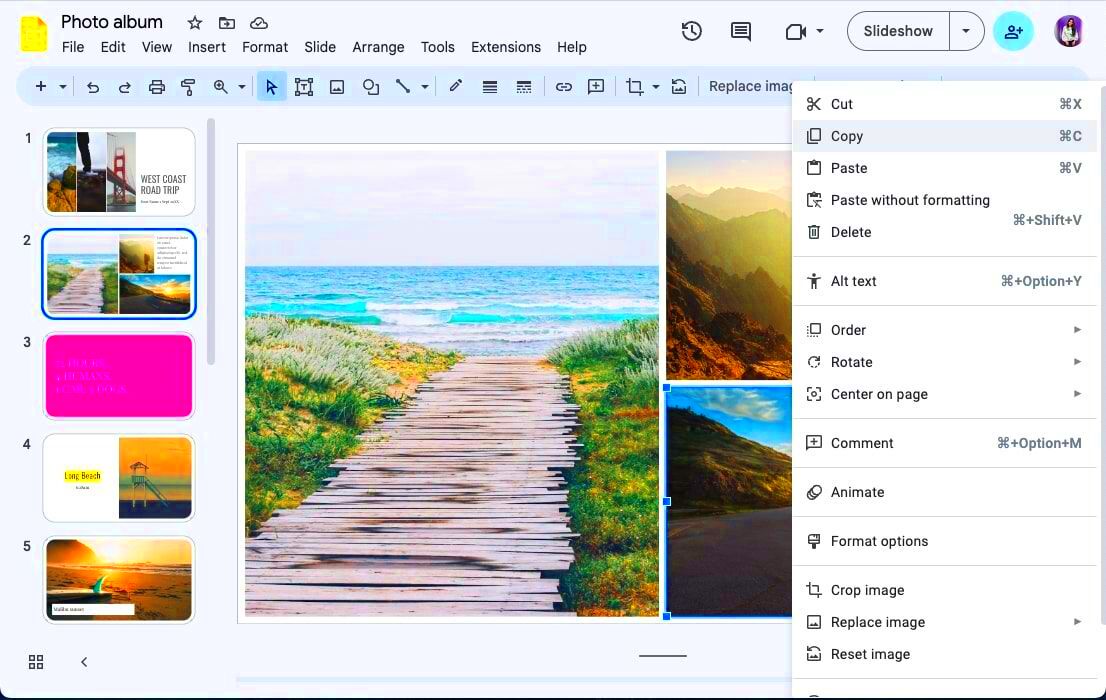
- Select the Image: Click on the image you want to save. It will be highlighted with a border.
- Right-Click on the Image: On a Windows PC, right-click on the image. On a Mac, press the Control key and click the image.
- Choose "Save Image As": In the menu that appears, select the "Save Image As" option. Choose the destination folder on your computer where you'd like to save the image.
- Complete the Process: After selecting the folder, click "Save" to download the image to your computer.
With these simple steps, you’ll have your image saved and ready for use in other projects.
Also Read This: A Complete Guide to Uploading 360-Degree Videos on YouTube
Using Google Slides Image as Part of Other Projects
Once you’ve saved an image from Google Slides, the possibilities are endless. You can use the image in various projects such as reports, presentations, websites, or even social media posts. Here’s how you can integrate your saved
- Use in PowerPoint Presentations: You can easily insert the saved image into a PowerPoint slide by clicking on the "Insert" tab, selecting "Pictures," and uploading your saved image file.
- Incorporate into Documents: Whether you’re creating a Word document or a PDF, saved images can be inserted with ease. Just use the "Insert Image" option in most word-processing software.
- Design Social Media Posts: Use your saved image in graphic design tools like Canva, Adobe Spark, or even social media platforms directly for your posts and advertisements.
- Utilize in Web Projects: For website builders like WordPress or Wix, you can upload your saved images as part of banners, blog posts, or product images.
It’s important to ensure that you’re not violating copyright when using these images for commercial purposes. Always check the image’s usage rights to make sure you’re using it legally.
Also Read This: How to Remove Unwanted Content and Update Your Behance Profile
Common Issues When Saving Images from Google Slides
While saving images from Google Slides is generally a straightforward process, sometimes things don’t go as smoothly as expected. If you run into trouble, you’re not alone! Here are a few common issues that might come up when trying to save images and how to fix them:
- Image Quality Loss: One common problem is that images may lose quality when saved from Google Slides. This often happens if the image was inserted at a low resolution. To avoid this, always use high-quality images to begin with, and try to download them from their original source rather than from the slide.
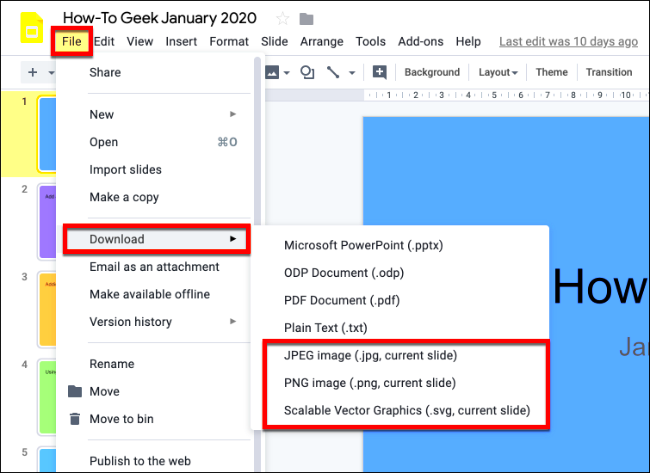
- Right-Click Not Working: Sometimes the "Save Image As" option doesn’t appear when right-clicking on an image. If this happens, try refreshing the page or using a different browser. Alternatively, you can try saving the image through Google Slides’ "Download" feature.
- Background Transparency Issues: If you’re saving PNG images with transparent backgrounds, the transparency may not always be preserved when saved. If this happens, make sure you’re saving the image in the correct format (PNG) and check that the transparency is maintained in the saved file.
- Images not Downloading: If the image isn’t downloading at all, it could be due to a temporary issue with Google Slides or your internet connection. Refreshing the browser or trying a different browser might resolve the issue.
If you experience any of these problems, try troubleshooting by restarting your browser or computer, or using another device. Most of the time, these issues can be solved with a quick fix.
Also Read This: The Purpose and Uses of Adobe Stock
Best Practices for Managing Saved Images
Once you’ve saved your images from Google Slides, it’s important to keep them organized for future use. Managing your images well can save you a lot of time and frustration. Here are some best practices to help you stay on top of your saved images:
- Organize by Categories: Create separate folders for different projects, themes, or types of images. For example, have one folder for images used in presentations and another for images intended for web design or social media.
- Use Descriptive File Names: Rename your image files with descriptive names so you can easily search for them later. Instead of generic names like "image1.png," use names like "marketing-poster-background.png" or "business-presentation-chart.png."
- Maintain File Format Consistency: Keep all your images in a consistent format that suits your projects, such as PNG for images with transparent backgrounds or JPEG for high-quality photos. Avoid unnecessary conversions that could degrade the image quality.
- Back Up Your Images: Always back up your saved images to cloud storage or an external hard drive. This ensures that you don’t lose any important visuals if something happens to your computer.
- Use Metadata and Tags: If you have a large collection of images, consider using metadata or tags to help you quickly filter and find specific images, especially if they’re part of a bigger project or theme.
By following these best practices, you’ll ensure that your images stay organized, easy to access, and ready to use whenever you need them.
Also Read This: Why Should You Use a Canva Template Downloader for Your Next Marketing Project?
How to Edit Saved Images for Your Projects
Once you’ve saved an image from Google Slides, you might need to make a few edits to fit it into your new project. Whether you need to crop, resize, adjust the brightness, or add text, there are plenty of tools available to help you get the job done. Here's how to edit your saved images:
- Using Simple Image Editors: For basic editing, you can use free tools like Paint (Windows), Preview (Mac), or online image editors like Pixlr or Canva. These tools let you crop, resize, or rotate images, adjust colors, and more.
- Using Advanced Image Editors: For more complex edits, Adobe Photoshop or GIMP can give you more control over the image. You can use these tools to adjust image layers, apply filters, or even remove backgrounds.
- Resizing Images: If you need to resize your image to fit a specific space in your project, most editors have a resizing feature that allows you to change the dimensions of the image without losing quality. Just ensure you maintain the aspect ratio if you want to avoid distortion.
- Adjusting Image Brightness/Contrast: You can easily make your images more vibrant or subtle by adjusting the brightness, contrast, or saturation in any editing tool. This can help the image better match the tone of your project.
- Adding Text or Graphics: If you want to add a title or other elements to your image, tools like Canva or Photoshop offer easy-to-use text editing features that allow you to choose fonts, colors, and effects to enhance the image.
After editing, don’t forget to save your work in the appropriate format for your project, and always keep an original copy of the unedited image in case you need it later.
Also Read This: The Perfect Size for Your YouTube Banner Design Tips and Recommendations
Using Google Slides Images for Commercial and Non-Commercial Purposes
When it comes to using images saved from Google Slides, it’s important to understand the difference between commercial and non-commercial use. Whether you're working on a personal project or something for your business, knowing how to handle the images legally is crucial. Here’s what you need to know:
- Non-Commercial Use: If you're using the images for personal projects like a school presentation, a personal blog, or non-profit work, you're generally in the clear. However, always check the image's original source and usage rights, as Google Slides doesn’t automatically grant you commercial use rights.
- Commercial Use: If you plan to use saved images in materials that generate revenue—like advertisements, product designs, or promotional content—you need to ensure that the images are licensed for commercial use. If you’ve used images from Google Slides that are copyrighted or sourced from third-party services, you must either get permission or purchase a license to use them commercially.
- Royalty-Free and Public Domain Images: For images sourced directly from Google Slides, there’s no guarantee that they’re free for commercial use. However, if you are using royalty-free or public domain images from other sources within your Google Slides, those images may come with fewer restrictions, but you should still confirm their usage rights.
Always double-check the copyright information and ensure that the image fits the purpose of your project to avoid any legal issues.
Also Read This: Saving Cricut Designs as Images
Frequently Asked Questions
If you still have questions about saving and using images from Google Slides, you're not alone. Here are some common questions people often ask:
- Can I save images from Google Slides? Yes! You can save images by right-clicking (or using keyboard shortcuts) and selecting the "Save Image As" option, or by downloading the entire slide as an image.
- How can I save an image with transparent background? To save an image with a transparent background, you need to use PNG format. Right-click on the image and choose “Save Image As,” ensuring you select PNG as the file type.
- Why is the image quality poor after saving? The quality of an image can decrease if the original image inserted into Google Slides is low resolution. Always use high-quality images to prevent this from happening.
- Can I use Google Slides images for my business website? If the images are copyrighted, you need to check their usage rights. For commercial use, it's best to use royalty-free or licensed images or create custom visuals.
- How do I resize an image saved from Google Slides? After saving the image, you can resize it using image editing tools like Canva, Photoshop, or even simple tools like Preview on Mac or Paint on Windows.
Conclusion
Saving images from Google Slides is a quick and easy way to gather visuals for your projects, whether they’re for personal or professional use. By following the simple steps outlined in this guide, you can easily extract images and incorporate them into your work. However, always keep in mind the legal implications, especially for commercial projects, to ensure you're using images appropriately. By understanding the rights behind the images and keeping your files organized, you can make the most out of the images you save and enhance your projects with ease.


