For multiple clients, particularly those developing work-related presentations, school projects and personal assignments, saving photos in Google slides is a standard operation. There are times when use has to be made of an image embedded in a slide for other things such as sharing with friends on Facebook or fitting it smartly into an office report. When you know how to do that, you will save time and keep your visuals looking good. This is a guide that describes how to simply save images directly from Google slides making sure that these loved images are available whenever required.
Understanding the Google Slides Interface
Before you begin to save pictures, it’s vital to learn about the Google Slides interface. The key parts are:
- Menu Bar: Located at the top, it contains all the main functions like File, Edit, and View.
- Toolbar: Just below the menu bar, you'll find options for formatting, adding images, and more.
- Slides Panel: This shows all your slides on the left side. You can easily navigate between them here.
- Slide Workspace: The central area where you can view and edit your current slide.
- Notes Section: At the bottom, you can add speaker notes that are not visible to the audience.
Getting used to the components will enable you to save images quickly and do other things in Google Slides.
Also Read This: How to Blur Images in Google Slides
Steps to Save an Image from Google Slides
Upon understanding the design, it’s time we hash out how to preserve a picture by walking through its procedures together:
- Open Your Presentation: Start by opening the Google Slides presentation that contains the image you want to save.
- Select the Image: Click on the image you wish to save. This will highlight it and show selection handles around the edges.
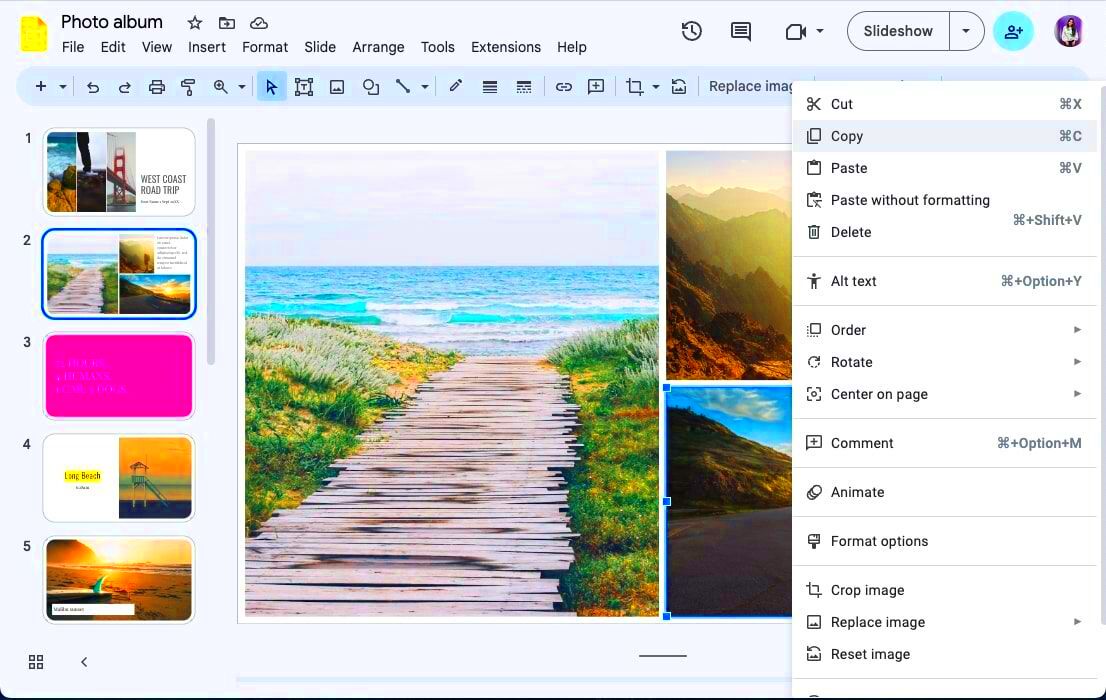
- Right-Click the Image: On your mouse or trackpad, right-click (or use two fingers on a trackpad) to open the context menu.
- Choose Save to Keep: Select the option that says “Save to Keep” if you’re using the “Keep” feature. This will add the image to the Google Keep note service, where you can access it later.
- Download the Image: If you just want to download the image directly, you can use the “Download” option if it's available in your version of Google Slides.
To download the image you want from your Google slides presentation, simply follow these simple steps. Just ensure that when saving your image, you are checking its quality especially in case it needs to be used for high-resolution projects.
Also Read This: How to Copy an Image from Google Slides
Using the Right-Click Method to Save Images
Most likely saving images from Google Slides via right-clicking can be considered as an immediate means. This is a simple procedure that is easy-to-follow and effective for standalone pictures integrated into slideshows. Herein lies the procedure:
- Find the Image: Navigate to the slide containing the image you want to save.
- Right-Click on the Image: Using your mouse or trackpad, right-click on the image. This will bring up a context menu with various options.
- Select Save Image As: Look for the option labeled “Save Image As...” in the menu. Click on it.
- Name Your File: A dialog box will pop up asking you to name the image file. Choose a descriptive name so you can find it easily later.
- Choose the Location: Select the folder where you want to save the image on your device.
- Hit Save: Click the “Save” button, and you’re done! Your image is now saved to your computer.
This method is incredibly efficient, especially if you’re working with multiple images. Just remember, if the image is copied from a website or another source, ensure you have the right to use it to avoid any copyright issues.
Also Read This: DIY Barbie Dresses with Fun Crafting Tips
Saving Images from the Google Slides Toolbar
Another method for saving pictures from Google Slides is also using the toolbar. This method may appear less complicated for certain individuals because it does not require right-clicking. In order to make this happen:
- Open Your Presentation: Launch Google Slides and open the presentation that holds the image.
- Select the Image: Click on the image you wish to save. Make sure it is highlighted.
- Access the Toolbar: Look at the top of the screen for the toolbar options.
- Use the Download Option: Click on “File” in the menu bar, then hover over “Download.” This will reveal several formats, such as PNG or JPEG. Choose your preferred format.
- Save the File: Your browser will initiate a download of the image file. Check your downloads folder to find your saved image.
It’s a good technique particularly whenever one seeks to assure that the picture is saved using a different kind of format. This gives access to the system which can be used for speeding up the process thus making it easier to save many images at once.
Also Read This: Quick Makeup Techniques to Hide Dark Circles
Common Issues When Saving Images
Sans compte que les images de Google Slides sont faciles à enregistrer, il existe plusieurs problèmes communs auxquels vous serez probablement confrontés. Voici quelques-uns des défis et comment les surmonter :
- Image Quality: Sometimes, saved images may lose quality. To maintain the best quality, try saving in PNG format if available.
- Permission Restrictions: If the image was copied from another source, there may be restrictions on saving it. Always check usage rights before saving.
- Right-Click Not Working: If the right-click menu doesn’t appear, ensure your mouse or trackpad is functioning correctly. Alternatively, use keyboard shortcuts.
- Download Issues: If images fail to download, check your internet connection. Sometimes, browser settings can prevent downloads; ensure pop-ups and downloads are allowed.
Being able to tackle such issues expeditiously can help you avoid wastage of time as well as minimize annoyance, so that you do not have to worry about technology hitches when making your presentation at all.
Also Read This: How to Download Free Design Templates from Behance
Tips for Best Image Quality in Google Slides
In terms of presentations, top notch images can significantly influence the outcome. It is crucial to ensure that your images appear crisp and professional when designing slides for business meetings, class projects or personal occasions. Below are some suggestions meant to help you achieve optimal image quality in Google Slides:
- Use High-Resolution Images: Start with images that are high resolution. This means they have more pixels, which translates to better clarity. Aim for images that are at least 1920x1080 pixels.
- Save Images in PNG Format: PNG files typically maintain better quality than JPEGs when resized. If possible, save your images as PNGs before inserting them into your slides.
- Avoid Stretching Images: When you resize images, hold the Shift key to maintain their aspect ratio. This helps prevent distortion and keeps your images looking their best.
- Use the Correct Image Format: Different types of images serve different purposes. Use vector images (like SVG) for logos and illustrations, as they can be resized without losing quality.
- Test Display Settings: Always preview your slides on the device you’ll be using for the presentation. Sometimes images can appear differently based on screen size and resolution.
This is simple to believe when it comes down the line. Nonetheless, case studies on how successful companies have used their pictures can provide great insight into the matter. High-quality images attract people’s attention and are effective in conveying information since they cannot be ignored (higher value).Keep in mind that an example should be given instead of making it general which may miss its point. For instance, Google has built up its reputation based on great GiC campaigns (Google picks GiC). High quality images will help you maintain your audience’s interest and communicate better.A few tips to manage the balance between creativity and business in presentations are as follows:It comes down to this for life, one believes. The picture of success stories from big companies may answer such questions very well. They are always catching one’s attention making it impossible not to notice them (higher worth).Also, think about providing practical examples rather than mere generalizations that may not indicate anything meaningful. To demonstrate: essentially Google relies on constant GiC (Google employs constant GiC). Therefore, they are effective in conveying messages while at the same time getting people’s attention.Some of the tips aimed at maintaining the equilibrium between imagination and commercial viability attempted to be highlighted below:
Also Read This: Creating a Unique Avatar for Your Dailymotion Profile
Frequently Asked Questions about Saving Images in Google Slides
A lot of people using Google Slides want to know how they can save images on them. Below are common questions people ask, along with their answers:
- Can I save an image directly from a Google Slides presentation?
- Yes, you can save images directly by right-clicking on the image and selecting the appropriate save option.
- What formats can I save images in?
- You can typically save images in PNG or JPEG formats, depending on how you choose to save them.
- Why is the image quality poor after saving?
- This may happen if you are using low-resolution images or if the image is stretched out of its original proportions. Always start with high-quality images.
- What if I can’t right-click on the image?
- If the right-click function is not working, try using keyboard shortcuts or access the toolbar options instead.
- Can I save images from a presentation created by someone else?
- Yes, but make sure you have the necessary permissions to use those images. Always respect copyright and usage rights.
The answers to frequently asked questions regarding image saving problems can be found here. This will help you use Google slides more efficiently.
Conclusion on Saving Images in Google Slides
In Google Slides, it is simple to save pictures but understanding how to do so and what are best practices might improve your use. You can access these options through using the right-click method or from the toolbar depending on how you want it done. However, by following some of the recommendations on keeping image quality as well as knowing some of the recurrent problems associated with them, one ends up making good looking presentations that pass across their intended message.
Whether you're a student, teacher, or business expert, mastering image-saving techniques can greatly improve the effect of your slides. The varied image formats and resolutions are many - sample as much as you can in order to find out what meets your needs. It does not take long before you acquire this technique like a professional!
 admin
admin


