If you're looking to enhance your Google Slides presentations, rounding images is a fantastic way to create a more polished and appealing look. Rounded images can soften the overall design and make your slides visually striking. Whether you're creating a professional presentation or a fun project, knowing how to round images can really elevate your visuals. In this guide, we’ll dive into a step-by-step process that makes it easy for anyone to achieve this effect, regardless of their design experience. Let’s get started!
Step-by-Step Guide to Rounding Images
Rounding images in Google Slides is a straightforward process. Follow these simple steps to give your images that polished, rounded look:
- Open Your Presentation: Start by launching Google Slides and opening the presentation where you want to round an image. If you haven’t created your presentation yet, just select Blank Presentation or open an existing one.
- Insert Your Image: Click on the Insert tab in the menu, then select Image. You can upload an image from your computer, use one from Google Drive, or even search the web for one. Just make sure to choose a relevant image that suits your presentation.
- Select the Image: Once your image is in place, simply click on it to select it. You'll notice the image is surrounded by blue handles; this indicates it is ready for editing.
- Open the Format Options: With the image selected, look for the Format Options on the toolbar. If you don't see it, right-click on the image and select Format options from the context menu.
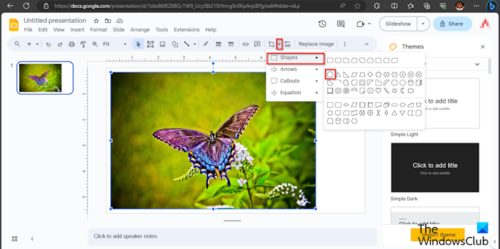
- Adjust the Corner Radius: In the Format Options sidebar that appears on the right, you'll find a section labeled Mask. Under this section, select Shape and then click on the drop-down menu. Choose Rounded Rectangle to apply the rounded edges. Below this option, you’ll see a Corner Radius slider. Adjust it to increase or decrease the roundness of the corners of your image. Play around with this slider until you find the perfect roundness you like!
- Apply Other Customizations: If desired, you can use the same Format Options menu to add a border, shadow, or reflection effects to your image. This can enhance the rounded design even further!
- Final Touches: Look at your newly rounded image in the context of your slides. Make sure it fits well with the other elements on your slide. Adjust the image size or placement if necessary for the best visual impact.
And there you have it! Rounding images in Google Slides can transform your presentation from ordinary to extraordinary, making it more visually appealing and engaging for your audience. So go ahead and give it a try—your slides will thank you!
Also Read This: How to Import Images from Fujifilm Instax to MacBook
3. Using the Masking Tool for Rounded Images

If you're looking to round images in Google Slides, the Masking Tool is your best friend! This feature allows you to create a variety of shapes, including circles and rounded rectangles, which can be applied to your images. Here’s how to do it:
- Insert Your Image: Start by inserting the image you want to round. Go to the top menu, click on Insert, select Image, and choose where to upload your image from (like your computer, the web, or Google Drive).
- Select the Image: Once your image is on the slide, click on it to select it. You should see a border with small blue squares around the image.
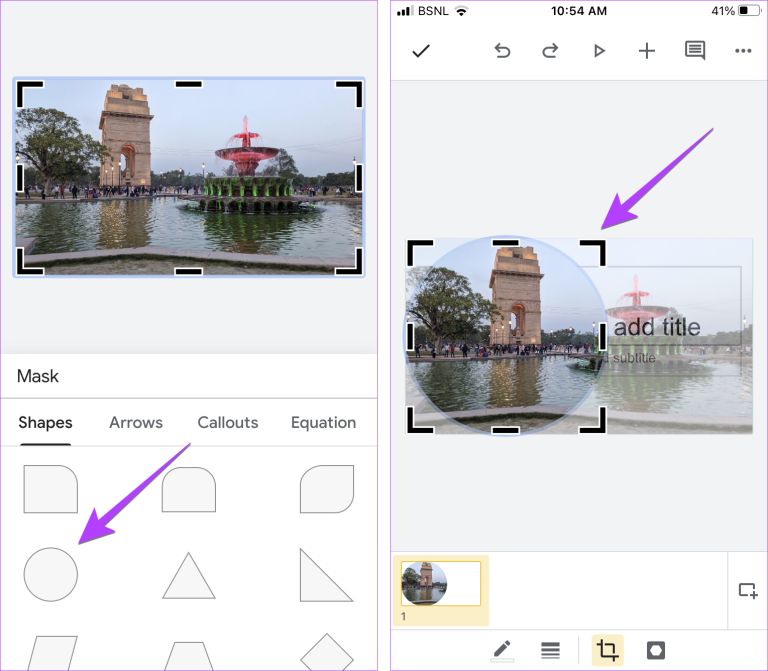
- Open the Masking Tool: With the image selected, look for the Crop Image option in the toolbar. Click on the downward arrow next to it, and you’ll see a Mask Image menu.
- Choose a Shape: Click on the shape icon and you’ll find a variety of predefined shapes, including circles and rounded rectangles. Choose the shape that fits your design needs.
- Apply the Mask: Once you click on your desired shape, your image will automatically conform to that shape. It’s as simple as that!
And just like that, you have a rounded image in your presentation! The masking tool not only allows you to create smooth, rounded corners but also gives you a wide range of shape options to enhance your design.
Also Read This: The Cost of the Rumble App and Its Subscription Fees
4. Adjusting the Image Shape and Size
Now that you’ve rounded your images with the Masking Tool, you might want to fine-tune the shape and size to better fit your slide and overall design. Here are a few tips to ensure your images look just right:
- Resize Your Image: Click on the image to reveal the blue selection handles. Drag these handles to make your image larger or smaller while maintaining the rounded shape.
- Adjusting the Crop: If you want to change which part of the image is visible, double-click on the masked image. This action will allow you to adjust the cropping area, and you can reposition the image within the mask.
- Reapply the Mask: If you decide you want a different rounded shape or size, simply click the image, go back to the Mask Image option, and select a new shape. You can experiment here until you find the perfect fit.
Additionally, remember that images can be aligned with other elements on your slide for a neat appearance. Use alignment tools available in the toolbar to center or distribute your images evenly.
By taking the time to adjust the shape and size of your images, you not only enhance their visual appeal but also contribute to a more professional-looking presentation. Rounded images can really soften the overall look, making your slides more engaging. So, don’t hesitate to play around with the options until you achieve that perfect look!
Also Read This: Boost Engagement with 123RF Stock Photos
5. Adding Borders and Effects to Rounded Images
Now that you’ve mastered how to round your images in Google Slides, the fun doesn’t stop there! Why not add a creative touch by incorporating borders or effects? This can really elevate your presentations and make your images pop. Here’s how you can easily add borders and effects to your rounded images:
Step 1: Select Your Image
First, click on the rounded image that you want to enhance. The image will be highlighted with a blue outline, indicating that it’s selected. This is the starting point for adding borders.
Step 2: Access the Format Options
With your image selected, you should see the toolbar at the top change to reflect options for image editing. Look for the Format options button (you can also right-click your image for a context menu and select Format options from there).
Step 3: Add a Border
- In the Format options pane, find the section for Border. Click on it.
- Select the Color for your border. This can contrast nicely against the rounded edges!
- Next, you can adjust the Weight of the border. A thicker border can give your image a bolder look, while a thinner border can be more subtle.
- Finally, choose the Dash style. Solid borders work well for most images, but dashed or dotted borders can add a unique flair.
Step 4: Apply Effects
Now, to enhance your image further, let’s add some effects!
- In the same Format options menu, you should find a section labeled Drop shadow or Reflection.
- If you click on Drop shadow, you can enable it and adjust the sliders to play with the opacity and blurriness, which gives a nice 3D effect.
- Reflection will create a mirrored effect below your image, which can be perfect for a touch of elegance.
Experiment with these options until you find the perfect combination that matches your style and theme!
Also Read This: Learn the Easiest Way to Create NSFW AI Images
6. Common Issues and Troubleshooting Tips
Even though rounding images in Google Slides is a straightforward process, you might run into a few hiccups along the way. Don't worry; I've got some common issues and troubleshooting tips that will help you out!
Issue 1: Image Not Rounding Correctly
If your image isn’t rounding as expected, make sure you’ve actually applied the mask properly. Sometimes, it’s easy to miss a step! Double-check the following:
- Is the right image selected?
- Did you choose the correct shape and click Find Image Options properly?
If you're still having trouble, try deselecting the image and going through the rounding process again.
Issue 2: Image Quality Decline
After rounding your image, it might appear pixelated or blurry. This usually happens if the image was low-resolution to begin with. Here's how to avoid this:
- Always use high-resolution images, especially when combining effects.
- If possible, resize images before importing them to Slides to maintain quality.
Issue 3: Borders Disappearing
If you’ve added a border but can’t see it, it might be due to a couple of reasons:
- The border color may be set to transparent.
- The border weight could be set to 0pt. Check the settings in the Format options!
Remember, troubleshooting is all about experimenting and checking each step to ensure everything is set correctly. Happy presenting!
Conclusion and Final Thoughts
Rounding images in Google Slides is a simple yet effective way to enhance the visual appeal of your presentations. By following the steps discussed, you can easily apply a circular mask to your images, creating a polished and professional look.
To recap:
- Access Google Slides: Open your presentation.
- Select the Image: Click on the image you wish to round.
- Use the Masking Tool: Choose 'Mask image' from the Format options and select the circular shape.
- Adjust the Size: Resize as necessary to fit your design.
You can further enhance your images by adding borders or adjusting shadows, which can lead to even more engaging presentations. Remember, visually appealing slides can make a significant difference in how your message is received by your audience.
Incorporating rounded images not only improves the aesthetics but also helps maintain consistency in your slide design, making your overall presentation look more cohesive. Get creative with the shapes and combinations to find what best conveys your message!
In conclusion, taking the time to round images in Google Slides can elevate your presentations, making them more memorable and professional. Happy presenting!
 admin
admin


