Have you ever looked at a presentation and thought, "This could use a little flair?" Rounding the corners of images in Google Slides is a simple yet effective way to enhance your visuals. It softens the overall look and can make your slides more cohesive and engaging. In just a few quick steps, you can transform ordinary images into polished elements that stand out. Let's dive into why rounding corners is a great idea!
Why Round Corners for Images?
Rounding the corners of images may seem like a minor detail, but it can significantly impact the aesthetics of your presentation. Here are a few reasons why you might want to consider this technique:
- Visual Appeal: Soft edges can make images feel more inviting and less harsh. This is especially important in design, where first impressions matter!
- Brand Consistency: If you’re using rounded corners in your branding, applying the same style to your images helps maintain a cohesive look across your slides. Think of brands like Apple, which often use rounded elements to create a sleek image.
- Focus Attention: Rounded corners can help guide the viewer’s eye to the focal point of the image. It subtly emphasizes the content without being distracting.
- Enhanced Readability: When images blend seamlessly with text or backgrounds, rounded corners create a smooth transition. This can make your slides easier to read and understand.
Let's not forget the emotional aspect! Rounded corners evoke a sense of friendliness and approachability. In a world where presentations can sometimes feel stiff, adding rounded images infuses a bit of personality and warmth.
Moreover, using rounded corners can help in creating a modern and professional look. It’s a design trend that’s been embraced widely, so incorporating it into your slides keeps your work fresh and relevant.
In summary, rounding corners isn't just about aesthetics; it enhances your message and can positively influence how your audience perceives your content. Now that we’ve covered why this technique is beneficial, let’s explore how to actually implement it in Google Slides!
Also Read This: Exploring the Poorest YouTuber and YouTube’s Least Financially Successful Creators
3. Step-by-Step Guide to Rounding Image Corners
Rounding the corners of your images in Google Slides is a simple yet effective way to enhance your presentation's visual appeal. Let’s dive into a step-by-step guide that will get your images looking sharp and stylish in no time!
- Open Your Google Slides Presentation: Start by launching Google Slides and opening the presentation where you want to round the corners of your images.
- Select the Image: Click on the image you wish to edit. If you haven't added the image yet, you can do so by navigating to Insert > Image, and choose your desired upload method.
- Access Image Options: Once your image is selected, look for the toolbar at the top. Click on the Format options button. It’s usually represented by a paint roller icon or can be found in the right-click context menu.
- Adjust Corner Radius: In the Format options pane, locate the Adjustments section. You will see a dropdown labeled Corner radius. Here, you can either drag the slider or enter a value to set how rounded you want the corners to be.
- Preview and Adjust: As you adjust the corner radius, keep an eye on your image. You might find yourself playing around with the slider until you achieve the perfect look. Don’t hesitate to go back and tweak it as you see fit!
- Final Touches: Once you’re satisfied with the rounded corners, click away from the image to see how it looks in the context of your slide. You can always return to the Format options if you’d like to make further adjustments.
And there you have it! Rounding corners is a straightforward process that can make a significant difference in the overall look of your slides. It’s a small detail, but trust me, it can elevate your presentation from good to great!
Also Read This: how to use telegram ai image generator
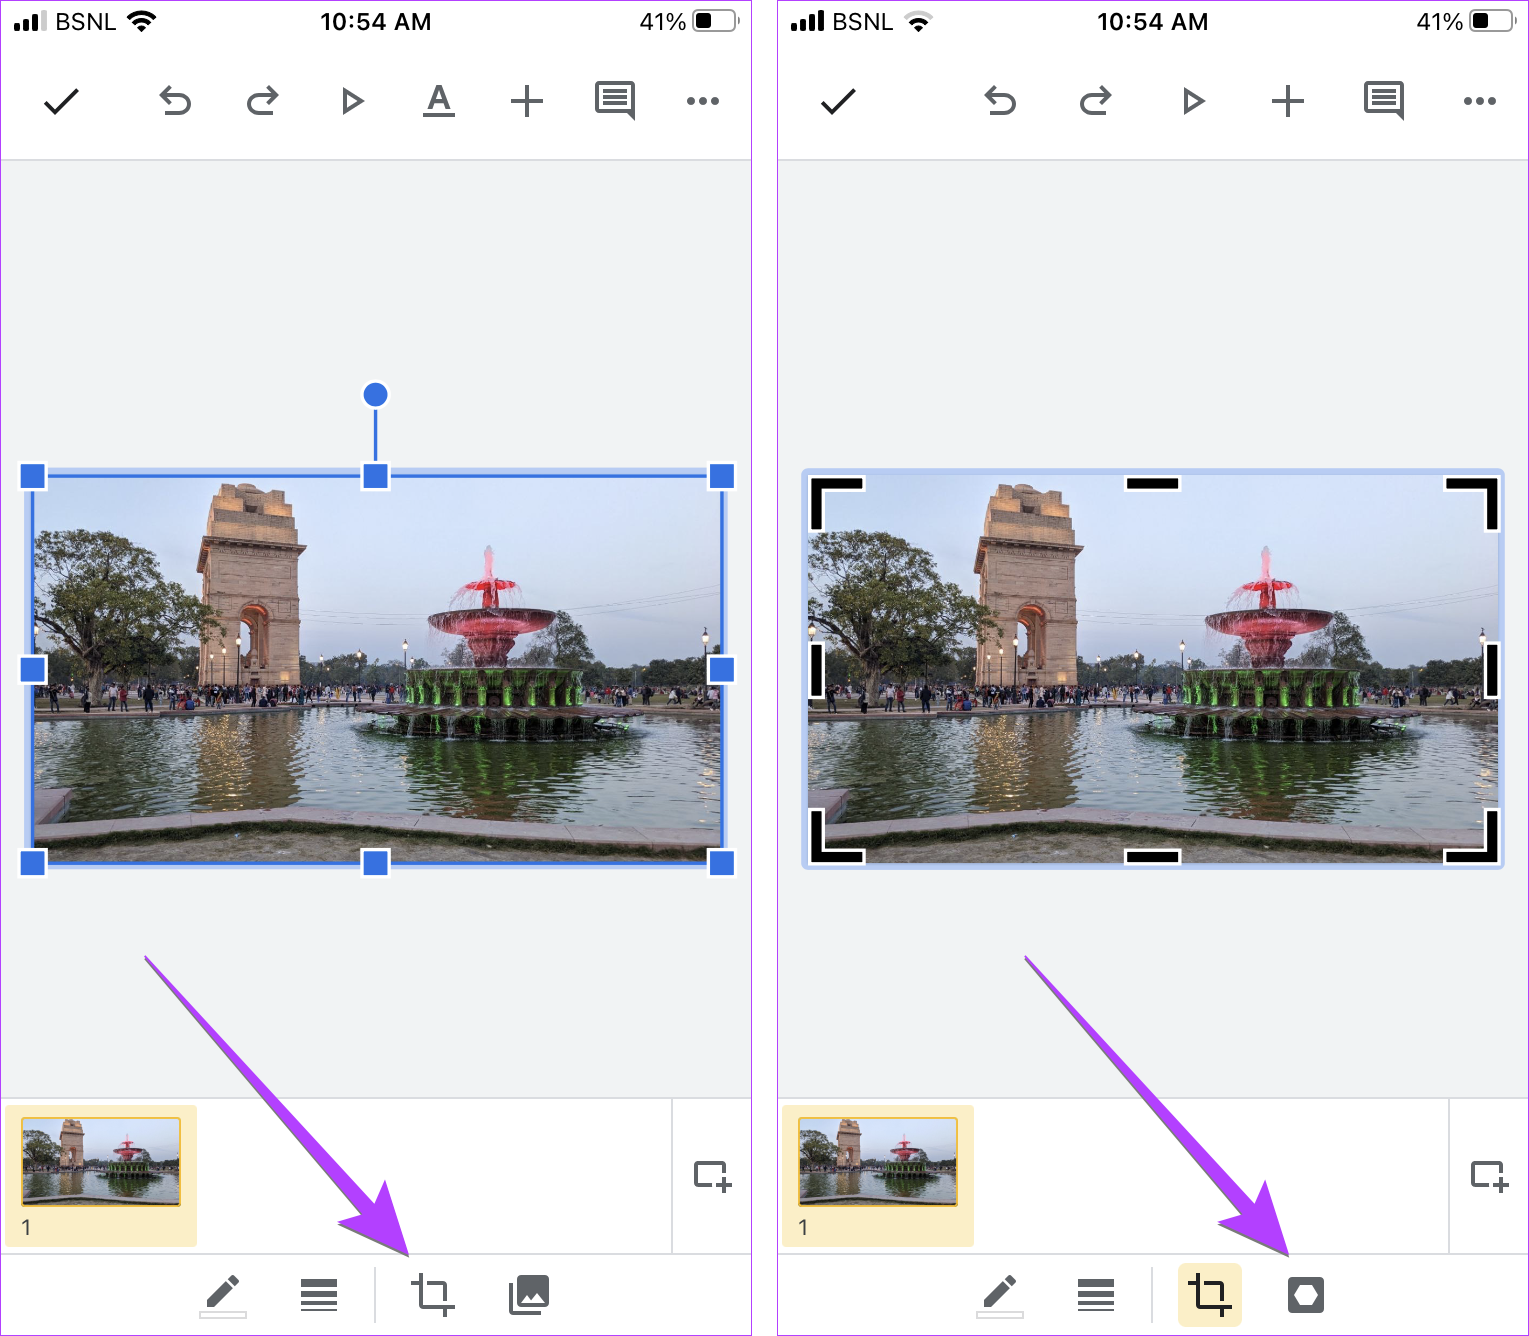
4. Using Shape Cropping to Achieve Rounded Corners
If you're looking for an alternative method to round image corners, using shape cropping is an excellent choice. This method allows for more flexibility and creativity in how you present your images. Here’s how to do it!
- Select Your Image: Start by selecting the image you want to modify. Remember, this can be any picture that fits your slide’s theme.
- Open the Crop Tool: Click on the Crop button in the toolbar. This will give you options for cropping your image in various shapes.
- Choose a Shape: Click on the small arrow next to the Crop icon. A dropdown will appear showing different shapes. Look for the Shapes category and select the Rounded Rectangle shape.
Here is a quick breakdown of how to apply the rounded rectangle shape:
| Action | Description |
|---|---|
| Draw the Shape | Click and drag to create the rounded rectangle over your image. Adjust the size as needed. |
| Adjust Corner Radius | You can modify the rounding of the corners by clicking and dragging the yellow handles that appear on the shape. |
| Finalize the Crop | Once satisfied, click outside the shape to apply the crop. Your image will now have beautifully rounded corners! |
Using shape cropping not only provides rounded corners but also allows you to explore other shapes like circles or stars! It’s a fun way to get creative with your visuals. So, go ahead and experiment with different shapes to see which best complements your content.
Also Read This: Read This Blog to Discover if Rumble Has Shorts
5. Adjusting Corner Radius for Perfect Results
Once you've applied rounded corners to your images in Google Slides, you might want to fine-tune the corner radius to get that perfect look. Adjusting the corner radius is a simple yet effective way to make your images look polished and visually appealing. Here’s how to do it:
Step 1: First, click on the image you want to adjust. This will bring up a toolbar at the top of your screen.
Step 2: In the toolbar, locate the Format options button. Clicking on this will open a sidebar on the right side of your screen.
Step 3: Within the Format options sidebar, look for the section labeled Crop. Here, you’ll find various cropping tools including the Mask image feature, which is what you’ll use to adjust your corner radius.
Step 4: After selecting Mask image, hover over the corner of your image until you see a small white circle appear. This is the corner radius control.
Step 5: Click and drag the white circle inward to increase the radius, making the corners more rounded. Alternatively, drag it outward to decrease the rounding. Take your time adjusting it until you find the radius that complements your design.
Don’t forget to preview your adjustments regularly! Click away from the image to see how it looks in the context of your slide. It’s amazing how a slight adjustment can vastly improve the overall aesthetic of your presentation.
If you need to apply the same corner radius to multiple images, simply copy the adjusted image and paste it elsewhere in your presentation. Google Slides will retain your corner adjustments, saving you time and effort!
Also Read This: Watching Copyrighted Videos on YouTube Rules and Tips You Should Follow
6. Common Issues and Troubleshooting Tips
Even with the straightforward tools available in Google Slides, you might run into a few hiccups while rounding the corners of your images. Here are some common issues and troubleshooting tips to help you navigate through them:
- Image Not Rounded: If your image doesn’t seem to have rounded corners after following the steps, double-check that you’ve applied the Mask image feature correctly. Sometimes, it’s easy to overlook a click or step.
- Corner Radius Doesn't Look Consistent: If you’re adjusting multiple images and the corner radius appears different, make sure you’re using the same measurement for all images. Consistency in design is key!
- Image Quality Loss: If your image looks pixelated, try starting with a higher resolution image. Low-quality images can appear worse after rounding corners. Always aim for clear, high-resolution visuals for the best effect.
- Format Options Missing: If you can’t find the Format options sidebar, it might be hidden. Look for a small arrow or just click on the image again to reactivate the toolbar. Sometimes, Google Slides needs a nudge!
- Shapes and Images Don’t Align: If your rounded images don’t align well within your slide, use the Arrange menu to align and distribute your images evenly. This will give your presentation a more professional look.
By keeping these tips in mind, you’ll be well-prepared to tackle any challenges that come up. Remember that practice makes perfect, and soon enough, rounding corners will become second nature! Happy presenting!
Also Read This: Creating YouTube Videos on Your Phone with Limited Storage Space
7. Examples of Effective Use of Rounded Images
Rounded images can transform the visual appeal of your Google Slides presentations. They don’t just look good; they can also help convey your message more effectively. Let’s dive into some specific scenarios where rounded images shine!
- Team Introductions: When presenting your team members, using rounded images can create a friendly and approachable vibe. For instance, consider a slide that showcases your team with round photos. This makes the layout feel cohesive and can even soften the overall look of the presentation.
- Product Showcases: If you’re highlighting products, using rounded images can draw attention without being too harsh. Imagine a slide featuring several products with rounded corners. The softer edges can enhance the visual flow and keep the audience’s focus on the products themselves.
- Testimonials and Quotes: Incorporating rounded images of customers alongside their testimonials can add a personal touch. This combination makes the feedback feel more relatable. For example, a slide displaying a glowing review with a rounded image of the customer can create a strong impression.
- Infographics: Rounded images can also enhance infographics. When presenting data, the use of rounded images can break up the content and help maintain audience engagement. Picture a slide filled with statistics that features rounded icons or images to represent different data points.
- Social Media Graphics: If your presentation includes social media highlights, rounded images can mimic the style of many social media platforms, which often feature rounded profile pictures. This continuity can resonate with your audience and make your content feel more relevant.
These examples illustrate the versatility of rounded images. They can simplify complex information, create visual continuity, and keep your audience engaged. So, the next time you're working on a presentation, consider how rounded images might elevate your slides!
8. Conclusion
Incorporating rounded corners into your images in Google Slides is a simple yet effective way to enhance your presentations. Not only do they add a modern touch, but they also improve the overall visual experience for your audience.
To recap, here’s what you’ve learned:
- How to round corners of images using the Crop tool.
- Benefits of using rounded images for a cleaner, more professional look.
- Examples of effective use in various contexts, from team introductions to product showcases.
Remember, the key is to maintain a balance between aesthetics and functionality. Rounded images work best when they complement your content rather than overshadow it. So, experiment with different images and placements, and see how they can transform your slides. Happy presenting!
 admin
admin


