You were equipped with data until October 2023.As a result, rounded corners aid in the creation of coherent designs. The presence of rounded images alongside other rounded elements creates a harmonious appearance. Such is important in branding or thematic presentations where there is need for visual consistency.Except for the fact that the edges of the
image are rounded, one is likely to be focused more on the main subject matter in such slides. The softness exhibited by these rounded edges make it easy for an observer to escape towards a portrait hanging at its center or any other point of interest. This method increases both understanding and memory retention concerning presented data.To conclude, the act of rounding
image corners in Google Slides serves not just to beautify them but also to grace it with a sophisticated appeal and an informal outlook altogether.
Steps to Round Corners of Images in Google Slides
It is incredibly easy to round the corners of pictures in Google Slides. Just do these:
- Open Google Slides: Start by launching Google Slides and opening the presentation where you want to add rounded images.
- Select Your Image: Click on the image you want to modify. If you haven't added an image yet, you can do so by selecting Insert from the top menu and then choosing Image.
- Access the Format Options: Once your image is selected, look for the toolbar at the top. Click on Format and then choose Format options from the dropdown menu.
- Find the Mask Image Option: In the format options sidebar that appears on the right, locate the Mask image option.
- Choose a Rounded Shape: Click on the drop-down menu next to Mask Image, and select the Rounded Rectangle shape.
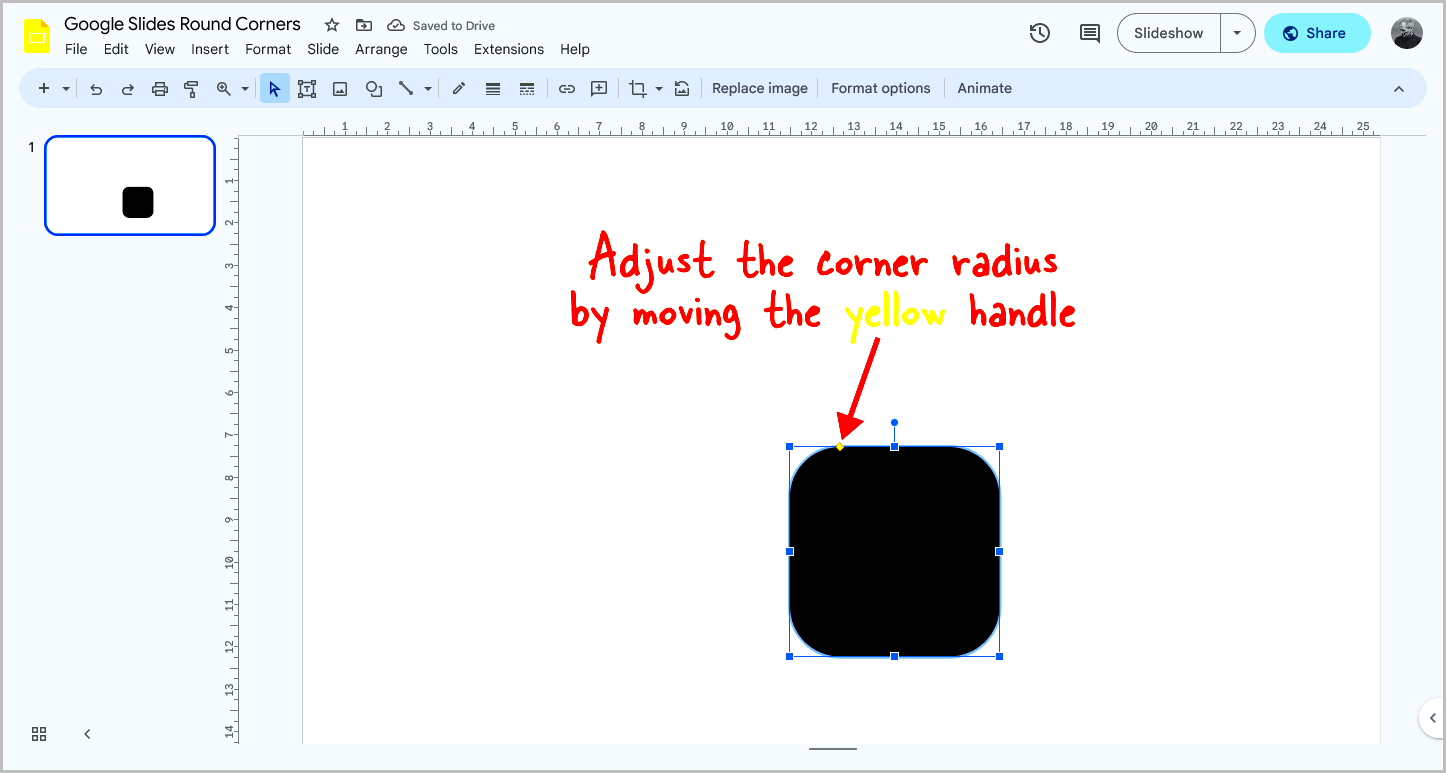
- Adjust the Roundness: You can customize the roundness of the corners by clicking and dragging the yellow dot on the image. This allows you to achieve the desired look.
- Finalize Your Changes: Once you're satisfied with the appearance, click outside the image to apply the changes. Your image should now have rounded corners!
Using Mask Image Tool for Rounded Corners
Google Slides have the Mask
Image tool which is the best method for rounding corner. To effectively use it, do the following:1.
Select Your Image: Start by clicking on the
image you want to round.2.
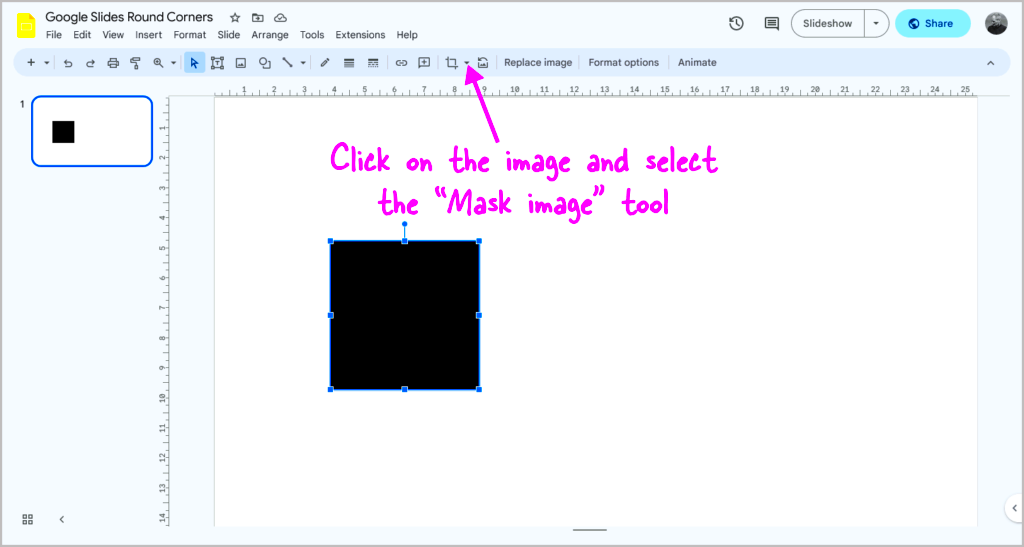
Access the Mask Tool: Navigate to the toolbar and click on the drop-down arrow next to the
Crop Image icon.3.
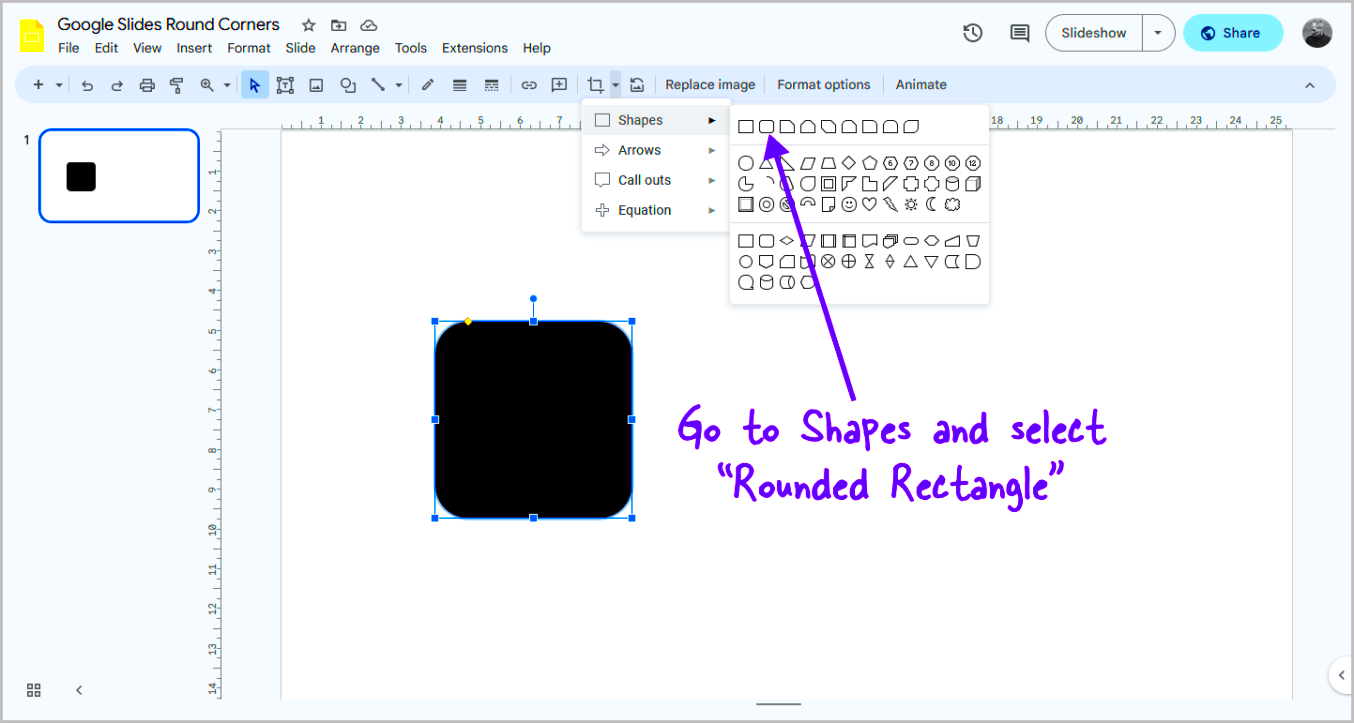
Choose Mask Shape: From the options, select
Shapes and then pick
Rounded Rectangle. Your
image will immediately take on a rounded shape.4.
Adjust the Shape: If needed, click on the yellow do
How to Customize the Roundness of Image Corners
By customizing the roundness of image corners in Google Slides, you can easily adjust your graphics to match the theme of your presentation. This is a simple way to make your photos even better than before. Here is how to go about it:
- Select the Image: First, click on the image you want to modify. This will activate the editing options.
- Open the Format Options: After selecting your image, go to the toolbar and click on Format, then select Format options from the dropdown.
- Find the Mask Image Tool: In the sidebar that appears, look for the Mask image option and click on it.
- Choose a Rounded Rectangle: From the mask options, select Rounded Rectangle. Your image will automatically be masked into this shape.
- Adjust Roundness: You’ll notice a yellow dot on the corners of the image. Click and drag this dot to adjust how rounded you want the corners to be. More drag results in softer corners.
- Preview Your Changes: Click outside the image to see the rounded effect in action. You can always go back and tweak the roundness if needed.
Here are the steps to make distinct and amazing images that will match your presentation design easily.
Tips for Enhancing Your Presentations with Rounded Images
To enhance your slides, you can benefit a lot from using rounded images. Here are some useful tips on how to use it well:
- Maintain Consistency: Use rounded corners for all your images to create a cohesive look throughout your slides. Consistency in style helps establish a professional appearance.
- Pair with Rounded Text Boxes: Combine rounded images with rounded text boxes to enhance visual flow. This helps create a harmonious design that feels balanced.
- Use Contrasting Backgrounds: Make your rounded images stand out by placing them against contrasting backgrounds. This draws the audience's eye and keeps them focused on your key points.
- Limit Image Clutter: Avoid overcrowding your slides with too many images. A few well-placed rounded images can make a stronger impact than a crowded slide.
- Test Different Sizes: Experiment with the size of your rounded images. Sometimes, larger images create a stronger visual impact, while smaller ones may work better for detailed layouts.
- Use High-Quality Images: Always opt for high-resolution images. Rounded corners will look best when applied to clear, sharp images that are relevant to your content.
Utilizing these suggestions may help to considerably improve your talk and get your material more captivating for the listeners.
Can You Round Corners on Other Shapes in Google Slides?
Sure thing! Google Slides enables users to round off corners of all shapes not limited to just images only. This enables one to be more creative when designing their presentations. Follow these steps:
- Create a Shape: Go to the toolbar and click on Insert, then select Shape. Choose any shape you like, such as a rectangle, oval, or star.
- Select the Shape: Click on the shape you just created to ensure it’s selected.
- Open Format Options: Again, navigate to the Format menu and choose Format options.
- Mask Image Tool: In the sidebar, look for the Corner radius section. You can enter a value or drag the slider to adjust how rounded the corners will be.
- Preview and Adjust: Click outside the shape to see the rounded corners. If needed, go back and tweak the roundness.
Rounding form edges improves its aesthetic as well as contests all over with one uniform style throughout the whole presentation. A seemingly minor change, but it could have huge impacts!
Frequently Asked Questions
In Google Slides, rounding the corners of images and shapes is a common thing for which people ask different questions and answers.
1. Can I round corners on any image?
Definitely, you will able to make the edges of every picture placed in Google Slides slightly curved. The method stays constant regardless of the image being a photograph, illustration or project.
2. Does rounding corners affect image quality?
This is the reason why rounding corners does not change the quality of the image in itself. In this light, always have a higher resolution image so that there can be clarity and sharpness.
3. Can I change the roundness after applying it?
Sure! You have the option of decreasing or increasing the smoothness of the corners at will. Just choose an image, go to mask tool, and change its corner radius accordingly.
4. Are there other shapes I can round?
In Google Slides can shape shapes with rounded corners, such as those that resemble rectangles or even ovals. Thus the uniformity of a presentation is achieved through this function.
5. How can rounded images enhance my presentation?
Images that have round edges contribute to enhancing the general beauty of slides, give them a contemporary touch and highlight important information. It gives an impression of being sophisticated and decent.
6. Is there a limit to how much I can round corners?
Nonetheless, the extent to which you can produce perfectly circular borders will depend on the size of your image in question. Consider playing around with various degrees of rounding until you discover what appears most pleasing.
7. Can I round corners on videos or other media?
As for now, only pictures and figures mainly benefit from the corner rounding feature. Google Slides is not programmed to enable round shaped corners for video material.
Conclusion
Rounding the corners of images in Google Slides is not only a simple design technique but also a powerful tool for enhancing the overall coherence and aesthetic appeal of your presentations. By employing rounded corners, you create a harmonious look that draws attention to the central subjects of your slides while maintaining visual consistency. This method not only beautifies your visuals but also fosters better understanding and retention of information among your audience.The straightforward steps for rounding image corners, coupled with effective tips for using rounded images, empower you to elevate your presentations significantly. Whether by creating a cohesive style, pairing rounded images with text boxes, or utilizing high-quality visuals, these techniques can transform your slides into a more engaging and polished experience. Additionally, the ability to round corners on various shapes adds further creative flexibility, allowing for uniformity across all design elements.Incorporating rounded images can give your presentations a modern and sophisticated touch, making them not only more visually appealing but also more effective in communicating your message.
 admin
admin


