Ever found yourself staring at a sideways photo, wondering how to make it right? You're not alone! Image rotation is a handy skill that can save you from the frustration of awkwardly positioned pictures. Whether you're working on a personal project or a professional presentation, knowing how to rotate images can help you achieve the perfect look. Let's dive into why this simple action is often necessary and how it can enhance your visual storytelling!
Why You Might Need to Rotate Images
There are several reasons why image rotation is essential, and understanding them can help you utilize this tool effectively. Here are a few common scenarios:
- Correcting Orientation: Sometimes, our cameras or smartphones don’t get the orientation right. You might take a vertical shot, only to find it saved horizontally. Rotating your image ensures it displays as intended.
- Improving Composition: A slight rotation can dramatically change the composition of your image. By tilting an image, you can create a dynamic perspective that enhances visual interest.
- Creating Consistency: If you're blending multiple images for a presentation or a blog post, consistent orientation is key. Rotating images ensures that they all align visually, making your project look polished and professional.
- Enhancing Aesthetic Appeal: Sometimes, a simple rotation can make your image more aesthetically pleasing. For instance, rotating a landscape photo to match an interesting line or horizon can draw the viewer’s eye better.
Additionally, rotating images is a fundamental skill for anyone who works with digital media. It’s a quick fix that can enhance the overall quality of your visuals. Whether you're a budding photographer, a graphic designer, or even just someone who enjoys sharing memories online, knowing how to rotate images effectively is a valuable tool in your arsenal.
By recognizing when to rotate an image and understanding its impact, you can elevate your visual content and ensure that your audience experiences your work exactly as you envision it!
Also Read This: How to Share YouTube Videos on Instagram Simply
3. Methods for Rotating Images
Rotating images can seem like a simple task, but there are various methods to achieve the perfect angle. Whether you’re working with photos for your blog, social media, or presentations, knowing how to rotate images can greatly enhance your visual content. Let’s dive into some effective methods!
1. Using Image Editing Software:
Programs like Adobe Photoshop or GIMP offer robust tools for image manipulation. Here’s how to rotate your image:
- Open your image in the software.
- Select the Rotate option from the menu.
- Choose your desired rotation angle (90°, 180°, or custom degrees).
- Save your image after applying the changes.
2. Built-in Photo Apps:
If you prefer something a bit simpler, most operating systems come with built-in photo editing apps:
- Windows: Open the image in the Photos app, click on the Edit Image icon, and find the rotate options.
- Mac: Use Preview. Open your image, go to the Tools menu, and select Rotate Left or Rotate Right.
3. Mobile Apps:
For on-the-go adjustments, mobile apps are a lifesaver. Many free apps allow you to rotate images quickly:
- Snapseed: A powerful photo editor that lets you easily rotate your photos.
- Instagram: If you’re posting directly, you can rotate images in the upload screen.
Each of these methods has its benefits, so choose the one that fits your needs best. Don't hesitate to experiment with different angles to add artistic flair to your images!
Also Read This: Editing Images in PDF Format Made Simple
4. Using Online Tools for Image Rotation
If you’re looking for convenience and efficiency, online tools can be a fantastic option for rotating images. These platforms usually require no software installation and allow you to rotate images in just a few clicks. Here are some popular online options:
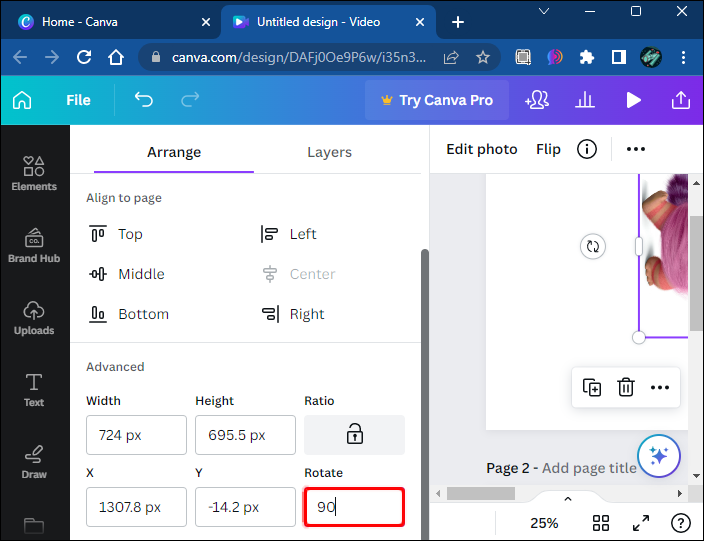
1. Canva: This versatile design tool is not just for creating graphics. You can easily rotate images by following these steps:
- Upload your image to Canva.
- Click on the image to select it.
- Use the rotate handle that appears to adjust the angle.
- Download your edited image.
2. Fotor: A user-friendly online editor that lets you rotate images instantly:
- Visit the Fotor website and upload your image.
- Look for the Rotate option in the editing menu.
- Select your desired rotation and download the final product.
3. Pixlr: Another great online editor that provides easy rotation features:
- Go to Pixlr’s website and load your image.
- Click on the Arrange tab and find the rotate options.
- Apply your changes and save the image to your device.
Online tools are particularly useful for quick edits or if you're using a public computer where you can’t install software. Plus, many of them are free and straightforward, making image rotation accessible to everyone!
Also Read This: how do you flatten an image in photoshop
5. Rotating Images in Image Editing Software
When it comes to rotating images, image editing software offers more flexibility and precision than basic tools. Let’s explore how you can easily rotate images using popular software like Adobe Photoshop, GIMP, and even some online editors.
Adobe Photoshop is a powerhouse for image manipulation. Here’s how to rotate an image:
- Open your image in Photoshop.
- Select the Edit menu.
- Choose Transform and then Rotate.
- You can also use the shortcut Ctrl + T (Windows) or Cmd + T (Mac) to transform the image.
By dragging the corners, you can rotate it to any angle you desire. If you need to rotate it by exact degrees, go to Image -> Image Rotation and select your preferred option.
GIMP is a free alternative that’s quite powerful. Here’s how to rotate an image:
- Open your image in GIMP.
- Go to the Image menu.
- Select Transform and then Arbitrary Rotation.
In the dialog that appears, you can enter the degree of rotation you want. Alternatively, clicking the Rotate Tool in the toolbox lets you rotate interactively.
If you’re looking for quick solutions without downloading software, online editors like Canva or Pixlr are fantastic:
- Upload your image.
- Access the rotation tool, often found under the image settings or effects.
- Adjust the slider or input degrees to rotate your image.
In any case, after you’ve rotated your image, remember to save it in your desired format. Whether it’s JPEG, PNG, or another, make sure you’re satisfied with the orientation before you hit save!
Also Read This: Cost Considerations: How Much Does Photobucket Cost?
6. How to Rotate Images in HTML and CSS
When working on web projects, you might need to rotate images directly within your HTML and CSS. This can be particularly useful for responsive designs or adding dynamic effects. Let’s dive into how you can achieve this with simple code snippets.
To rotate an image using CSS, you can use the transform property. Here’s a quick example:

Now, in your CSS file, you can write:
.rotate-image {
    transform: rotate(90deg); / Rotates the image 90 degrees /
    transition: transform 0.5s; / Adds smooth transition /
This snippet will rotate your image 90 degrees clockwise. You can adjust the degree value to any angle you want!
For interactive rotation, you can even use JavaScript to change the rotation based on user actions. Here’s a simple example:
This way, every time you click the button, your image will rotate by 90 degrees, creating a fun interactive experience!
Whether you’re using CSS for static rotations or JavaScript for dynamic effects, rotating images in HTML is straightforward and can greatly enhance your website’s aesthetics. So go ahead and give it a try!
Also Read This: How to Bypass YouTube Adblock Restrictions and Skip YouTube Ads
7. Best Practices for Image Rotation
When it comes to rotating images in your projects, whether it's a website, a presentation, or a digital portfolio, following best practices can make all the difference. Here are some tips to ensure your images look polished and professional:
- Maintain Aspect Ratio: Always keep the aspect ratio in mind while rotating. This prevents your images from becoming stretched or squished. Most photo editing tools allow you to lock the aspect ratio, making it easier to handle.
- Use High-Quality Images: Start with high-resolution images to ensure that rotating them doesn't degrade their quality. Low-resolution images can become pixelated, especially when modified.
- Choose the Right Format: Different image formats (JPEG, PNG, GIF) have varying qualities and features. For instance, PNG is great for images with transparency while JPEG is perfect for photographs. Choosing the appropriate format can enhance the final look after rotation.
- Preview Before Finalizing: Always preview your rotated images. This helps you catch any unexpected issues, such as misalignment or unwanted backgrounds, which could distract from the main content.
- Keep a Backup: Before making any rotation changes, save a copy of the original image. This way, if you don’t like the rotated version, you can easily revert back.
- Be Mindful of File Sizes: Rotating and saving images can sometimes increase file sizes. Optimize your images post-rotation to ensure your pages load quickly.
- Consistent Style: Maintain a consistent style across all your images. If you're rotating images for a cohesive look, be sure they all have a similar orientation, color scheme, and editing style.
By adhering to these best practices, you can ensure that your image rotations enhance rather than detract from your overall project. A well-rotated image can draw attention and create a more engaging visual experience for your audience.
8. Conclusion and Additional Resources
In conclusion, rotating images can significantly enhance the visual appeal of your content, whether it's for digital marketing, presentations, or personal projects. With the right tools and techniques, you can easily manipulate images to fit your creative vision. Remember, practice makes perfect! The more you play around with image rotation, the more skilled you’ll become.
Here are some additional resources to help you further explore image rotation:
- Adobe Creative Cloud Photography - A comprehensive suite for all your photo editing needs, including advanced rotation tools.
- Canva - An easy-to-use platform that offers simple image rotation features along with design options.
- GIMP - A free and open-source image editor that provides robust rotation and manipulation options.
- Pixlr - An online photo editor with quick rotation features, perfect for those working on the go.
Lastly, don’t hesitate to experiment with different angles and orientations. You might discover unique perspectives that can breathe new life into your images. Happy rotating!
 admin
admin


