Rotating images in OneNote is a simple yet effective way to improve the layout and overall look of your notes. Whether you’re working on a school project, business meeting notes, or personal journals, having properly aligned images can make a huge difference in how your information is presented. Sometimes, the default orientation of an image doesn't quite fit, or it may need to be adjusted to align better with the surrounding text or diagrams.
By rotating images, you can achieve a more polished and organized layout, helping your notes look cleaner and more professional. It’s an easy task to do, and once you know the steps, it becomes second nature. Let’s dive into why rotating images in OneNote is so useful and how it can help you create better-looking documents.
Why Rotating Images is Useful in OneNote

Rotating images in OneNote isn't just about changing the orientation for the sake of it; it's about optimizing your workspace and making your notes more visually appealing. Here’s why rotating images can be so useful:
- Improved Alignment: Sometimes, images don’t align well with the text or other elements. Rotating an image helps it fit neatly within your page, making everything look organized.
- Better Layouts: When working with multiple images, rotating them can help create a more cohesive and structured layout. It allows you to customize the design of your page for a more professional appearance.
- Better Use of Space: Rotating an image might allow you to use the space on the page more efficiently, especially if you're working with a limited area or trying to fit everything into a grid.
- Enhanced Visual Appeal: Rotating an image at the right angle can make it look more engaging, helping to draw attention to key details or sections of your notes.
These are just a few reasons why learning how to rotate images in OneNote can help streamline your workflow and create more visually attractive pages.
Also Read This: Blast from the Past: How to View Old Photobucket Images
Steps to Rotate an Image in OneNote

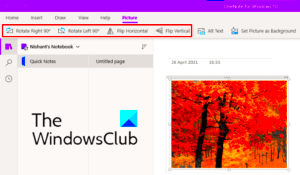
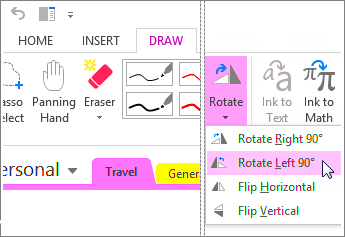
Rotating an image in OneNote is straightforward. Follow these simple steps to easily rotate images and achieve the layout you’re looking for:
- Open Your OneNote Notebook – Start by opening your notebook and going to the page where the image is located.
- Select the Image – Click on the image you want to rotate. Once selected, it will show a small box around the image.
- Locate the Rotation Handle – At the top of the image, you'll notice a circular handle. This is the rotation handle, which allows you to rotate the image to any angle.
- Drag the Rotation Handle – Click and drag the rotation handle clockwise or counterclockwise. As you drag, the image will rotate around its center.
- Fine-Tune the Angle – If you need a specific angle, keep dragging until you reach your desired position. OneNote doesn’t provide angle guides, so it might take a few tries to get it exactly where you want it.
- Release and Adjust – Once you’re satisfied with the rotation, release the mouse button. You can further adjust the image’s position by dragging it to the preferred spot on the page.
It’s that simple! With just a few steps, you can rotate any image in OneNote and start building better layouts for your notes.
Also Read This: Can I Use My iStock Photos on Facebook?
Using the Rotation Handle in OneNote

The rotation handle in OneNote is a simple but powerful tool for adjusting the orientation of images. When you insert an image into a note, the rotation handle appears as a small circular icon at the top center of the image. This handle allows you to manually rotate your
Here’s how you can make the most of the rotation handle in OneNote:
- Easy Manual Rotation: Just click and hold the rotation handle, then drag it left or right. The image will rotate in real-time, allowing you to see the changes immediately.
- Full 360-Degree Control: Unlike some other tools, OneNote gives you a full 360-degree rotation range. You can turn your image in any direction, offering flexibility to suit your layout needs.
- Customizing for Perfect Fit: Use the rotation handle to position your image at the perfect angle, ensuring it aligns with your text or other images without distortion.
While the rotation handle is great for general use, be mindful of over-rotating. It’s always a good idea to keep your images at visually appealing angles to maintain the overall readability and professionalism of your notes. With practice, using the rotation handle becomes second nature and allows you to fine-tune the layout of your OneNote pages.
Also Read This: Upload Photos to 123RF and Start Earning
Aligning and Resizing Images After Rotation
Once you’ve rotated an image in OneNote, you may need to adjust its alignment or size to ensure it fits well with the surrounding content. This is important because rotating an image can change its proportions and make it look out of place. Fortunately, OneNote gives you the tools to easily align and resize images after rotation, so everything stays neat and organized.
Here’s how to align and resize your rotated images:
- Resizing the Image: After rotating the image, click on it to show the resize handles on the corners and sides. Drag these handles to resize the image proportionally or stretch it to fit a specific area.
- Aligning the Image: To align the image within your page, simply drag it into position. You can use the gridlines or snap-to features in OneNote to help you align the image with other content, like text or shapes.
- Use Alignment Guides: OneNote offers alignment guides that automatically appear as you move the image. These guides help ensure that the image is positioned exactly where you want it relative to the page layout or other elements.
- Adjusting Aspect Ratio: If the image appears stretched or compressed after rotating, you can hold the Shift key while resizing to maintain its aspect ratio, ensuring the image doesn't become distorted.
With these simple steps, you can ensure that your rotated images fit perfectly within your OneNote pages, creating a clean and professional layout.
Also Read This: Creating a YouTube Channel for Young Creators Under 13
Tips for Better Image Layouts in OneNote
When working with images in OneNote, creating a polished layout can be challenging, especially if you're dealing with multiple images or trying to fit them within a limited space. However, with a few helpful tips, you can make your images look more organized, balanced, and professional. Here are some practical suggestions for improving your image layouts in OneNote:
- Use Grids and Alignment Tools: OneNote provides gridlines and alignment tools that can help you position your images precisely. Make sure to turn on the grid to help align everything properly.
- Balance Text and Images: Ensure there’s enough space around your images and text so neither one feels overcrowded. Images should complement the text, not overwhelm it.
- Keep Consistency in Mind: If you're using multiple images, try to keep their size and orientation consistent. This creates a more cohesive and aesthetically pleasing layout.
- Group Images Together: If you’re working with several images, consider grouping them together to maintain a clean look. OneNote allows you to group objects, so they stay together when you move them around.
- Use Image Borders: Adding a subtle border around images can help them stand out and prevent them from blending too much with the background. This is especially helpful if your notes have lots of text and shapes.
- Experiment with Angles: Don’t be afraid to experiment with different rotation angles. Sometimes, a slight tilt can make an image more visually appealing and help it fit better in your layout.
By following these tips, you can create visually appealing and well-organized notes in OneNote, with images that enhance the overall design rather than disrupt it. With a little practice, you’ll be able to master image layout techniques in no time!
Also Read This: How to Add Motion Templates in Adobe Stock
Common Issues and Troubleshooting Tips
While rotating images in OneNote is generally a simple process, users may occasionally run into a few common issues. These problems can make image rotation more frustrating, but don't worry—most of them have easy solutions. Whether it's a minor glitch or an alignment problem, here are some common issues and how to resolve them:
- Image Not Rotating Properly: If the image doesn’t rotate as expected, it might be due to a software glitch. Try closing and reopening OneNote or restarting your computer to reset the program. Sometimes, simply selecting the image again and moving the rotation handle can fix the issue.
- Image Gets Stretched or Distorted: If your image looks stretched after rotating, it might be because of the resizing options. To maintain the aspect ratio while resizing, hold down the Shift key as you drag the resize handles to prevent distortion.
- Images Out of Alignment After Rotation: After rotating an image, it may not align with the surrounding content. Use the gridlines or alignment guides in OneNote to snap your image into place. You can also manually adjust the positioning by dragging the image to the correct spot.
- Rotation Handle Not Visible: If the rotation handle isn’t showing up, make sure the image is selected. Sometimes, the handle may be hidden behind other content. Click on the image and try again. If this doesn’t work, try resizing the image first, which can sometimes trigger the rotation handle to appear.
- Unable to Rotate Image Beyond a Certain Point: Some users may notice that they can't rotate the image past a certain angle. If this happens, check to see if the image is locked or if OneNote is experiencing any lag. Restarting the app can often resolve this issue.
If you're still facing issues after trying these solutions, consider checking for updates for OneNote or reinstalling the program to ensure you have the latest version. Keeping the software updated can help avoid bugs and improve functionality.
Also Read This: Burning CDs from YouTube Audio for Personal Use
Conclusion on Rotating Images in OneNote
Rotating images in OneNote is a simple, yet powerful way to enhance the layout and presentation of your notes. Whether you’re adjusting an image to better fit the page or aligning it with your text, rotating images can help you create cleaner and more organized documents. The rotation handle offers full control over how images are oriented, and with the ability to resize and align images after rotation, OneNote gives you the flexibility to create the perfect layout for your needs.
By following the steps and tips outlined in this guide, you can easily incorporate rotated images into your notes, improving both functionality and visual appeal. With just a bit of practice, you'll become proficient in rotating and aligning images, making your OneNote experience even more efficient and enjoyable. So go ahead, experiment with rotating images, and take your notes to the next level!
FAQ
Q: Can I rotate images in OneNote on both Windows and Mac?
A: Yes, you can rotate images in OneNote on both Windows and Mac versions. The process is very similar on both platforms, with a rotation handle allowing you to manually rotate images to any angle.
Q: Why can’t I rotate an image in OneNote?
A: If you’re unable to rotate an image, it could be due to a software glitch or a locked image. Ensure that the image is selected and check for any restrictions or settings that may be preventing rotation. Restarting OneNote or the computer often resolves such issues.
Q: Can I rotate an image to a specific angle in OneNote?
A: OneNote doesn’t offer a feature for setting an exact angle for image rotation. However, you can manually rotate the image by dragging the rotation handle and estimating the angle. For more precise control, you may need to use another image-editing tool before inserting the image into OneNote.
Q: How do I resize an image after rotating it?
A: After rotating an image, you can resize it by clicking on the image to show the resize handles. Drag the handles to adjust the image’s size. If you want to maintain the aspect ratio while resizing, hold down the Shift key.
Q: How do I align an image after rotating it?
A: You can align your rotated image by dragging it to the desired location on the page. OneNote offers alignment guides to help you position the image relative to other content. You can also use the gridlines for more precise alignment.

 admin
admin


