Rotating images in Google Docs is a simple yet powerful way to improve the layout and appearance of your documents. Whether you're working on a report, project, or personal document, rotating images can help align them better with your text, create a more dynamic look, or simply fix an image that was uploaded in the wrong orientation.
In this guide, we'll walk you through how to rotate images in Google Docs, explaining the basic steps and useful tips for making your documents visually appealing. It's a straightforward process, and once you know how to do it, you'll be able to adjust any image with ease!
Why You Might Need to Rotate Images in Google Docs

Rotating images in Google Docs is not just about making things look good—sometimes it’s necessary for functionality. Here are a few reasons why you might need to rotate images:
- Correcting Orientation – If you've uploaded an image from your phone or camera, it may appear upside down or sideways. Rotating it helps fix this problem.
- Improving Document Layout – Sometimes, rotating an image can make it fit better with the surrounding text, improving the overall design of your document.
- Creating Visual Interest – If you want to add a unique touch to your document, rotating images at different angles can make your content stand out more.
- Making Space for Text – Rotating images can also help when you're trying to free up space in a tight layout, allowing text to flow around the image more easily.
Rotating images can be useful for both aesthetic and functional purposes, making your document look polished and professional. Whether you need to straighten an image or create a more creative layout, Google Docs makes it simple.
How to Insert an Image in Google Docs

Before you can rotate an image, you first need to insert it into your Google Docs document. Luckily, adding an image is easy and only takes a few steps. Here's how you can do it:
- Step 1: Open your Google Docs document.
- Step 2: Place the cursor where you want the image to appear.
- Step 3: Go to the top menu and click on Insert.
- Step 4: In the dropdown menu, select Image.
- Step 5: You will have several options to upload an image:
- Upload from computer: Select an image saved on your device.
- Search the web: Use Google’s image search to find a picture online.
- Drive: Choose an image saved in your Google Drive.
- Photos: Insert an image from your Google Photos.
- Step 6: After selecting an image, click on Insert, and the image will appear in your document.
Once the image is inserted, you're ready to move on to rotating it. The next steps will show you how to easily rotate the image once it’s in your document.
Step-by-Step Guide to Rotating an Image
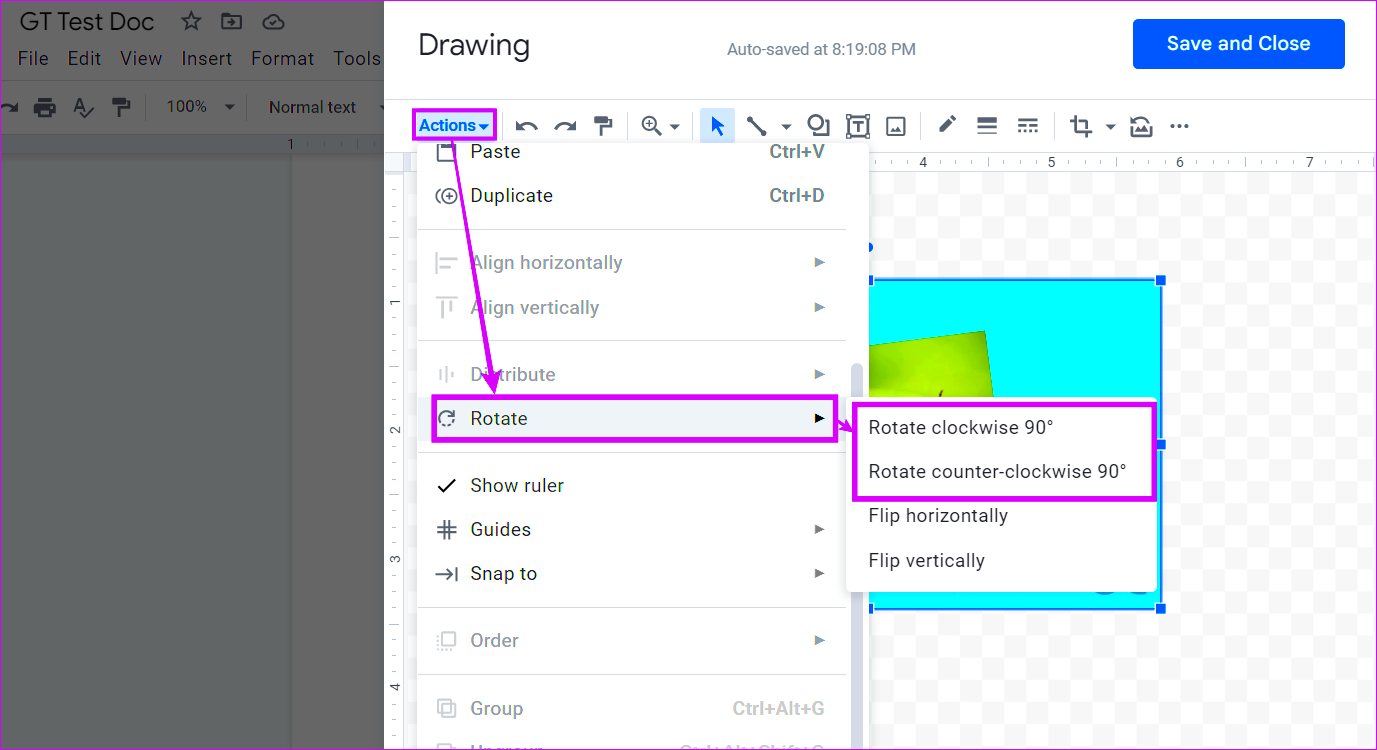
Rotating an image in Google Docs is quick and easy. Whether you need to adjust the orientation of an image or make it fit better into your document, Google Docs provides simple tools for the job. Here's a step-by-step guide to rotating an image once it's inserted into your document:
- Step 1: Click on the image you want to rotate. Once selected, you'll see a blue border around the image with a small circle above it.
- Step 2: Hover your mouse over the circular handle at the top of the image. The cursor will change to a circular arrow, indicating that you can rotate the image.
- Step 3: Click and hold the circular handle, then drag your mouse left or right to rotate the image. You can rotate the image to any angle, either clockwise or counterclockwise, based on your preference.
- Step 4: Release the mouse button when the image is at the desired angle.
It's that simple! You can also make small adjustments by repeating these steps or dragging the handle more precisely. The rotation tool is intuitive, making it perfect for users of all experience levels.
Using the Image Toolbar for Rotation
In addition to manually rotating an image with the circular handle, Google Docs also provides another way to rotate images using the image toolbar. This method is ideal for those who prefer precise control over the angle of rotation. Here's how you can use the image toolbar for rotation:
- Step 1: After clicking on the image, a toolbar will appear at the top of your screen with different options for managing the image.
- Step 2: Look for the "Image options" button on the toolbar and click it. A sidebar will appear on the right side of your document.
- Step 3: In the sidebar, find the "Rotation" section. Here, you can either rotate the image by a specific angle or choose a preset option.
- Step 4: You can enter the exact angle in the box next to "Rotate" for a precise rotation, or use the arrows to adjust the angle incrementally.
- Step 5: Once you're happy with the rotation, click "Close" to exit the image options toolbar.
This method gives you more control, especially if you need to rotate the image by a specific number of degrees. It's perfect for users who want their images to be rotated precisely to fit the layout of their document.
Adjusting Image Position After Rotation
Once you’ve rotated your image, you might find that its positioning in the document needs some adjustment. Don't worry—Google Docs makes it easy to move and align images exactly how you want them. Here’s how you can adjust the position of a rotated image:
- Step 1: Click on the rotated image. You'll see a set of options appear around the image, including the ability to drag the image to a new position.
- Step 2: To move the image, simply click and hold anywhere on the image and drag it to the desired location within the document.
- Step 3: For more precise control, use the alignment options available in the toolbar. You can align the image to the left, center, or right of the page, or adjust its positioning relative to the surrounding text.
- Step 4: You can also adjust how the text wraps around the image. Right-click on the image, select "Image options," and under the "Text Wrapping" section, choose from options like "Inline," "Wrap text," or "Break text" to control how the image interacts with the text in your document.
- Step 5: Finally, if you need to adjust the size of the image after rotating it, use the blue handles on the corners to resize the image proportionally or drag from the sides to stretch or compress it.
By adjusting the position and text wrapping of the image, you can ensure that the rotated image fits seamlessly into your document and enhances its overall layout. These simple adjustments give you full control over your document's appearance and formatting.
Common Issues When Rotating Images in Google Docs
While rotating images in Google Docs is typically a straightforward process, sometimes you may run into a few issues that can be frustrating. These issues are usually easy to solve once you understand the possible causes. Here are some common problems users face when rotating images in Google Docs:
- Image not rotating properly: If the image isn't rotating smoothly or as expected, it might be due to the image’s format. Some images, especially those embedded from external sources, may not respond well to rotation commands. Try downloading the image and re-uploading it into Google Docs to see if that helps.
- Image gets distorted after rotating: After rotating, some images might appear stretched or compressed. This can happen if you resize the image after rotating it, causing it to lose its proportions. To prevent this, resize the image before rotating or ensure you maintain the aspect ratio by holding the Shift key while resizing.
- Image overlaps text: Sometimes, a rotated image may overlap with text in a document. This is typically because the image’s wrapping settings aren't correct. You can fix this by adjusting the text wrapping settings (Inline, Wrap text, Break text) to ensure the image doesn’t interfere with the surrounding text.
- Rotation tool not showing up: If the rotation handle or image toolbar isn’t appearing when you click on the image, it could be a browser-related issue or a glitch in Google Docs. Refreshing the page or clearing your browser cache usually fixes this issue.
- Image misaligned after rotation: Sometimes, after rotating an image, it may shift unexpectedly. This can happen due to default alignment settings. To fix this, simply re-align the image using the toolbar’s alignment options (left, center, right) or adjust the image’s position manually.
By understanding these common issues, you’ll be better prepared to troubleshoot and continue working with your images without interruption.
Conclusion
Rotating images in Google Docs is a simple but useful skill that can enhance your documents’ appearance and layout. Whether you're fixing the orientation of an image, aligning it with your text, or adding a creative touch to your content, Google Docs provides easy-to-use tools for all your image rotation needs. By following the steps outlined in this guide, you can confidently rotate images to suit your document’s design. Remember, if you encounter any issues, troubleshooting is usually quick and straightforward. With these tips, you'll be able to seamlessly incorporate rotated images into your Google Docs and create well-organized, professional-looking documents.
Frequently Asked Questions
Here are some answers to common questions about rotating images in Google Docs:
- Can I rotate images by a specific degree in Google Docs? Yes, you can rotate an image by a specific degree using the image toolbar. Just click on the image, open the “Image options” sidebar, and enter the desired rotation angle in the “Rotation” section.
- How do I fix an image that rotates incorrectly in Google Docs? If an image doesn’t rotate correctly, try downloading and re-uploading the image. Sometimes, browser-related issues or image format problems can cause this. Alternatively, try using the "Image options" toolbar for more precise rotation controls.
- Why isn’t the rotation handle showing up? The rotation handle may not show if the image is not selected or if there is a browser issue. Refreshing the page or clearing your browser cache usually resolves this problem. Make sure the image is clicked on before attempting to rotate.
- How can I make the text wrap around the rotated image? After rotating the image, right-click on it and choose “Image options.” In the “Text wrapping” section, select either "Wrap text" or "Break text" to ensure the text flows correctly around the image.
- Can I rotate images using keyboard shortcuts? Unfortunately, Google Docs does not support rotating images via keyboard shortcuts at this time. You will need to use the mouse or the image toolbar to rotate images.
If you have other questions or encounter specific issues while rotating images in Google Docs, feel free to explore more tutorials or reach out for support!


