Have you ever taken a stunning photo, only to realize it’s not quite right? Maybe it’s tilted or turned at an odd angle. No worries! Rotating images in Lightroom is a breeze. This powerful tool not only allows you to adjust your images but also ensures they look their best. Whether you’re a seasoned photographer or just getting started, mastering image rotation can elevate your work. Let’s dive into how you can easily rotate your images and enhance your photography game!
Step-by-Step Guide to Rotating Images
Now that we’ve set the stage, let’s get into the nitty-gritty of rotating images in Lightroom. Follow these steps to achieve the perfect orientation:
- Open Your Image: Launch Lightroom and navigate to the Library module. Select the photo you want to rotate by clicking on it. You’ll see a preview in the main window.
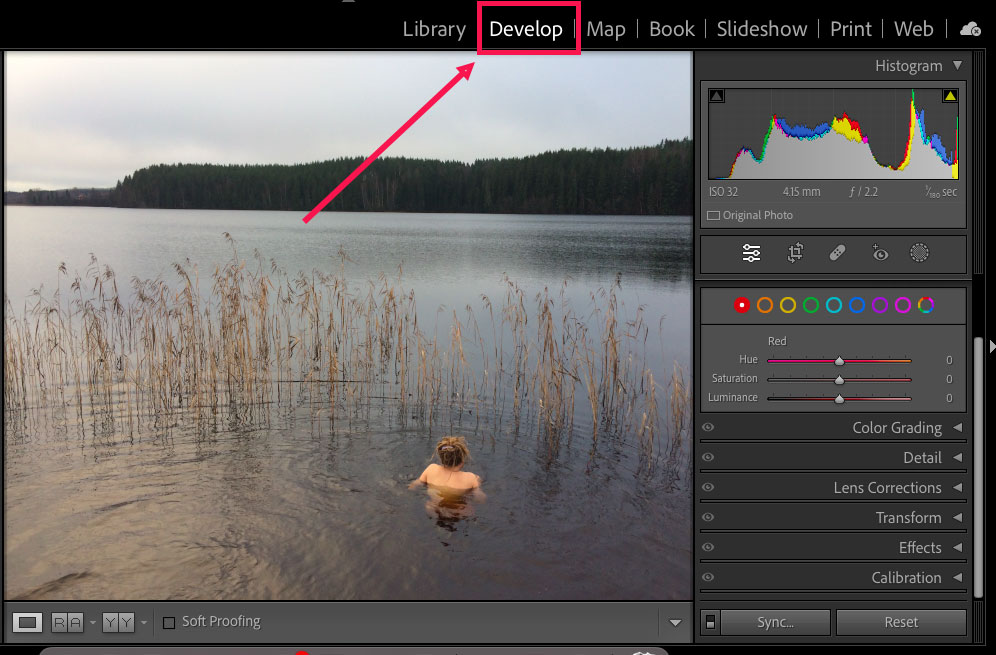
- Enter the Develop Module: Click on the “Develop” module in the upper right corner. This is where all the magic happens! The Develop module provides various editing tools, including rotation options.
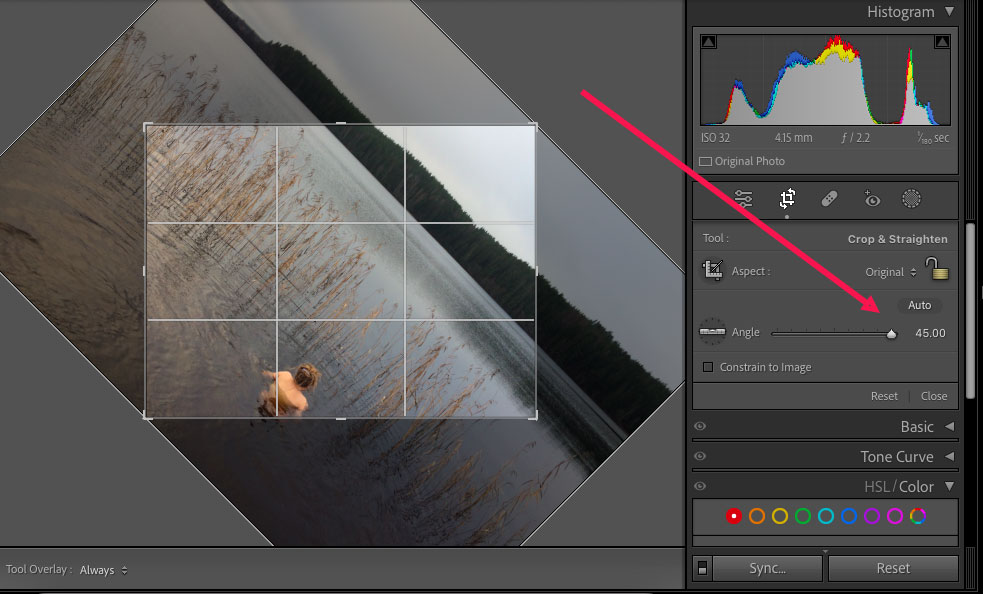
- Find the Crop Tool: On the right panel, look for the Crop Overlay tool (it looks like two intersecting right angles). Click on it to enable cropping and rotation functionalities.
- Rotate Your Image:
- Using the Slider: At the top of the Crop panel, you’ll see a rotation slider. Drag it left or right to adjust the angle of your image. A little rotation goes a long way!
- Keyboard Shortcuts: For quick adjustments, you can also use keyboard shortcuts. Press Ctrl + [ to rotate left and Ctrl + ] to rotate right. (On Mac, use Command instead of Ctrl!)
- Check Your Aspect Ratio: As you rotate, pay attention to the aspect ratio. If you want to maintain the original proportions, ensure the “Lock” icon is activated in the Crop panel. This will keep your image from stretching or squishing.
- Fine-Tune Your Composition: After rotating, you may want to adjust the crop to improve your composition. Drag the corners of the crop box to frame your image perfectly. Remember, less can be more!
- Apply Changes: Once you’re satisfied with the rotation and cropping, click the “Done” button in the Crop Overlay panel. Your changes will be saved automatically, but it’s always a good idea to double-check your edits.
- Export Your Rotated Image: Finally, if you plan to share your photo or print it, head over to the Library module, select your image, and click “Export.” Choose your desired settings, and voila! Your beautifully rotated image is ready for the world!
And there you have it! Rotating images in Lightroom is straightforward and quick. With just a few clicks, you can turn a tilted snapshot into a masterpiece. Happy editing!
Also Read This: Understand How to Earn Money by Uploading Photos to Shutterstock
3. Using Keyboard Shortcuts for Faster Rotation
When it comes to editing images in Lightroom, efficiency is key. One of the best ways to speed up your workflow is by mastering keyboard shortcuts. Rotating an image is no exception! Using keyboard shortcuts not only saves time but also keeps your hands on the keyboard, allowing for a smoother editing experience.
Here are the essential keyboard shortcuts for rotating images in Lightroom:
- Rotate Left: Press Ctrl + [ (Windows) or Cmd + [ (Mac) to rotate your image counterclockwise.
- Rotate Right: Press Ctrl + ] (Windows) or Cmd + ] (Mac) to rotate your image clockwise.
These shortcuts are incredibly handy, especially when you’re working with multiple images. Imagine you’re editing a series of landscape photos, and some of them need a quick adjustment. Instead of navigating through menus, you can simply tap your shortcuts to rotate each image seamlessly. This allows you to focus more on the creative aspects of your work rather than getting bogged down by the technicalities.
Additionally, if you find yourself rotating images frequently, consider customizing your keyboard shortcuts. Lightroom offers a range of options to tailor the shortcuts to your preferences, making your editing process even more intuitive.
In conclusion, mastering the keyboard shortcuts for image rotation can significantly enhance your editing efficiency in Lightroom. Whether you’re a beginner or a seasoned professional, these tips will help you streamline your workflow and get the most out of your editing sessions!
Also Read This: How to Display an Image in Python: A Beginner’s Guide to Image Processing
4. Common Mistakes to Avoid When Rotating Images

Rotating images in Lightroom may seem straightforward, but there are several common pitfalls that can trip up even the most experienced editors. Here are some mistakes to watch out for and tips to ensure your images are perfectly aligned.
- Not Checking Your Orientation: One of the most common mistakes is failing to check the orientation of your image before rotating. It’s easy to mistakenly rotate an image too far, leading to awkward angles that may not be appealing. Always double-check if the image is truly upside down or just slightly tilted.
- Ignoring the Crop Tool: After rotating, don’t forget about the crop tool! Rotating an image can leave empty spaces at the corners, which might detract from the composition. Use the crop tool to adjust and fill your frame properly.
- Over-Rotating: It's tempting to rotate until the horizon looks straight, but over-rotating can make the photo look unnatural. If you’re working with landscapes, consider using the grid overlay feature in Lightroom to ensure your horizon is straight without going overboard.
- Skimping on Review: After making adjustments, take a moment to review your edits. Zoom in and out to see how the rotation affects the overall image quality. Sometimes, what looks good at a smaller scale may not hold up when viewed closely.
By keeping these common mistakes in mind, you’ll be better equipped to achieve stunning results with your image rotations. Remember, editing is as much about finesse as it is about technique. Taking an extra moment to ensure your work is polished can make a world of difference!
Also Read This: Understanding YouTube Video Length Limits
5. Tips for Maintaining Image Quality After Rotation
When you rotate an image in Lightroom, it’s essential to keep the image quality intact. Here are some handy tips to help you achieve that:
- Use Lossless Formats: Whenever possible, work with lossless file formats like TIFF or RAW. These formats save all the detail in your image, which is crucial for maintaining quality after rotation.
- Avoid Excessive Cropping: If you rotate an image and find you need to crop it, be mindful of how much you’re cutting away. Excessive cropping can lead to a loss of detail, so try to keep the original framing in mind.
- Check Resolution Settings: Before exporting your rotated image, check the resolution settings. For prints, aim for 300 DPI, while 72 DPI works well for web use. This helps ensure your image looks sharp wherever it's displayed.
- Apply Edits Non-Destructively: Make edits in Lightroom’s Develop module rather than applying them directly to the image file. This way, you can always revert back to the original if needed, preserving the highest quality possible.
- Export with Care: When exporting your final image, choose the right format and quality settings. For web use, JPEG at high quality is often sufficient, but for prints, consider exporting as TIFF to maintain the best quality.
By following these tips, you can confidently rotate your images while ensuring they retain their pristine quality. Remember, preserving image quality is all about making smart choices during the editing and exporting processes!
6. Conclusion and Additional Resources
Rotating images in Lightroom is a straightforward process, but understanding the nuances can take your editing skills to the next level. Whether you're correcting the orientation of a landscape shot or getting that perfect angle for a portrait, knowing how to rotate effectively is key.
As we wrap up this guide, here are a few additional resources you might find useful:
- Adobe Lightroom Learning Center: Dive deeper into all the features of Lightroom with Adobe's comprehensive tutorials and guides. It's a treasure trove of information for both beginners and advanced users.
- YouTube Tutorials: Check out channels like PHLEARN and Piximperfect for visual learners. They offer fantastic step-by-step video guides that cover everything from basics to advanced editing techniques.
- Books: Consider picking up a book like “Adobe Lightroom Classic: The Missing Manual”. It’s packed with tips, tricks, and techniques to help you master Lightroom.
Remember, practice makes perfect. So, don’t hesitate to experiment with rotating your images and applying the tips we've discussed. Happy editing!
 admin
admin


