Lightroom Classic is a versatile tool that lets photographers make precise edits to their images. One of the essential features it offers is image rotation, which can help fix crooked horizons or align your subject better. A well-rotated image can improve its balance and draw the viewer's attention to the key elements. But understanding how to rotate your
Image rotation in Lightroom Classic can be used for simple adjustments or more advanced edits, such as correcting distortions. This process ensures your photo has the right orientation and is visually appealing. Let’s dive into the basics and some handy techniques.
Steps to Rotate an Image in Lightroom Classic

Rotating an image in Lightroom Classic is straightforward and can be done using a few different methods. Follow these steps to get started:
- Import Your Image: Begin by importing your image into Lightroom Classic. Navigate to the Library module and select your desired photo.
- Open the Develop Module: Click on the Develop tab to access editing tools.
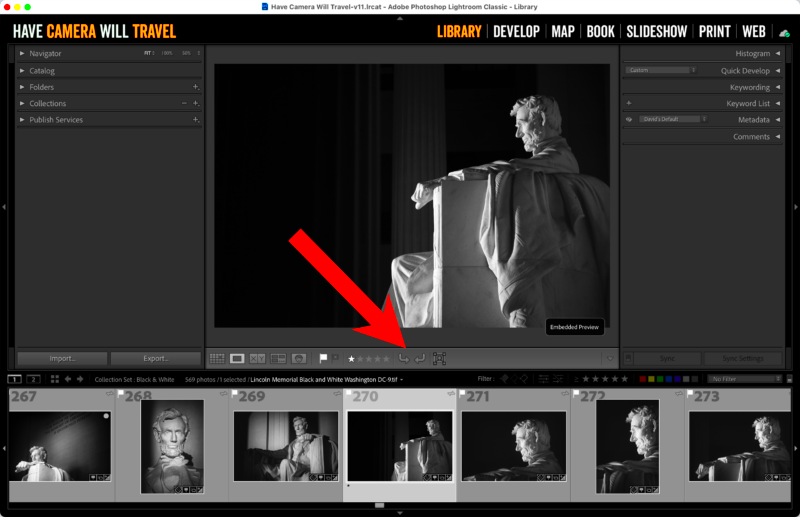
- Use Rotate Options: Locate the rotation buttons in the toolbar or use the shortcut keys:
- Ctrl/Cmd + [ to rotate counterclockwise.
- Ctrl/Cmd + ] to rotate clockwise.
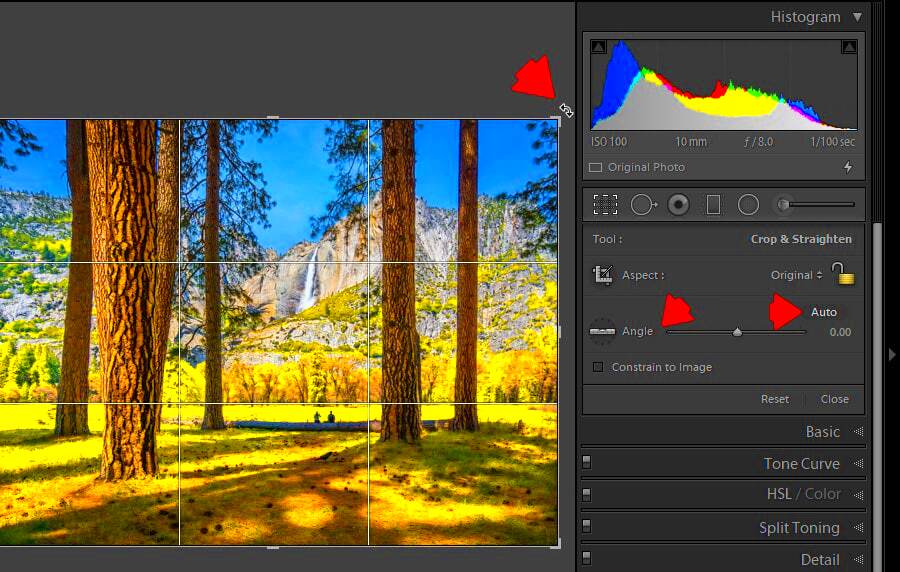
- Fine-Tune Rotation: Drag the angle slider under the Crop Overlay tool to make subtle adjustments.
By following these steps, you can quickly align your photo as needed.
Also Read This: Creating Beautiful Paper Flowers on Dailymotion
Using the Crop Tool for Precise Adjustments
The Crop Tool in Lightroom Classic is more than just a tool for cropping. It also helps in making precise rotation adjustments. Here's how you can use it:
- Select the Crop Tool: Click on the Crop Overlay icon or press R to activate the tool.
- Enable the Grid: Use the grid overlay to align the horizon or other straight lines in your image.
- Adjust the Angle: Drag the rotation handle outside the crop box or use the Angle slider for precise control.
- Confirm Your Changes: Press Enter to apply the rotation and crop adjustments.
This tool is perfect for aligning elements and ensuring your image composition is spot on.
With these techniques, your photos will always look balanced and professional.
Also Read This: Extracting Audio from YouTube Videos for Personal Use
How to Use the Rotate Options in the Toolbar
Lightroom Classic makes rotating images effortless, thanks to the dedicated rotate options in its toolbar. These features are ideal for quick fixes when you need to adjust your photo’s orientation without diving into more advanced tools.
Here’s how to use the toolbar rotate options:
- Locate the Rotate Buttons: The rotate icons are in the bottom left corner of the toolbar in the Develop module.
- Clockwise and Counterclockwise Options: Use the “Rotate Left” and “Rotate Right” buttons to adjust the orientation by 90 degrees in either direction.
- Keyboard Shortcuts: Save time by using Ctrl/Cmd + [ to rotate left and Ctrl/Cmd + ] to rotate right.
These options are perfect for quick adjustments, such as flipping a portrait or landscape photo that imported incorrectly. When combined with the Crop tool, you can fine-tune your rotations further.
Also Read This: How to Download Photos Licensed from Adobe Stock
Correcting Image Perspective Through Rotation
Rotating an image isn’t just about fixing crooked lines; it can also help correct perspective distortions. Lightroom Classic includes tools to refine perspectives, ensuring that vertical and horizontal lines appear natural.
Steps to correct perspective through rotation:
- Activate the Transform Panel: In the Develop module, scroll down to the Transform section.
- Use the Upright Tool: Click on “Auto” or manually adjust the sliders for vertical and horizontal corrections.
- Combine with Rotation: Use the angle slider or the Crop tool to further adjust the image’s tilt and alignment.
- Fine-Tune with Guides: Enable the grid overlay to ensure straight lines are properly aligned.
This method is especially useful for architecture or landscape photos where maintaining symmetry is critical.
Also Read This: Incorporating Adobe Stock Images in Photoshop
Tips for Rotating Images to Improve Composition
Rotation can significantly enhance an image’s composition, making it more visually appealing. Here are some practical tips to achieve the best results:
- Align the Horizon: A crooked horizon can distract viewers. Use the Crop tool’s grid overlay to ensure it’s perfectly straight.
- Use the Rule of Thirds: Rotate and crop your image so that key elements align with the rule of thirds grid lines.
- Focus on Leading Lines: Rotate your image to emphasize natural leading lines that guide the viewer’s eye through the photo.
- Experiment with Angles: Don’t hesitate to try unconventional rotations to create a dynamic composition.
- Keep the Subject Centered: In portraits, rotating to keep the subject well-framed can make the image more engaging.
By following these tips, you can turn a simple photo into a captivating piece of art with proper rotation and alignment.
Also Read This: Displaying Side-by-Side Images for Easy Comparison
Frequently Asked Questions About Rotating Images in Lightroom
Rotating images in Lightroom Classic is a straightforward process, but users often have questions about specific features or scenarios. Below are some common questions and answers to help you understand this tool better:
- Can I rotate multiple images at once?
Yes, you can rotate multiple images simultaneously. Select all the images in the Library module, right-click, and choose Rotate Left or Rotate Right from the menu.
- Is it possible to rotate by a specific angle?
Absolutely. Use the Crop Overlay tool in the Develop module and adjust the Angle slider to rotate your image by a precise degree.
- What happens to the image quality after rotation?
Lightroom Classic is non-destructive, meaning your original file remains untouched. Rotation and other edits are applied virtually, ensuring image quality stays intact.
- Can I undo a rotation?
Yes, you can undo any rotation by pressing Ctrl/Cmd + Z or resetting the image adjustments in the Develop module.
- What’s the difference between rotating and flipping?
Rotating changes the image’s angle, while flipping creates a mirror image either horizontally or vertically. Both options are available in the toolbar.
These answers should clear up any confusion and help you make the most of Lightroom’s rotation tools.
Conclusion on Rotating Images for Better Composition
Rotating images in Lightroom Classic is a powerful way to enhance your photo composition, correct perspectives, and align elements. By mastering tools like the Crop Overlay, Transform Panel, and toolbar options, you can create visually striking images with precision and ease.

 admin
admin


