Rotating an image in Lightroom can be a game changer for your photography. Whether you’ve accidentally tilted a stunning landscape shot or want to fine-tune the orientation of a portrait, using Lightroom’s rotation tools is simple and effective. Not only does it enhance the composition of your images, but it also helps ensure that your final output reflects your creative vision. In this guide, we'll explore how to easily rotate images and make your photos stand out. Let’s dive in!
Accessing the Develop Module
To rotate an image in Lightroom, you first need to access the Develop Module. This is where all the magic happens! Here’s how to get there:
- Open Lightroom: Launch the application on your computer.
- Import Your Photos: If you haven’t already, import your photos by clicking on the Import button in the Library Module. Select the images you want to edit and click Import again.
- Navigate to the Library Module: You’ll start in the Library Module, which is where you organize and manage your images.
- Select Your Image: Click on the thumbnail of the photo you wish to rotate. This brings it into the focus for editing.
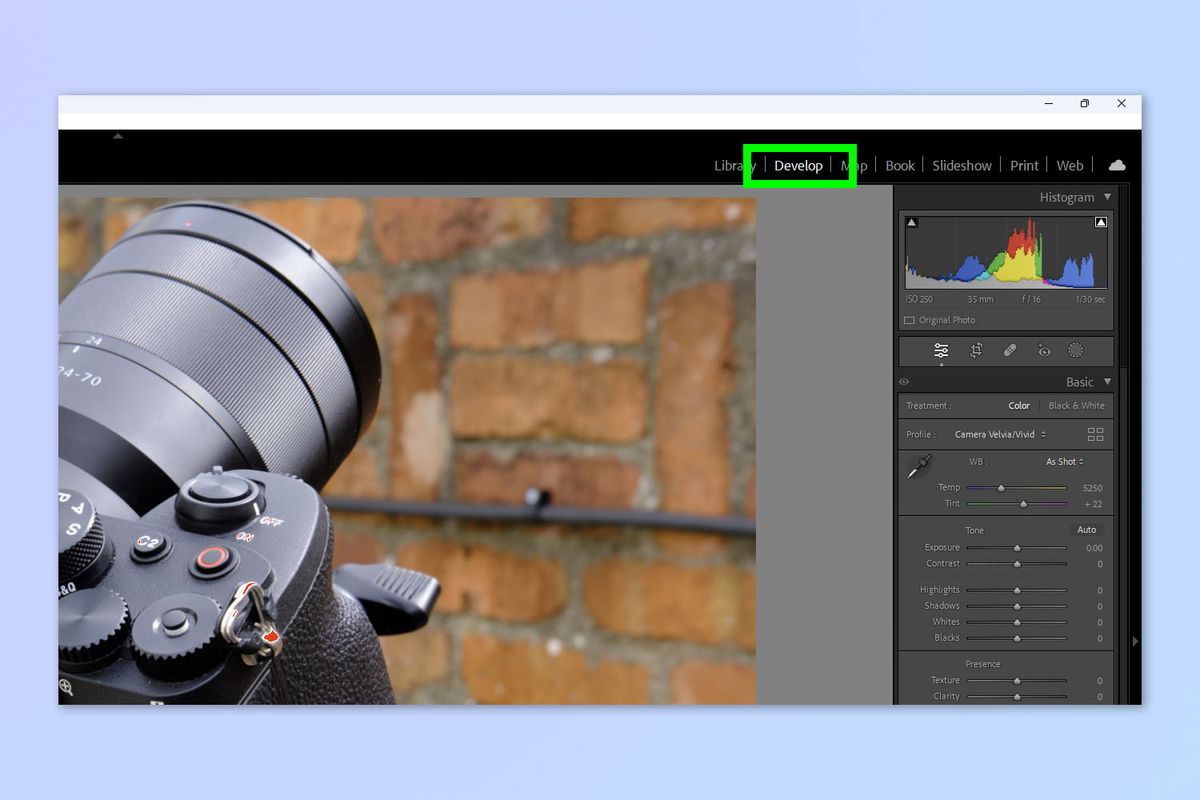
- Enter the Develop Module: You can switch to the Develop Module by clicking on the Develop tab located at the top right of the screen, or simply press D on your keyboard.
Once you’re in the Develop Module, you’ll see a variety of editing tools on the right side of the screen. This is where you’ll find the rotation options to adjust your image’s orientation effortlessly!
Also Read This: Understanding the What the Hell Cat YouTube Channel
Using the Crop Tool for Rotation
One of the most straightforward ways to rotate an image in Lightroom is by utilizing the Crop Tool. This tool is not only excellent for cropping your photos but also offers a handy rotation feature. Here’s how to do it:
- Select the Image: Start by choosing the image you want to rotate in the Library or Develop module.
- Activate the Crop Tool: You can access the Crop Tool by clicking the crop icon in the right panel or pressing the R key on your keyboard.
- Rotate the Image: Move your cursor just outside the corner of the cropping box until you see a curved double arrow. Click and drag to rotate the image to your desired angle.
- Fine-Tune Your Rotation: For precise adjustments, you can also use the angle slider in the right panel. This allows for smoother and more controlled rotations.
- Apply and Exit: Once you’re satisfied with the rotation, press Enter or click the “Done” button to apply the changes and exit the Crop Tool.
This method is particularly useful for images that might have minor tilts or need a quick adjustment. The Crop Tool not only allows for rotation but also gives you an opportunity to crop out any distractions around the edges, making your image even more visually appealing.
Also Read This: How to Mirror Images Easily
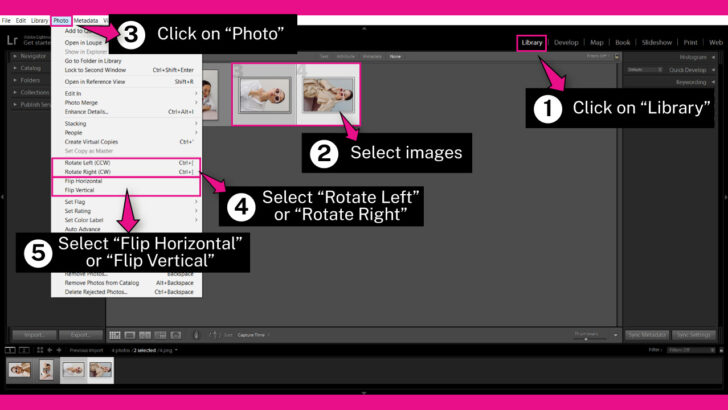
Rotating Images Using Keyboard Shortcuts

If you’re looking for a quicker way to rotate your images in Lightroom, keyboard shortcuts are a fantastic option! They can significantly speed up your workflow, especially when editing multiple images. Here’s a guide to the essential keyboard shortcuts for rotation:
| Rotation Action | Keyboard Shortcut |
|---|---|
| Rotate Left | Cmd/ Ctrl + [ |
| Rotate Right | Cmd/ Ctrl + ] |
| Flip Horizontal | Cmd/ Ctrl + Shift + H |
| Flip Vertical | Cmd/ Ctrl + Shift + V |
To use these shortcuts, simply select the image you want to rotate and then press the corresponding keys. For example, to rotate an image to the left, just hold down the Cmd key (or Ctrl on Windows) and press the [ key. It’s as simple as that!
Leveraging these shortcuts can make your editing process more efficient, allowing you to focus on the creative aspects of your photography instead of getting bogged down by repetitive tasks.
Curl error: OpenSSL SSL_connect: SSL_ERROR_SYSCALL in connection to chatgpt4online.org:443 Curl error: OpenSSL SSL_connect: SSL_ERROR_SYSCALL in connection to chatgpt4online.org:443
Also Read This: Citing Images in PowerPoint: Easy Tips
5. Saving and Exporting the Rotated Image
Once you've rotated your image in Lightroom, the next step is to save and export it. This process allows you to preserve your edits and share your masterpiece with the world. Let's break it down!
To save your rotated image, follow these simple steps:
- Click on the File menu at the top left corner.
- Select Export from the dropdown.
Now, you’ll be greeted with the Export dialog box where you can choose how to save your image:
- File Format: Choose between JPEG, TIFF, or PSD. JPEG is great for online sharing, while TIFF preserves more detail for printing.
- Quality: For JPEGs, you can adjust the quality slider. A setting between 80-90 is a sweet spot for most uses.
- Resize to Fit: If you plan to share online, consider resizing your image. You can choose specific dimensions or a percentage of the original size.
Once you’ve set your preferences, simply choose the destination folder and hit Export. Voila! Your rotated image is now saved and ready to be showcased.
6. Common Issues and Tips for Image Rotation
Rotating an image in Lightroom is usually a straightforward task, but you may encounter a few hiccups along the way. Don’t worry; we’ve got some common issues and handy tips to help you out!How to Rotate an Image in Lightroom
Rotating an image in Adobe Lightroom is a straightforward process that allows you to adjust your photos to achieve the desired composition. Whether you want to straighten a tilted horizon or change the orientation of a portrait photo, Lightroom provides several tools to help you rotate images effectively.
Here’s a step-by-step guide to rotating an image in Lightroom:
- Import Your Image: Begin by launching Lightroom and importing the image you wish to rotate. Click on the “Import” button at the bottom left corner.
- Select the Image: Once imported, navigate to the Library module and click on your image to select it.
- Enter Develop Mode: Click on the “Develop” tab at the top right of the window to enter the editing mode.
- Use the Crop Overlay Tool: Press the “R” key or click on the Crop Overlay tool in the right panel. This tool allows you to rotate and crop simultaneously.
- Rotate the Image: To rotate your image, move your mouse outside the corners of the crop box until you see a curved double-arrow icon. Click and drag to rotate the image to your desired angle.
- Finalize Your Edits: After rotating, you can adjust the crop to fit your preferences. Click “Done” to save the changes.
In addition to the manual rotation, you can also use the following options:
- Keyboard Shortcuts: Use Ctrl + ] (Windows) or Cmd + ] (Mac) to rotate clockwise and Ctrl + [ (Windows) or Cmd + [ (Mac) to rotate counterclockwise.
- Auto Rotate: Lightroom can also automatically straighten images by clicking on the “Auto” option in the Crop Overlay tool.
By following these steps, you'll be able to rotate images quickly and efficiently in Lightroom, enhancing your editing workflow and achieving the perfect composition.
Conclusion: Rotating images in Lightroom is a simple yet essential skill for any photographer, allowing for precise adjustments that can significantly improve the overall aesthetic of your photos.
 admin
admin


