Rotating a video on YouTube is a straightforward yet often overlooked task. Whether you’ve filmed a video in portrait mode or simply want to adjust the orientation for a better viewing experience, YouTube offers tools to help you with this. This guide will walk you through the process, ensuring your content looks its best for your audience.
Understanding Video Rotation on YouTube
Video rotation is essential for maintaining the visual integrity of your content. Here’s what you need to know:
- Why Rotate? Videos can be filmed in various orientations, such as landscape or portrait. If your video looks awkward or is difficult to view, rotation can enhance the viewer's experience.
- How It Works: YouTube provides an editing tool that allows creators to rotate their videos post-upload. This means you don't have to re-upload or edit the original file outside of the platform.
- Effects of Rotation: Rotating a video can change its aspect ratio, potentially affecting how it appears on different devices. It’s crucial to preview the changes before finalizing.
Here’s a quick rundown of the rotation degrees you can apply:
| Rotation Angle | Description |
|---|---|
| 90° | Rotates the video to the right, turning portrait videos into landscape. |
| 180° | Flips the video upside down, useful for certain filming angles. |
| 270° | Rotates the video to the left, another option for correcting orientation. |
Understanding these basics lays the groundwork for effectively rotating your videos on YouTube, making your content more appealing and easier to watch.
Also Read This: Adding YouTube Songs to Spotify Step-by-Step Instructions
3. Step-by-Step Guide to Rotate Your Video
Rotating a video on YouTube can seem a bit daunting at first, but it's actually quite straightforward! Follow these simple steps to get your video oriented just the way you want it:
- Log into Your YouTube Account: Start by signing into your YouTube account. If you don’t have one, you’ll need to create it before proceeding.
- Access YouTube Studio: Click on your profile icon at the top right corner of the YouTube homepage and select "YouTube Studio" from the dropdown menu.
- Select Videos: In the left sidebar, click on “Content” to see all your uploaded videos. Choose the video you want to rotate.
- Open Video Details: Click on the video title or thumbnail to open the video details page.
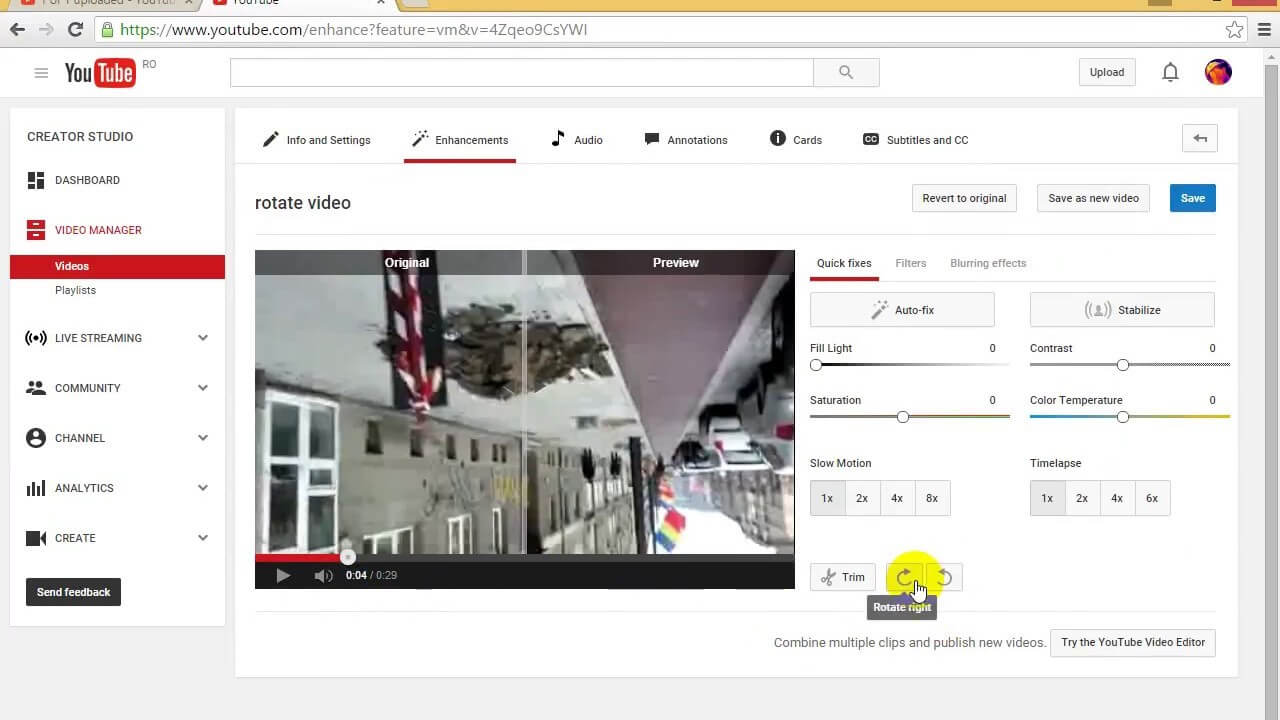
- Click on the Editor: In the left menu, find and click on “Editor.” This will bring up the video editing options available for your selected video.
- Rotate Your Video: Look for the rotation options in the editor. You can usually find a rotate button that allows you to turn the video 90 degrees. Click it until your video is in the desired orientation.
- Preview Changes: Once you’ve rotated your video, take a moment to preview it. Ensure it looks the way you want it to.
- Save Changes: After confirming the rotation is correct, don’t forget to save your changes! Click the “Save” button at the top right corner.
And there you go! Your video is now rotated and ready for viewers to enjoy.
Also Read This: Do YouTubers Get Paid If You Skip Ads? How YouTube Ad Revenue Works
4. Using YouTube Studio for Video Editing
YouTube Studio is a powerful tool that not only lets you manage your channel but also provides various editing features to enhance your videos. Here’s how you can make the most of YouTube Studio for video editing:
- Easy Access: YouTube Studio is easily accessible from your YouTube account. Just click on your profile icon and select "YouTube Studio."
- Comprehensive Dashboard: The dashboard gives you a snapshot of your channel’s performance, including views, subscribers, and recent uploads, making it easy to keep track of your content.
- In-depth Analytics: Dive deeper into video performance with YouTube Analytics. You can track watch time, audience demographics, and engagement metrics to see what’s working and what’s not.
- Enhanced Editing Features: Beyond rotation, YouTube Studio offers features like trimming, adding music, and blurring faces or backgrounds, which can be very useful for content creators.
- Custom Thumbnails: You can also upload custom thumbnails to make your videos more appealing and clickable. Make sure your thumbnails are eye-catching!
- End Screens and Cards: Use these tools to promote other videos, playlists, or even external links, encouraging viewers to engage more with your content.
Utilizing YouTube Studio effectively can elevate your video editing game and enhance your channel’s overall appeal!
Also Read This: How to Find Porn on YouTube: Navigating Restricted Content Safely
Common Issues and Troubleshooting
When it comes to rotating a video on YouTube, you might encounter a few bumps along the road. But don’t worry; most issues are easy to resolve! Here’s a rundown of common problems and their solutions:
- Video Not Rotating: Sometimes, after you’ve made adjustments, the video doesn’t seem to rotate. This could be due to a poor internet connection. Try refreshing the page or checking your connection.
- Audio Issues: If you notice that the audio doesn’t sync with the video after rotation, it could be a glitch. Consider re-uploading the video or using a video editing software to sync the audio before uploading.
- Quality Loss: Rotating a video might slightly affect its quality. To maintain quality, always upload the highest resolution version you have. A video editing app can help in preserving quality.
- Browser Compatibility: Sometimes, the rotation feature may not work well on all browsers. If you’re facing issues, try switching to a different browser like Chrome or Firefox.
If you continue experiencing difficulties, checking YouTube’s help center or contacting support can provide you with additional guidance. Remember, troubleshooting is often just a matter of patience and a little tinkering!
Conclusion
Rotating a video on YouTube is a handy skill that can greatly enhance your content's presentation. Whether you’re correcting an orientation mistake or adding a creative twist, the process is straightforward if you follow the steps outlined above.
To recap:
- Access the YouTube Studio and select your video.
- Use the Video Editor to rotate your video as needed.
- Always preview your edits to ensure everything looks just right.
In the world of video content, ensuring your videos are visually appealing is crucial. So, don’t shy away from experimenting with rotation and other editing features. With a little practice, you’ll be a pro at enhancing your videos in no time. Happy editing!
 admin
admin


