Resizing images is an essential part of digital image editing, especially when you want to make them fit specific requirements for websites, presentations, or social media. GMP (Graphic Manipulation Program) provides a versatile platform to help users resize images easily while maintaining their quality. Whether you're working with large images that need to be scaled down or small images that need to be enlarged, GMP offers the tools to do so without losing much detail. This guide will walk you through the basics of resizing images in GMP and highlight some key tips to ensure your images look just right.
Understanding Image Resizing in GMP
When you resize an image, you're either reducing or increasing its dimensions (width and height). GMP offers different resizing methods, including scaling and cropping. It’s crucial to understand how resizing works to ensure your image doesn’t lose its visual appeal or clarity. Here are some terms and concepts that can help:
- Resolution: The number of pixels in an image. Resizing an image with a low resolution may make it blurry or pixelated.
- Aspect Ratio: The ratio of the width to the height of an image. Keeping the aspect ratio intact while resizing helps avoid distortion.
- Image Quality: Resizing an image too much can result in loss of sharpness or detail.
GMP provides various tools to resize images while taking these factors into account, ensuring that your image retains its integrity no matter the new size.
Also Read This: Posting Images on Adobe Stock
Steps to Resize Images on GMP
Resizing images in GMP is straightforward. Follow these steps to resize an image without hassle:
- Open GMP and Load Your Image: Start by opening the program and loading the image you want to resize.
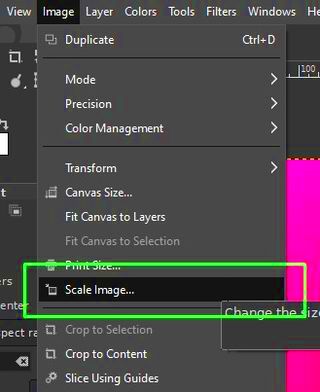
- Navigate to the Resize Option: Look for the resize tool in the menu. It is often located under the "Image" tab or a similar section.
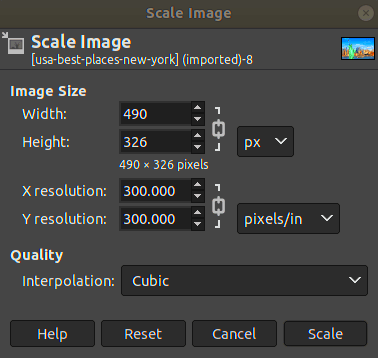
- Set the New Dimensions: You can resize by either specifying the exact pixel dimensions or by adjusting the percentage scale. Ensure the "Constrain Proportions" option is checked to maintain the aspect ratio.
- Preview the Changes: Before finalizing the resize, preview the image to make sure it looks good. If necessary, adjust the dimensions slightly to get the best results.
- Apply the Resize: Once you're satisfied with the new size, click "OK" or "Apply" to finalize the resizing process.
- Save the Image: Don’t forget to save your resized image. You can either overwrite the original file or save it as a new version.
By following these simple steps, you'll be able to resize your images effectively for any purpose. Just remember to keep an eye on image quality, especially if you're reducing the size.
Also Read This: Steps to Upload Images to Adobe Stock for Profit
Choosing the Right Dimensions for Your Image
When resizing an image, selecting the right dimensions is crucial to ensure it looks perfect for its intended use. Whether you're resizing an image for a website, social media post, or print material, understanding the target dimensions is key. Choosing the wrong size can lead to distorted images or low-quality results. Here are some factors to consider when deciding on the right dimensions:
- Purpose of the Image: Think about where the image will be displayed. For web usage, images often need to be smaller to load faster, while for print, high resolution and larger dimensions are essential.
- Aspect Ratio: Keeping the original aspect ratio (width-to-height ratio) ensures the image doesn't get stretched or squished. For example, a 16:9 image should remain that ratio even after resizing.
- Platform Requirements: Different platforms may have specific size requirements. For instance, Instagram prefers square images, while Twitter often uses landscape-style images. Always check the platform’s recommendations.
- Image Resolution: Higher resolution means more pixels, which translates to better quality, especially for printing. However, higher resolution images can also be much larger in file size.
To help you choose the right dimensions, here's a table with common image sizes for various uses:
| Purpose | Dimensions (pixels) |
|---|---|
| Website Header | 1920 x 1080 |
| Instagram Post | 1080 x 1080 |
| Twitter Post | 1200 x 675 |
| Print (A4) | 2480 x 3508 |
Knowing these factors will guide you in selecting the right image size for your project, ensuring it's optimized for quality and performance.
Also Read This: The Evolution of Custom LMS Development: Trends Shaping E-Learning in 2025
Resizing Images Without Losing Quality
One of the biggest challenges when resizing images is maintaining quality. Scaling an image down too much or enlarging it beyond its resolution can cause blurring or pixelation. However, there are ways to resize images without compromising their quality. Here are some techniques to help:
- Use Resampling Techniques: Many editing programs, including GMP, offer resampling options like Bicubic, Bilinear, or Lanczos. These algorithms help preserve image quality when resizing by calculating the best pixel values.
- Maintain Aspect Ratio: Always ensure you keep the aspect ratio locked when resizing. This prevents the image from stretching or distorting, which can degrade its quality.
- Avoid Over-enlarging: Enlarging an image beyond its original resolution can result in blurry or pixelated results. If you need a larger size, start with a high-resolution image to minimize quality loss.
- Sharpen the Image After Resizing: Sometimes resizing can cause slight blurring. After resizing, use the "sharpen" tool to improve the clarity of the image.
By applying these techniques, you can resize images without losing too much detail, ensuring they remain crisp and professional-looking, whether for digital or print use.
Also Read This: Does Dailymotion Remove Copyrighted Music from Videos
Common Image Resizing Issues and How to Fix Them
While resizing images can be a simple task, it can sometimes lead to unexpected issues. Fortunately, most resizing problems can be solved with a few adjustments. Here are some common resizing issues and their solutions:
- Blurry Images: This happens when you enlarge an image too much or shrink it too small. To fix this, avoid resizing beyond the image's original resolution and apply sharpening tools after resizing.
- Distorted Aspect Ratio: If you don’t lock the aspect ratio while resizing, the image can stretch or squash. Always make sure to maintain the aspect ratio by selecting the "Constrain Proportions" option in your resizing tool.
- Pixelation: When you resize an image too much, it can become pixelated. To prevent this, always work with high-resolution images when enlarging, and avoid scaling down excessively.
- File Size Issues: A resized image may end up with a larger or smaller file size than desired. If the file is too large for your platform, try using a file compression tool or reduce the resolution. If it’s too small, consider increasing the resolution slightly, but always check for quality loss.
By following best practices for resizing and using the right tools in GMP, most of these issues can be avoided or corrected easily, ensuring your image maintains its quality and looks perfect for any use.
Also Read This: how do you flatten an image in photoshop
Using GMP’s Tools for Efficient Image Resizing
GMP (Graphic Manipulation Program) offers a variety of tools to resize images efficiently while ensuring they maintain high quality. These tools are designed to make the process smooth and precise, whether you're working with large files or small ones. Let’s look at some of the key tools in GMP that help with resizing images:
- Resize Tool: This is the core feature for resizing images. You can input specific pixel dimensions or scale the image by a percentage. The tool also allows you to lock the aspect ratio, ensuring the image doesn't stretch or distort during resizing.
- Crop Tool: Sometimes, instead of resizing, you might want to crop an image to focus on a particular area. The crop tool in GMP allows you to select a portion of the image to retain while discarding the rest, which can be an efficient way to adjust image size.
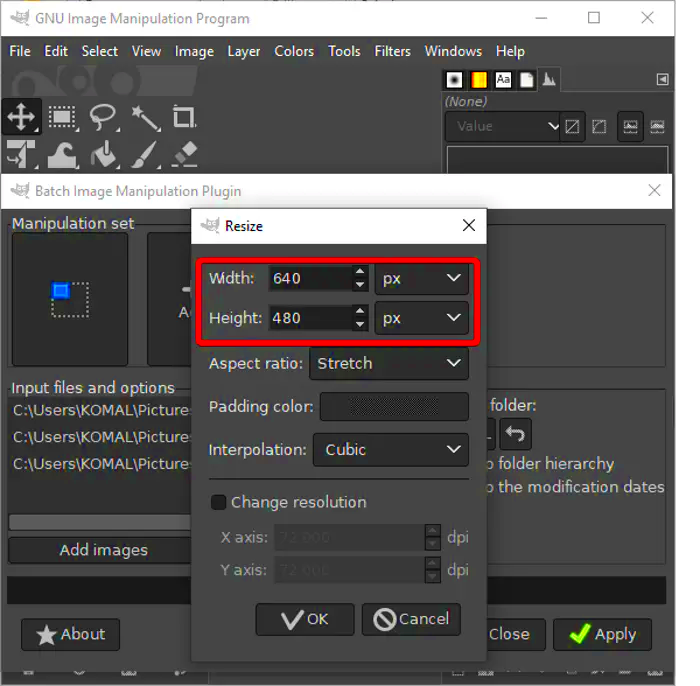
- Batch Resizing: If you need to resize multiple images at once, GMP offers a batch resizing feature. This allows you to apply the same size adjustments to a group of images, saving you time and effort.
- Resample Options: GMP includes different resampling methods, such as Bilinear, Bicubic, and Lanczos, to help you resize images without losing quality. These algorithms work by adjusting the pixel values to ensure smooth transitions when the image is resized.
By using these tools effectively, you can resize images with great accuracy and maintain their visual quality, making GMP a powerful option for your image editing needs.
Also Read This: How to Send Auto-Delete Pictures on Telegram
Tips for Resizing Images for Different Purposes
Resizing images can vary depending on the purpose of the image. Whether you're preparing images for web use, print materials, or social media, each platform or medium may have specific requirements. Here are some helpful tips for resizing images for different purposes:
- For Web Use: Images for the web should be optimized to load quickly without sacrificing too much quality. Resize images to smaller dimensions (like 800 x 600 pixels) and compress them to reduce file size while keeping them sharp. Use the JPEG or PNG format for web images.
- For Social Media: Each social media platform has its preferred image size. For example, Instagram prefers square images (1080 x 1080 pixels), while Facebook and Twitter often use landscape-style images (1200 x 675 pixels). Always check the platform’s guidelines for the best results.
- For Print: When resizing for print, you need a high-resolution image to ensure quality. Images for print should generally be 300 DPI (dots per inch) at their final print size. For example, if you're printing an 8x10 photo, the image should be 2400 x 3000 pixels for optimal quality.
- For Presentations: Resizing images for PowerPoint or other presentation tools often requires balancing size and quality. Ensure your image dimensions match the slide size, which is typically 1920 x 1080 pixels for a 16:9 presentation format.
By tailoring your image size to the specific use case, you can ensure that the image looks its best and is optimized for performance.
Also Read This: Will CoryxKenshin Make a Comeback on YouTube in 2024
FAQ about Resizing Images in GMP
If you’re new to resizing images or using GMP, you might have some questions. Here are some frequently asked questions to help clarify common concerns:
- What is the best way to resize an image without losing quality?
The best way is to maintain the image's aspect ratio and use GMP's resampling tools, like Bicubic or Lanczos, which help preserve quality. Avoid enlarging the image too much, as this can cause pixelation. - Can I resize multiple images at once in GMP?
Yes, GMP offers a batch resizing feature that allows you to resize several images at the same time, applying the same dimensions and settings to each. - What is the difference between resizing and cropping an image?
Resizing changes the overall dimensions of the entire image, while cropping removes part of the image to focus on a specific area. Both can adjust the size but serve different purposes. - How do I avoid pixelation when resizing images?
To avoid pixelation, always work with high-resolution images and avoid enlarging images too much. If you need to enlarge, make sure the original image has a high pixel count to start with. - Should I resize an image before or after editing it?
It's generally best to resize an image after editing it. Editing the image (like adjusting brightness, contrast, or sharpness) before resizing ensures you’re working with the best version of the image. However, resizing can sometimes make adjustments look different, so always preview before finalizing.
By keeping these answers in mind, you’ll be able to use GMP for resizing images with confidence and ease!
Conclusion
Resizing images efficiently is an essential skill for any digital project, and GMP (Graphic Manipulation Program) offers powerful tools to help you resize images while maintaining their quality. Whether you're working on web design, social media posts, or print materials, understanding the right dimensions and using GMP’s features can ensure your images look professional. By keeping in mind the tips and techniques shared in this guide, you’ll be able to resize your images with confidence, ensuring they are optimized for their intended use. Remember to always check your image’s quality after resizing and use the proper tools to get the best results!


