Resizing images in Adobe Illustrator is essential for designers who want to create stunning visuals without compromising quality. Whether you're adjusting dimensions for a website banner or scaling down a logo for business cards, understanding how to resize effectively can save you time and maintain the integrity of your artwork. In this post, we'll explore various methods for resizing images in Illustrator, helping you choose the right approach for your design needs.
Understanding the Different Methods to Resize Images
When it comes to resizing images in Adobe Illustrator, there are several methods you can employ, each with its unique advantages. Let’s break them down so you can find the perfect fit for your project.
1. Using the Selection Tool
The most straightforward method involves using the Selection Tool. Here’s how you can do it:
- Select the image you wish to resize by clicking on it.
- Hold down the Shift key to maintain the image's aspect ratio.
- Click and drag the corner handles of the bounding box to resize your image.
This method is simple and works well for most images, but be careful not to distort your artwork if you’re using non-uniform scaling!
2. Transform Menu
If you need more precision, the Transform menu is your best friend. Here's how to access it:
- Select your image and go to Window in the top menu.
- Choose Transform or press Shift + F8.
- In the Transform panel, you can enter specific values for width and height.
Using the Transform menu allows you to input exact measurements, ensuring your image fits perfectly within your design constraints.
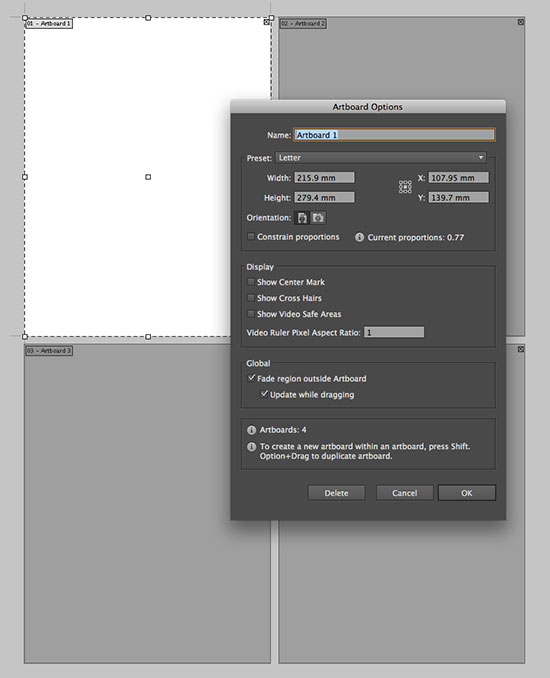
3. Artboard Resizing
Sometimes, you might want to resize images relative to your artboard. Here’s how:
- Go to the Artboard Tool (Shift + O).
- Select the artboard you want to adjust.
- Resize the artboard to your desired dimensions, and Illustrator will prompt you to scale the contents if needed.
This method is useful when you want all elements on the artboard to resize proportionately.
4. Using the Scale Tool
The Scale Tool is another powerful option, particularly for precise scaling:
- Select the image and choose the Scale Tool (S).
- Click and drag to resize, or double-click the Scale Tool for a dialog box where you can enter percentage values.
This approach is great for uniformly scaling your images and allows for quick adjustments on the fly.
5. Rasterizing Images
Lastly, if you’re working with raster images (like JPEGs or PNGs) and need to resize without losing detail, consider rasterizing:
- Select your image, go to Object > Rasterize.
- Choose your settings and click OK.
After rasterizing, you can resize your image more flexibly, but remember that this can impact the quality.
Each of these methods has its place in your design toolbox. Experiment with them to see which one best suits your workflow, and you'll be resizing images in Adobe Illustrator like a pro in no time!
Also Read This: Photobucket Cleanup: Mastering the Art of Deleting Photos from Your Account
3. Using the Selection Tool to Resize Images
Resizing images in Adobe Illustrator can be a breeze, especially when you use the Selection Tool. This tool is your best friend when it comes to selecting and adjusting your artwork, including images. Here’s how you can do it:
- Select the Image: First, click on the Selection Tool (it looks like a black arrow). Then, click on the image you want to resize. You’ll know it’s selected when you see a bounding box around it.
- Adjust the Size: To resize, simply click and drag one of the corner handles of the bounding box. If you want to maintain the aspect ratio (to avoid stretching your image), hold down the Shift key while dragging. This ensures your image scales proportionately.
- Move the Image: If your image shifts around while resizing, no worries! Just click and drag inside the bounding box to reposition it as needed.
- Finalizing the Resize: Once you’re happy with the new size, release the mouse button, and your image will be resized. You can still fine-tune the position if necessary.
This method is simple and effective, especially for quick adjustments. The Selection Tool is intuitive, making it accessible even to those new to Illustrator. Plus, it allows you to keep the design process smooth and efficient!
Also Read This: Mirroring an Image in PowerPoint
4. Resizing Images Using the Transform Tool
If you need more control over resizing, the Transform Tool is a versatile option. This tool not only allows you to resize but also to rotate and flip your images. Here’s how to use it:
- Select Your Image: Start by selecting the image with the Selection Tool, just like before. Once selected, you can access the Transform options.
- Open the Transform Panel: Navigate to the top menu and click on Window > Transform to open the Transform panel. This panel provides precise control over your image’s size and position.
- Input Specific Dimensions: In the Transform panel, you’ll see fields for Width (W) and Height (H). You can enter the exact dimensions you want. If you want to maintain the aspect ratio, click the lock icon between these fields before making adjustments.
- Use the Scale Option: Another handy feature in the Transform panel is the Scale option. You can use percentages to increase or decrease the size of your image. For instance, entering 50% would make your image half its current size.
- Apply and Adjust: After entering your desired dimensions or scale, press Enter to apply the changes. Just like with the Selection Tool, you can reposition your image as needed.
The Transform Tool is ideal when you need precision or when working with multiple images that require consistent sizing. It’s especially useful in professional design settings where accuracy is key!
Also Read This: Steps to Create an Account on Behance and Launch Your Creative Profile
5. Maintaining Image Quality While Resizing
Resizing images might seem straightforward, but maintaining the quality during the process can be a bit tricky. When you shrink or enlarge an image, you risk losing detail or making it look pixelated. Here are some tips to ensure that your image remains crisp and clear:
- Use Vector Graphics: If you’re working with vector images (like logos or illustrations), resizing isn’t an issue. Vectors are resolution-independent, which means you can scale them up or down without losing quality.
- Check Resolution Settings: Before resizing, ensure that your image has a high enough resolution. For print, aim for at least 300 DPI (dots per inch); for web, 72 DPI is typically sufficient.
- Utilize the Transform Tool: When resizing, hold down the Shift key to maintain the aspect ratio. This prevents distortion and keeps the image looking natural.
- Preview Before Finalizing: Always zoom in and check the details after resizing. Look for any blurriness or pixelation that might have occurred during the process.
- Smart Object Usage: If you're working with raster images, consider converting them to Smart Objects first. This capability allows for non-destructive resizing, keeping the original image intact.
By following these tips, you can significantly minimize quality loss while resizing images in Adobe Illustrator. Always remember, the key is in the preparation and the tools you choose to use during the process!
Also Read This: Complete Guide to Becoming an Adobe Stock Contributor
6. Saving and Exporting Your Resized Image
Once you've resized your image to perfection, it’s time to save and export it. This step is crucial, as the file format you choose can affect the image quality and usability. Here’s a quick guide to help you through the saving and exporting process:
- File Formats: Choose the right file format depending on your needs:
- AI: This is Adobe Illustrator’s native format, perfect for preserving layers and editing capabilities.
- EPS: Great for vector images and compatible with many other graphic software.
- PNG: Ideal for web use, as it supports transparency and maintains quality in images with text and sharp edges.
- JPEG: Good for photographs but can lose some quality due to compression. Use this for web images where file size matters.
- Export Settings: When you’re ready to export:
- Select File > Export > Export As.
- Choose your desired file format from the dropdown menu.
- Check the Use Artboards option if you only want to export specific sections of your design.
- Adjust Export Options: Depending on your chosen format, you may have additional settings, such as quality levels for JPEGs or resolution settings for PNGs. Adjust these according to your project requirements.
Finally, don’t forget to name your file appropriately and choose a location that’s easy to remember. Once everything looks good, hit that Save or Export button, and your resized image is ready for action!
Whether you’re preparing graphics for a client, creating social media posts, or designing a website, knowing how to resize and export images effectively in Adobe Illustrator is a valuable skill. Happy designing!
Also Read This: How to Use Imago Images to Improve Your SEO
7. Troubleshooting Common Resizing Issues
Resizing images in Adobe Illustrator can sometimes feel like a puzzle, especially if you're encountering unexpected results. Don't worry, though! Let's dive into some common resizing issues and how to tackle them.
Issue 1: Distorted Images
Have you ever resized an image only to find it looks squished or stretched? This usually happens when you resize an image using the bounding box without holding down the Shift key. To maintain the image's original proportions, remember to hold Shift while dragging a corner handle. This simple step keeps your image looking sharp and professional.
Issue 2: Rasterization Problems
If you’re working with vector images but inadvertently convert them to raster images during resizing, you may lose quality. Make sure that your image is in vector format (like .AI or .EPS) and avoid frequent switching between formats. If you find yourself needing to scale up a raster image, consider using an external tool like Adobe Photoshop to enhance the resolution before importing it back into Illustrator.
Issue 3: Clipping Mask Issues
Clipping masks can sometimes hinder your resizing efforts. If your resized image seems to disappear or show unexpected results, check if it’s still inside the clipping mask. To resolve this, right-click on the clipping mask and choose Release Clipping Mask. After that, you can resize freely, and if needed, create a new clipping mask afterward.
Issue 4: Image Resolution Dilemmas
When resizing for print versus digital, resolution plays a crucial role. Ensure your images are set to 300 DPI for print purposes, while 72 DPI is generally fine for digital use. If you're unsure, go to Effect > Document Raster Effects Settings to adjust the resolution for the best output quality.
If you continue to face challenges, don't hesitate to check out Adobe's support community or forums. Often, fellow users and experts provide tips that can save you time and frustration.
8. Conclusion and Additional Resources
Resizing images in Adobe Illustrator doesn't have to be a daunting task. With the right techniques and a bit of practice, you can make adjustments that keep your designs looking stellar. Remember, whether you're creating graphics for web use or print, size matters!
To recap:
- Use the Selection Tool for resizing.
- Hold Shift to maintain proportions.
- Watch out for rasterization and resolution issues.
- Be mindful of clipping masks.
For further learning, consider checking out these additional resources:
- Adobe Illustrator Tutorials - Official tutorials covering various features.
- Adobe Creative Cloud YouTube Channel - Video tutorials for visual learners.
- Skillshare Classes on Illustrator - A variety of classes that cater to different skill levels.
Now, grab your creative toolkit and start experimenting with those resizing techniques. Happy designing!
 admin
admin