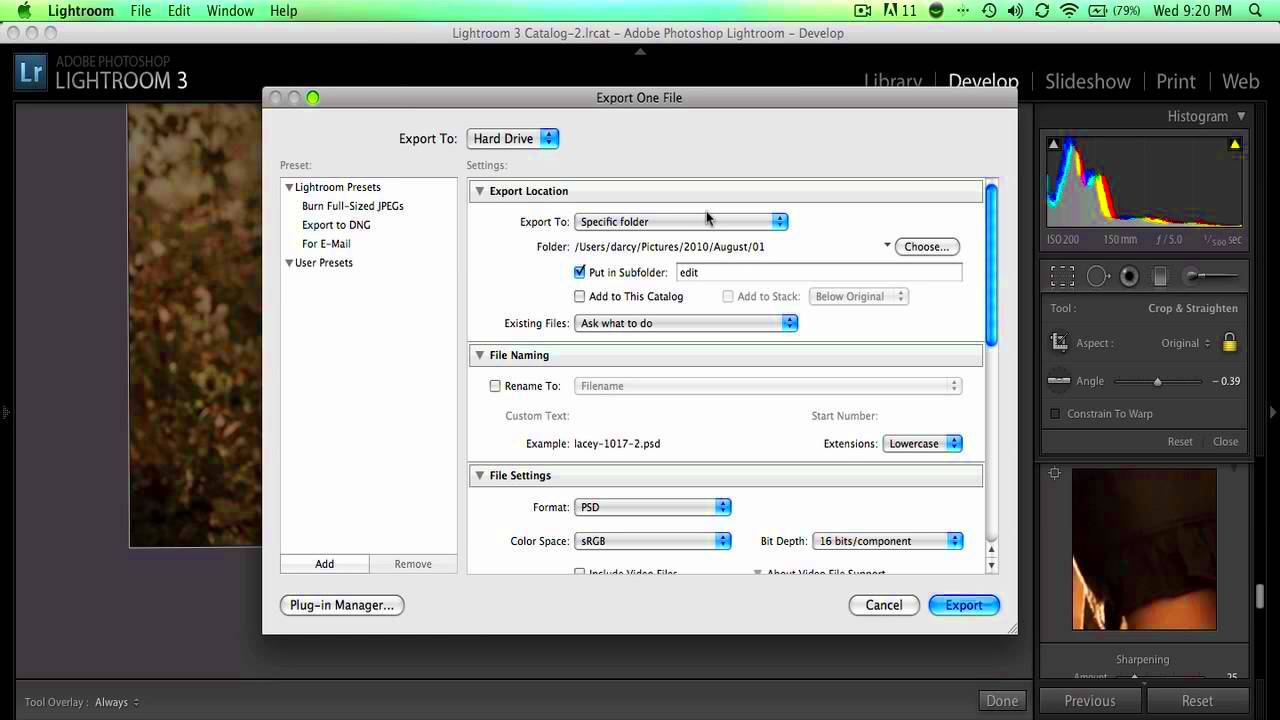
Resizing images in Lightroom is an essential skill for anyone looking to produce high-quality photos, whether for editing or printing. In Lightroom, resizing an image can help maintain its sharpness and clarity while adjusting it to fit various output formats. When you resize an image properly, you ensure that it prints well at the desired size and displays correctly online.
One of the main reasons to resize an image is to adjust its file size for specific uses. For example, you might need a smaller file for a website or a larger one for a high-quality print. Lightroom makes this process easy and ensures your images retain the best possible quality after resizing.
Understanding Image Resolution in Lightroom
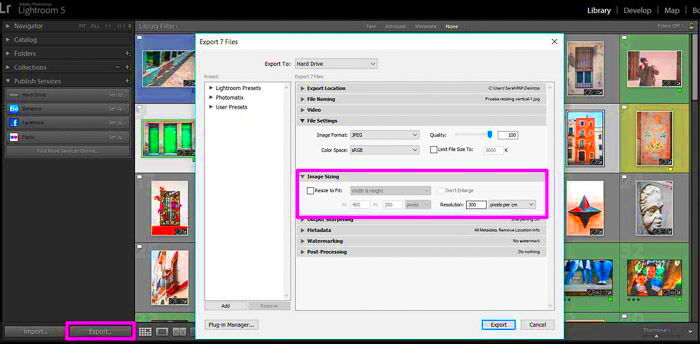
Resolution refers to the amount of detail an image holds, often measured in pixels per inch (PPI) or dots per inch (DPI). In Lightroom, adjusting resolution is crucial for ensuring that your images look their best, whether viewed on a screen or printed.
For printing, a resolution of 300 DPI is commonly recommended for high-quality prints, while web images usually require 72 DPI for efficient loading and display. It’s important to balance resolution with image dimensions to avoid stretching or losing quality.
Here’s what to keep in mind:
- High resolution provides more detail and clarity, ideal for prints.
- Low resolution can speed up website loading but might result in blurry prints.
- When resizing in Lightroom, you can adjust both resolution and dimensions to meet your needs.
Resolution is a key factor in image quality, and understanding how to control it in Lightroom will help you get the results you want, whether you’re preparing images for print or online use.
Also Read This: How to Save Images from TikTok
Steps to Resize an Image in Lightroom
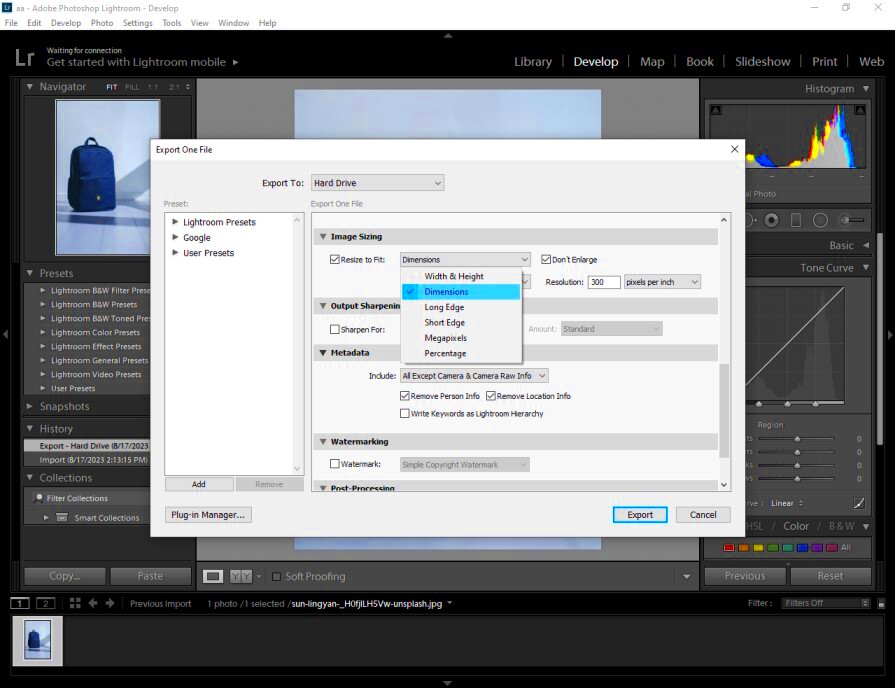
Resizing an image in Lightroom is a simple and straightforward process, but it’s important to follow the right steps to ensure you maintain image quality. Whether you need to adjust your image for printing or optimize it for web use, Lightroom provides all the tools you need.
Here’s how you can resize an image in Lightroom:
- Step 1: Open the Image in Lightroom
Start by importing your image into Lightroom and selecting the one you wish to resize.
- Step 2: Go to the Export Dialog
After selecting your image, click on the Export button in the bottom-left corner of the screen to open the export settings.
- Step 3: Choose Your Export Settings
In the export window, you can set your desired file format, image quality, and resolution. Make sure to choose the appropriate format (e.g., JPEG, PNG) and adjust the quality slider based on your needs.
- Step 4: Resize the Image
Scroll down to the "Image Sizing" section and check the box that says Resize to Fit. You can then select a resizing option that works best for your needs, such as "Long Edge" for printing or "Dimensions" for web use.
- Step 5: Set the Resolution
Set the resolution based on your output requirement. For print, use 300 DPI, and for web, use 72 DPI to avoid unnecessarily large files.
- Step 6: Export the Image
Once all settings are configured, click Export. Your resized image will be saved in the chosen location, ready for use.
By following these simple steps, you can resize your image without losing quality, ensuring it's perfect for your intended use—whether it's for high-resolution prints or optimized web images.
Also Read This: How to Capture Audio from YouTube Videos
Choosing the Right Dimensions for Your Image
Choosing the right dimensions for your image is crucial, whether you're preparing it for print or online display. The dimensions—measured in pixels—determine the image’s width and height. In Lightroom, you can easily adjust these dimensions to ensure your image looks great wherever it’s viewed. It's important to choose dimensions that match the intended use of the image, as it can affect both quality and file size.
For prints, you’ll need dimensions that match the desired print size, while for the web, you'll want to ensure the image fits within the layout without being too large for quick loading. Here’s a quick guide:
- Prints: Choose the dimensions that match the physical size of the print, such as 8x10 inches or 16x20 inches. Keep in mind that larger prints require higher resolution to maintain quality.
- Web Use: For images on websites or social media, dimensions should fit the space available, such as 1200x800 pixels for a large web banner or 1080x1080 pixels for Instagram posts.
Make sure to consider the medium where your image will appear. Resizing an image to the appropriate dimensions helps to maintain its quality and ensure it looks its best.
Also Read This: how to cut out part of an image in photoshop
Setting Resolution for Printing and Web Use
Resolution determines the amount of detail in an image, and it plays a big role in how your image looks when printed or displayed online. In Lightroom, you can easily adjust resolution settings during the export process. Setting the right resolution for your image ensures that it appears sharp and clear, whether you’re printing it on a large poster or sharing it on social media.
For print, a higher resolution (usually 300 DPI) is recommended to ensure fine details are preserved, while for the web, a lower resolution (typically 72 DPI) is sufficient, as it reduces file size and speeds up page loading.
| Use Case | Recommended Resolution |
|---|---|
| 300 DPI | |
| Web | 72 DPI |
| Social Media | 72 DPI or 150 DPI for better quality |
By adjusting the resolution in Lightroom, you can ensure your images are optimized for their intended purpose. For prints, go for a high DPI to keep the quality intact. For the web, lower the resolution to keep the file size manageable without sacrificing visual appeal.
Also Read This: How to Export from iMovie to YouTube Easily
Understanding Aspect Ratios and Cropping
Aspect ratios are the proportional relationship between the width and height of an image. Understanding aspect ratios and how they affect your images is important when resizing or cropping photos in Lightroom. Different platforms and print sizes often require specific aspect ratios, so knowing how to adjust this ratio can help you achieve the desired outcome without distorting the image.
For example, when you crop an image in Lightroom, it’s important to keep the aspect ratio in mind to avoid cutting out important elements of the photo. Lightroom allows you to crop using predefined aspect ratios like 4:3, 16:9, or square, or you can manually enter custom dimensions.
Here’s how aspect ratios influence your work:
- Prints: If you're printing an image, make sure the aspect ratio matches the print size. For instance, an 8x10 print uses a 4:5 aspect ratio.
- Social Media: Platforms like Instagram often use square (1:1) images, while Facebook prefers rectangular (4:3) photos.
- Web Use: Websites and blogs may need specific aspect ratios for banners or featured images, so knowing the required dimensions ensures your images fit properly without stretching.
In Lightroom, you can easily crop images to fit these aspect ratios. By selecting the right aspect ratio, you ensure that your image looks proportional and avoids unnecessary empty space or distortion.
Also Read This: How to Download Audio from YouTube on Mac
Common Mistakes to Avoid When Resizing Images in Lightroom
Resizing images in Lightroom is straightforward, but there are several common mistakes that can affect the quality of your image. Whether you’re resizing for print or web use, understanding these pitfalls will help you avoid problems like pixelation, stretching, or blurry images.
Here are some of the most common mistakes to avoid when resizing images in Lightroom:
- Resizing without maintaining aspect ratio: If you resize an image without keeping its aspect ratio intact, you could stretch or distort the image. Always ensure that the "Constrain Proportions" box is checked when resizing to avoid this problem.
- Using too low a resolution for print: When preparing images for print, using a low resolution (like 72 DPI) can result in blurry or pixelated prints. For high-quality prints, always use a resolution of 300 DPI.
- Over-resizing images: Increasing the size of a low-resolution image will lead to loss of sharpness and clarity. Avoid enlarging images too much, as it will result in pixelation and loss of detail.
- Ignoring output requirements: Each platform (print, web, social media) has specific size and resolution requirements. Ignoring these can lead to poor image quality. For example, a large image intended for a web banner might take too long to load if the file size is too large.
- Not checking file format: The format you save your resized image in matters. JPEG is best for web use, while TIFF or PNG is ideal for printing. Make sure to choose the right format based on your use case.
By avoiding these common mistakes, you’ll ensure your resized images maintain their quality and are optimized for whatever purpose you have in mind.
Also Read This: 5 Smart Ways to Use Stock Photos to Enhance Social Media Visuals and Engagement
FAQ
Here are some frequently asked questions about resizing images in Lightroom, along with helpful answers to clear up any confusion you may have:
- What is the ideal resolution for printing?
The ideal resolution for printing is 300 DPI (dots per inch). This ensures your prints are sharp and clear. Lower resolutions can result in blurry prints.
- Can I resize an image without losing quality?
Yes, resizing an image without losing quality is possible if you reduce the image size rather than increase it. Enlarging a low-resolution image can lead to pixelation and loss of clarity.
- How do I resize an image for social media?
For social media, you should resize your image to fit the platform's requirements, typically around 1080x1080 pixels for square images on Instagram. Always ensure the resolution is 72 DPI for quicker loading times.
- How can I maintain the aspect ratio while resizing?
In Lightroom, make sure the "Constrain Proportions" or "Lock Aspect Ratio" option is selected to maintain the proportions when resizing your image. This prevents stretching or distorting the image.
- What file format is best for resizing?
The best file format for resizing depends on the intended use. JPEG is good for web use, while PNG and TIFF are better for print as they preserve higher quality.
Conclusion
Resizing images in Lightroom is a valuable skill that can help you prepare your photos for various uses, from print to social media. By following the right steps, understanding image resolution, and choosing the proper dimensions, you can achieve the best results for any project. Avoiding common mistakes such as distorting the aspect ratio or using the wrong resolution ensures that your images retain their quality and look their best. With these tips in mind, you can confidently resize your images in Lightroom and be assured that they will be optimized for whatever you need.
Remember to always check your output requirements and adjust the image settings accordingly. Whether you're resizing for a print, a website, or a social media post, Lightroom provides all the tools you need to get professional-looking results.
