Removing stock footage in Adobe After Effects might seem daunting at first, but it's a straightforward process once you get the hang of it. Whether you’re trying to eliminate unwanted clips or simply looking to streamline your project, understanding the right techniques can make all the difference. In this guide, we’ll walk you through the essential steps to effectively remove stock footage, ensuring your project shines without any distractions.
Setting Up Your Project

Before diving into the actual removal of stock footage, it's crucial to set up your project correctly. A well-organized project not only saves time but also enhances your workflow. Here’s how to do it:
- Create a New Project: Open After Effects and select File > New > Project. This gives you a fresh slate to work on.
- Import Your Stock Footage: Go to File > Import > File and select the stock footage you want to work with. Ensure it's in a compatible format like .mov or .mp4.
- Organize Your Assets: Create folders in the Project panel to separate your footage, audio, and other assets. Right-click in the Project panel and choose New Folder to keep things tidy.
Once your project is set up, it's time to start editing. Make sure to check the resolution and frame rate of your footage for a smoother editing experience. This will ensure that the final product looks professional and polished.
Remember, a well-organized project leads to a more efficient workflow. So take a moment to organize your assets properly before proceeding to remove any stock footage!
Also Read This: Leveraging Getty Images for Editorial Photography: Guidelines and Best Practices
Using the Masking Tool

The Masking Tool in Adobe After Effects is a powerful feature that allows you to isolate specific parts of your footage, making it easier to remove unwanted stock elements or backgrounds. This technique is particularly useful when you want to focus on a subject or eliminate distractions from your scene.
Here’s how to effectively use the Masking Tool:
- Select the Layer: Start by selecting the layer in your timeline that contains the stock footage you want to modify.
- Choose the Pen Tool: From the toolbar, select the Pen Tool (shortcut: G). This tool allows you to create custom masks by drawing around the area you want to keep or remove.
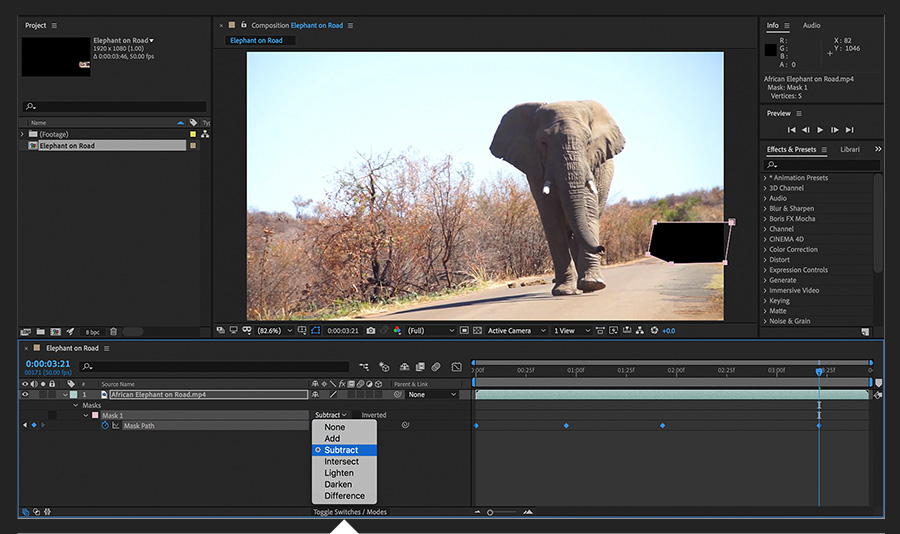
- Draw Your Mask: Click to create points around the subject you want to keep. Close the mask by connecting the last point to the first. You can adjust the mask's shape by dragging the points or adding new ones as needed.
- Feathering and Expansion: To make the edges of your mask softer, use the Feather property. This can help blend the masked area with the surrounding footage. You can also adjust the Mask Expansion to refine the area you want to remove.
Remember, the Masking Tool is all about precision. Take your time to adjust the mask to achieve a seamless look. With practice, you’ll become proficient in isolating elements and enhancing your projects!
Also Read This: How Much iStock Pays Contributors
Applying Keying Techniques

Keying techniques in Adobe After Effects are essential for removing backgrounds, especially when dealing with stock footage that may include green screens or other solid backgrounds. These techniques enable you to "key out" specific colors, leaving behind only the subjects you want to keep.
Here’s a step-by-step guide to applying keying techniques:
- Import Your Footage: Start by importing your stock footage into your project. Drag it onto the timeline.
- Select the Keying Effect: Go to the Effects panel and search for keying effects like Keylight (1.2) or Color Key. Drag your preferred keying effect onto the footage layer.
- Adjust the Key Color: Use the Eyedropper tool to select the color you want to remove (e.g., green or blue). This will help After Effects isolate the desired elements.
- Fine-Tune the Key: Adjust settings like Screen Gain and Screen Balance to enhance the keying effect. Utilize the Clip Black and Clip White sliders to refine what’s visible and what’s not.
By mastering these keying techniques, you can achieve professional-looking results, making it easy to incorporate stock footage into your projects without any unwanted backgrounds. Experiment with various settings until you find the perfect balance!
Also Read This: How to Remove Transparent Backgrounds from iStock Images
5. Refining Edges
Refining edges in Adobe After Effects is crucial for achieving a polished, professional look in your animations and compositions. Whether you’re working with video footage or animated elements, sharp, clean edges can make all the difference. Here are some techniques to help you refine those edges effectively:
- Use Layer Masks: Layer masks are your best friends when it comes to isolating parts of your image. You can create a mask to define which areas should be visible or hidden. To refine edges, use the Feather property in the mask settings to soften the edges, blending them seamlessly with the background.
- Apply the Refine Edge Tool: This tool is made for exactly this purpose! It allows you to adjust the edge properties like softness, contrast, and shift edge. Simply select your layer, navigate to the Effects & Presets panel, and apply the tool for fine-tuning.
- Adjusting Color: Sometimes, edges appear harsh due to color discrepancies. Consider using the Color Correction effects to match the edge colors with the background, enhancing the overall integration of the elements.
Remember, refining edges is about striking a balance between visibility and subtlety. Don’t hesitate to experiment with these techniques until you find what works best for your specific project!
Also Read This: Effective Methods for Removing Getty Images Watermark on Mac
6. Final Touches
Once you've gotten through the initial stages of your After Effects project, it's time to add those all-important final touches. These finishing details can elevate your work from good to exceptional. Here’s what to consider:
- Color Grading: Add a color grading layer to unify the entire composition. This can create a cohesive look and feel, making the elements feel like they belong together. Experiment with the Lumetri Color panel to adjust highlights, midtones, and shadows.
- Adding Motion Blur: For movement-heavy animations, adding motion blur can give your clips a more natural feel. It helps to simulate the way cameras capture fast-moving objects. You can enable it in the layer settings by checking the Motion Blur box.
- Sound Design: Don’t forget about audio! A great soundtrack or sound effects can enhance the emotional impact of your visuals. Use the Audio Spectrum or Audio Waveform effects to visualize sound elements that sync well with your animation.
Lastly, always preview your project multiple times. Sometimes, small tweaks can make a world of difference!
How to Remove Stock in Adobe After Effects
Adobe After Effects is a powerful tool for video editing and animation, but sometimes you may find stock footage or elements that you need to remove from your project. Whether it’s due to a change in concept or the need for a cleaner look, removing stock can be done efficiently with the right techniques. Here’s a comprehensive guide on how to achieve this:
There are several methods to remove stock elements in After Effects:
- Using Masks: Masks allow you to hide portions of your footage without deleting them.
- Select the layer you want to mask.
- Use the Pen Tool (G) to draw a mask around the area you want to remove.
- Adjust the mask properties in the timeline to refine the mask edges.
- Adjustment Layers: You can create an adjustment layer that affects the underlying layers.
- Go to Layer > New > Adjustment Layer.
- Add effects like Gaussian Blur to soften unwanted areas.
- Clone Stamp Tool: This tool allows you to paint over areas in your footage.
- Select the Clone Stamp Tool (Alt + S).
- Hold Alt and click to define a source point.
- Paint over the stock element to cover it.
For a more advanced approach, consider using the Content-Aware Fill feature available in After Effects. This allows you to remove unwanted elements while automatically filling in the background based on surrounding pixels.
| Method | Best For | Complexity |
|---|---|---|
| Masking | Precise removal | Medium |
| Adjustment Layers | Overall look | Low |
| Clone Stamp Tool | Textured details | High |
In conclusion, removing stock elements in Adobe After Effects can be accomplished through various methods, each tailored to different needs and levels of complexity. Experiment with masks, adjustment layers, and the Clone Stamp Tool to find the best solution for your project.
 admin
admin


