When sharing images from your iPhone, the size of the image plays an important role in how easily it can be sent and received. Large images can take up a lot of storage space and might not upload or send through messaging apps due to size limits. Reducing the size helps you send photos quickly without compromising too much on quality. Also, smaller images are easier to manage and share across various platforms without waiting for too long or running into errors.
There are several reasons why image size matters:
- Faster Upload and Download Times: Smaller files take less time to upload or download, especially on slower internet connections.
- Reduced Data Usage: Reducing the image size means consuming less mobile data, which is important for those with limited data plans.
- Better Compatibility: Some apps and websites have size limits, and reducing the size can ensure the image fits within those limits.
- Storage Space: Compressing images helps save space on your device, leaving room for other photos and apps.
Built-in Tools on iPhone for Reducing Image Size

Your iPhone already has a few simple, built-in tools to help reduce the size of images. You don’t need to download any third-party apps to shrink images for sharing. Let’s take a look at the built-in options available on your device:
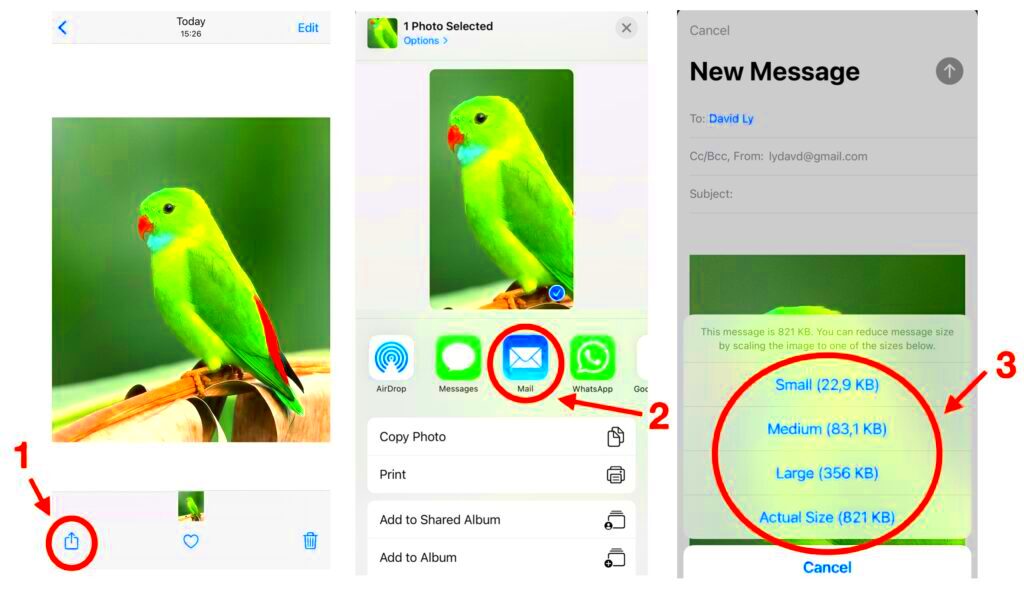
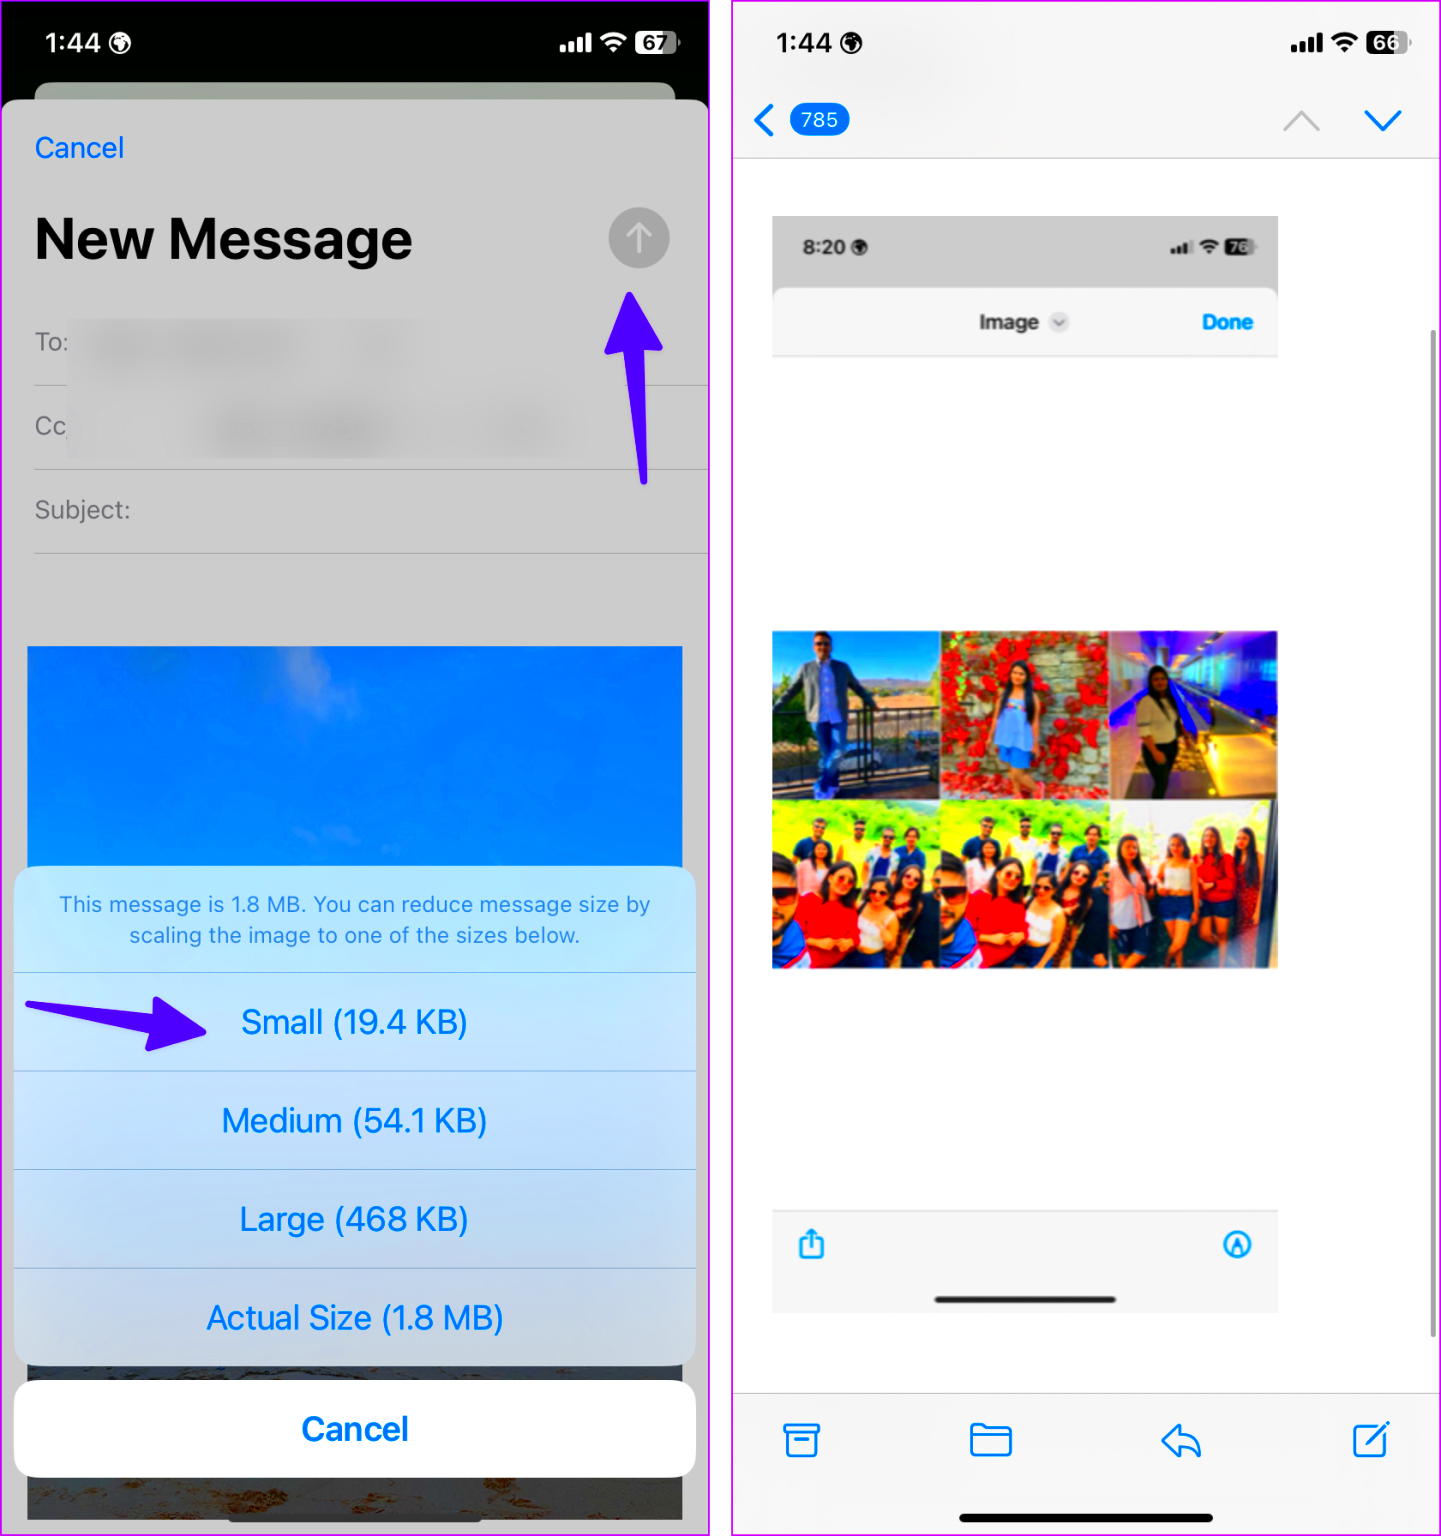
- Mail App (iOS): When you email a photo, your iPhone offers the option to automatically reduce the image size. Simply attach the image, and you'll be prompted to choose between Small, Medium, Large, or Actual Size for the image.
- Photos App Editing: You can use the built-in editing features to crop the image, which in turn reduces its file size. Cropping out unnecessary parts of the image can make it smaller without losing much quality.
- Shortcuts App: iPhone's Shortcuts app allows you to create a custom shortcut for resizing images. This is especially useful if you need to resize multiple images at once.
These tools are user-friendly and help you save time while sharing images quickly.
Also Read This: How to Download Ringtones from YouTube
Using Third-Party Apps for Better Compression

While the built-in tools are useful, third-party apps can offer more advanced compression options that give you greater control over the image size and quality. Many of these apps are free or come with a free version, making them a cost-effective way to reduce image sizes. Here are a few popular third-party apps for iPhone:
- Compress Photos & Pictures: This app allows you to reduce image size without losing quality. You can set the level of compression and see the results before saving the image.
- Image Size: A simple yet powerful app that lets you resize images by defining the exact dimensions you need. It's perfect for users who want more control over the output size.
- JPEG / PNG Image File Compressor: This app is great for compressing both PNG and JPEG images. It automatically optimizes photos for faster uploads while preserving high-quality resolution.
Third-party apps offer additional features like batch resizing, better quality control, and even more advanced compression algorithms. If you frequently need to reduce image sizes, using one of these apps could save you time and improve the overall quality of your shared images.
Also Read This: Learn How to Sell Photos to Shutterstock
Steps to Reduce Image Size Without Losing Quality

Reducing image size without losing quality is a delicate balance. Fortunately, with the right tools and methods, you can compress your images effectively while maintaining their appearance. Let’s explore the steps you can take to shrink the file size without sacrificing too much on quality.
Here are some easy steps to reduce image size without noticeable loss of quality:
- Resize the Image Dimensions: Reducing the physical dimensions of the image (height and width) is one of the most effective ways to reduce size. Use the built-in photo editing tools or third-party apps to adjust the size according to your needs.
- Use a Compression Tool: Compression tools work by reducing the file size without changing the image's visible quality. Popular apps like Compress Photos or TinyPNG for images like PNG and JPEG can help.
- Choose the Right Format: File formats like JPEG are known for compressing well while maintaining decent quality. If the image doesn’t require a transparent background, JPEG is often the best choice.
- Avoid Over-Compression: Over-compressing can lead to significant quality loss, causing pixelation and blurriness. Always preview the image after compressing to make sure it still looks good.
By following these steps, you can easily reduce the image size while keeping its quality high enough for sharing, making it easier to upload and send without any issues.
Also Read This: How to Crop Images in Photopea for Perfect Edits
Best Practices for Sharing Compressed Images
Once you've compressed your images, it’s essential to share them in a way that ensures the recipient receives the best quality version possible. Here are some best practices to keep in mind when sharing compressed images:
- Choose the Right Platform: Some platforms automatically compress images, so it’s a good idea to choose one that supports high-quality file formats. For instance, sending images via email or cloud services like Google Drive or Dropbox can preserve much of the original quality.
- Send the Original if Possible: If the recipient needs the highest quality, consider sending the original file along with the compressed version. This way, they can choose the best option for their needs.
- Ensure the Image Is Optimized: Before sharing, make sure the image is not just small but also properly optimized. This means the file should load quickly without taking up excessive storage space.
- Use the Right File Type: Choose the most suitable file format based on the image content. JPEG is great for photos, while PNG or TIFF might be better for images with transparency or higher detail.
- Check the Quality: Always preview the compressed image before sharing it. Zoom in to check for any noticeable quality loss, such as pixelation or blurring.
By following these best practices, you ensure that your compressed images remain usable and shareable, while also maintaining quality and ease of access for the recipient.
Also Read This: Listing Leverage: Creating eBay Listings with Variations
Common Mistakes to Avoid When Reducing Image Size
When reducing the size of your images, it's easy to make mistakes that can negatively impact the result. To help you avoid this, here are some common mistakes people make and how to steer clear of them.
- Over-Compressing the Image: Trying to make an image too small often results in loss of quality. The image might become pixelated or blurry. Always find a balance between size and clarity.
- Not Checking the Image After Compression: Sometimes, it's easy to think the image looks fine just after compression. However, it’s important to zoom in and examine details. Failing to check could lead to a poor-quality image being shared.
- Choosing the Wrong File Format: Using an inappropriate file format can lead to poor results. For example, PNG is not ideal for photos because it tends to have larger file sizes, while JPEG is more suitable for photos with good compression.
- Neglecting Image Cropping: Cropping unnecessary parts of the image before resizing it can significantly reduce the file size. Don’t forget to crop the image to remove extra space and focus on the important part of the photo.
- Not Using a Reliable Compression Tool: Using low-quality compression tools can result in poor image quality. Always use reputable tools or apps that are designed for compressing images while maintaining a good level of quality.
By avoiding these common mistakes, you can ensure that your images are effectively reduced in size while keeping them crisp and clear for sharing.
Also Read This: Ways to Remove iFunny Watermark from Videos and Images
FAQs About Image Size Reduction on iPhone
Reducing image size on your iPhone is a common task, but there are often questions about the best methods, tools, and potential issues. Here are some frequently asked questions (FAQs) that can help clarify the process for you.
- Q: Can I reduce the size of a photo without losing quality on my iPhone?
A: Yes, you can reduce image size without significant quality loss by using the right compression tools or resizing methods. Built-in apps like Mail and Photos offer basic resizing options, and third-party apps like Compress Photos provide more control over the quality during compression. - Q: What is the best way to resize multiple images at once?
A: To resize multiple images quickly, use apps like Shortcuts or third-party apps like Batch Resize or Image Size. These apps allow you to select multiple images and resize them in bulk, which saves you time. - Q: Will resizing a photo affect its resolution?
A: Yes, resizing reduces the resolution of an image. However, if you use the right resizing or compression method, you can maintain a balance between file size reduction and image quality. Always preview the image after resizing to ensure it still looks good. - Q: What’s the ideal file size for sharing images from my iPhone?
A: The ideal file size depends on the platform you are using to share. For email, images should generally be under 5 MB. For social media, file size should be less than 1 MB for quicker upload times and better performance. - Q: Can I reduce an image size without using third-party apps?
A: Yes, iPhones come with built-in options like the Mail app and the Photos app that let you resize and compress images without needing third-party tools. These tools are easy to use for basic resizing needs.
Conclusion and Final Thoughts
Reducing the size of an image on your iPhone is a simple process that helps make sharing photos faster and easier. Whether you're using built-in tools or third-party apps, there are various methods to choose from depending on your needs. By following the right steps, avoiding common mistakes, and using the best practices for sharing, you can ensure that your images maintain their quality while being optimized for faster uploads and reduced storage usage.


