Are your images taking up too much space on your Mac? Whether it's for web use, email attachments, or simply to save storage, reducing image file size can be a game changer. In this post, we’ll explore effective methods to shrink those hefty files without sacrificing quality. Let’s dive into the world of image file sizes and why it matters!
Understanding Image File Size and Its Importance
Before we jump into the nitty-gritty of reducing image sizes, let's first understand what image file size actually means. Simply put, the file size of an
Why should we care about file sizes? Here are a few reasons:
- Storage Space: Large image files can quickly consume your Mac's storage. If your hard drive is full, it can slow down your device and limit your ability to save new files.
- Upload and Download Speed: Smaller images upload to websites and transfer over email much faster. If you’re sharing photos with friends or uploading them to a site, smaller files mean less waiting time.
- Website Performance: For those running websites, large images can slow down page load times, affecting user experience and potentially hurting your SEO ranking.
Now, let's break down the factors that influence image file size:
- Dimensions: The width and height of an image play a huge role in its size. A higher pixel count (like 4000 x 3000) will be larger than a smaller one (like 800 x 600).
- Resolution: Measured in DPI (dots per inch), higher resolutions lead to larger file sizes. For example, a 300 DPI image is much larger than the same image at 72 DPI, which is typically used for web images.
- File Format: Different formats compress images differently. JPEG files are great for photographs with some loss of quality, while PNG files are lossless, retaining more detail but often resulting in larger sizes.
Understanding these factors can help you choose the right images for your needs and know how to effectively reduce their sizes without compromising too much on quality. By taking control of your image file sizes, you can enhance your Mac’s performance and improve your overall workflow.
Also Read This: How to Enlarge a PDF Image for Better Detail
3. Using Preview to Reduce Image File Size
Did you know that your Mac comes with a built-in tool called Preview that can help you easily reduce image file sizes? It’s user-friendly and doesn’t require any additional downloads. Let’s walk through the steps together!
First, open the image you want to reduce in Preview. You can do this by simply double-clicking the image file, and it should automatically open in Preview. If it doesn’t, right-click the file, choose “Open With,” and select “Preview.”
Once your image is open, follow these simple steps:
- Go to the File menu in the top left corner.
- Select Export (not Export As).
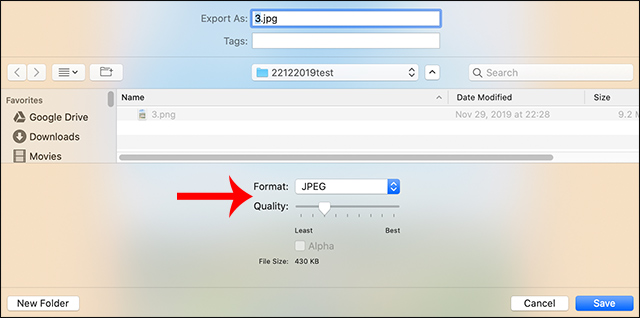
- In the dialog box that appears, you’ll see a slider for adjusting the Quality of the image.
- Move the slider to the left to reduce the quality and therefore the file size. You can preview the file size change at the bottom of the dialog.
- Choose your destination and click Save.
And voila! You’ve just compressed your image using Preview. This method is great for quick adjustments and works well for most typical image formats like JPEG and PNG.
Just remember: while decreasing the quality does reduce the file size, it can also affect the image resolution. Make sure to find the right balance so your images still look good, especially for prints or professional use.
Also Read This: CapCut Compositions: Adding Music from Spotify to Your CapCut Projects
4. Compressing Images with Third-Party Applications
If you’re looking for more advanced options, third-party applications can take your image compression to the next level! Here are a few popular ones you might consider:
- ImageOptim: This app is fantastic for batch processing images. You can drag and drop a whole folder of images, and it will compress them without losing quality. It supports numerous formats and is super easy to use!
- JPEGmini: If you frequently work with JPEGs, this tool is a godsend. It promises to reduce file sizes by up to 80% while preserving image quality. Perfect for photographers looking to save space.
- GIMP: This is a free, open-source image editor that offers extensive features, including image resizing and compression. While it’s more complex than some other options, it’s powerful if you want to tweak images further.
Each of these applications has its own unique features, but they all focus on keeping the quality high while reducing the file size. After installation, simply follow the prompts to import your images, adjust compression settings, and let the software do its magic!
Moreover, many of these apps allow you to set preferences for different formats, which is super handy if you regularly switch between image types. For example, you might want a high-quality PNG for web use but a smaller JPEG for emails.
In conclusion, while Preview is a great built-in option for quick adjustments, third-party applications provide enhanced features and flexibility for anyone serious about image management. Give a couple of them a try and see which one fits your workflow best!
Also Read This: Amazon Alliance: Linking Alibaba to Your Amazon Business
5. Adjusting Image Resolution for Smaller File Sizes
When it comes to reducing image file sizes on your Mac, one of the most effective techniques is adjusting the image resolution. Higher resolution images contain more pixels, which means larger file sizes. By lowering the resolution, you can significantly decrease the size without drastically compromising quality.
Here’s how you can do it:
- Open Preview: This built-in application on your Mac is your best friend for quick edits. Simply right-click your image and select Open With > Preview.
- Access the Adjust Size Option: In Preview, go to the menu bar and click on Tools > Adjust Size. A new window will pop up.
- Change the Resolution: Here, you'll see the current resolution in pixels per inch (PPI). For web use, a resolution of 72 PPI is often sufficient, while for high-quality prints, you might want to keep it around 300 PPI. Adjust this number, and you'll see the file size change right before your eyes!
- Save Your Image: After adjusting, hit OK and then File > Save As to save a new version of your image. This way, your original file is untouched!
Adjusting the resolution is particularly useful for images intended for websites or social media. For example, if you're uploading an image to your blog, a 1200 x 800 pixel image at 72 PPI is usually more than enough. Plus, your site will load faster, providing a smoother experience for your visitors.
Also Read This: Maximizing Discoverability on 123RF: Tips for Increasing Exposure
6. Batch Processing Images for Efficiency
If you have a large number of images to reduce in size, manually adjusting each one can be a real time sink. Thankfully, your Mac has built-in tools and applications that allow for batch processing, letting you apply changes to multiple images at once.
Here’s a simple way to batch process images using Automator:
- Open Automator: You can find this application in your Applications folder. Once opened, select New Document and choose Workflow.
- Add the Action: In the left panel, under Photos, find Scale Images. Drag this action into your workflow on the right. You'll be prompted to add a "Copy" option if you want to keep the originals intact.
- Set the Desired Size: Input your desired size, say 800 pixels, and the action will scale all images to that width while maintaining the aspect ratio.
- Save Your Workflow: Now, simply click on File > Save and give your workflow a name. Next time, you’ll just need to open this workflow and drop your images in!
Using this method can save you countless hours, especially when dealing with images for presentations, websites, or photo galleries. Plus, you can customize your workflow to include additional actions, like converting file types or renaming files in bulk.
In summary, adjusting image resolution and batch processing are two powerful methods to reduce image file sizes on your Mac. Not only do they enhance your workflow, but they also ensure that your images remain crisp and clear, ready for any platform.
7. Best Practices for Image Formats and Compression
When it comes to reducing image file sizes on a Mac, choosing the right format can significantly impact both quality and size. Here are some best practices to guide you:
- Choose the Right Format: The most common image formats are JPEG, PNG, and GIF. Each has its strengths:
- JPEG: Ideal for photographs with rich colors and gradients. Use this format when you need to maintain quality while significantly reducing file size.
- PNG: Best for images that require transparency or for graphics with text and sharp edges. PNG files can be larger but retain high quality.
- GIF: Perfect for simple animations and graphics. However, it’s limited to 256 colors, making it less ideal for complex images.
- Try Different Compression Levels: Most image editing software allows you to
 admin
admin


