If you're diving into the world of YouTube, you know how crucial it is to have top-notch audio for your videos. Great audio not only enhances the viewer's experience but also keeps them engaged. Luckily, recording high-quality audio doesn't have to be complicated, especially when you have a fantastic tool like Audacity at your disposal. In this guide, we'll walk you through the basics of recording YouTube audio using Audacity, making it easy for anyone—yes, even beginners—to get started!
What You Need to Get Started
Getting your audio recording setup ready is simpler than you might think. With a few essential items and software, you'll be all set to produce clear, professional-sounding audio for your YouTube videos. Here’s a breakdown of what you’ll need:
1. Hardware Essentials
To achieve great audio quality, you'll need some basic hardware. Here are the must-have items:
- Microphone: A good microphone is key. You can start with a USB microphone, which is user-friendly and connects directly to your computer. Popular options include the Blue Yeti and the Audio-Technica ATR2100x.
- Headphones: A decent pair of closed-back headphones is necessary for monitoring your recordings. This helps to catch issues like background noise or audio distortion as you record.
- Pop Filter: Although optional, a pop filter helps eliminate plosive sounds that can make your audio sound less professional.
2. Software Setup
Next, you'll need to download a reliable audio recording software. Audacity is a fantastic choice because it’s free, open-source, and packed with features. To get started:
- Go to the Audacity website and download the version compatible with your operating system.
- Install the software by following the prompts.
3. Additional Tips
Before you start recording, consider doing the following:
- Choose a Quiet Room: Select a space with minimal background noise to improve recording quality.
- Check Your Levels: Make sure the audio levels are set correctly in Audacity to avoid clipping or distortion.
- Use a Stable Surface: If you're using a stand, ensure your microphone is stable and doesn’t pick up vibrations.
By gathering these essential tools and prepping your environment, you’ll be well on your way to creating high-quality audio for your YouTube videos. Excited yet? Let’s take the next steps together and dive deeper into the recording process in the sections that follow!
Also Read This: How to Download MP3 Files from a YouTube Playlist for Music Enjoyment
3. Installing Audacity on Your Computer
Installing Audacity is a breeze, and I promise you’ll be up and running in no time! The first step is to visit the official Audacity website. Just grab your favorite web browser and type in audacityteam.org. You’ll be greeted by a friendly interface that makes it super easy to find what you need!
Once you’re on the site, look for the Download button. Depending on your operating system—whether you’re on Windows, macOS, or Linux—click the appropriate option. For most users, the process will be straightforward:
- Windows: Click on the Windows version link and the download should start automatically.
- macOS: For Mac users, select the macOS version. Depending on your security settings, you may need to allow installations from the internet.
- Linux: Linux users typically find Audacity in their distribution’s software center, but you can also download the classic version directly from the site.
After the download completes, it’s time to install! Double-click the downloaded file to launch the installation wizard. Follow the on-screen prompts—nothing too complex here. You’ll be asked to agree to the software license, choose an installation location, and then you can just sit back and let Audacity do its thing.
Once the installation is complete, you can find Audacity in your applications or start menu. Open it up, and voila! Welcome to the world of audio recording!
One quick tip: Make sure your computer meets the system requirements for Audacity. Typically, if your computer can run the latest version of your operating system, you should be just fine for Audacity as well!
Also Read This: Why Can't I See Comments on YouTube Mobile? How to Fix Comment Viewing Problems
4. Setting Up Audacity for Recording

Now that you’ve installed Audacity, it’s time to set it up for recording! This is the part where you customize your environment so that you can capture great audio effortlessly.
First, let’s take a look at the layout. Audacity’s interface might seem a little overwhelming at first, but don’t worry; once you get familiar with the basic tools, it’ll feel like second nature.
Here are a few essential steps to get you going:
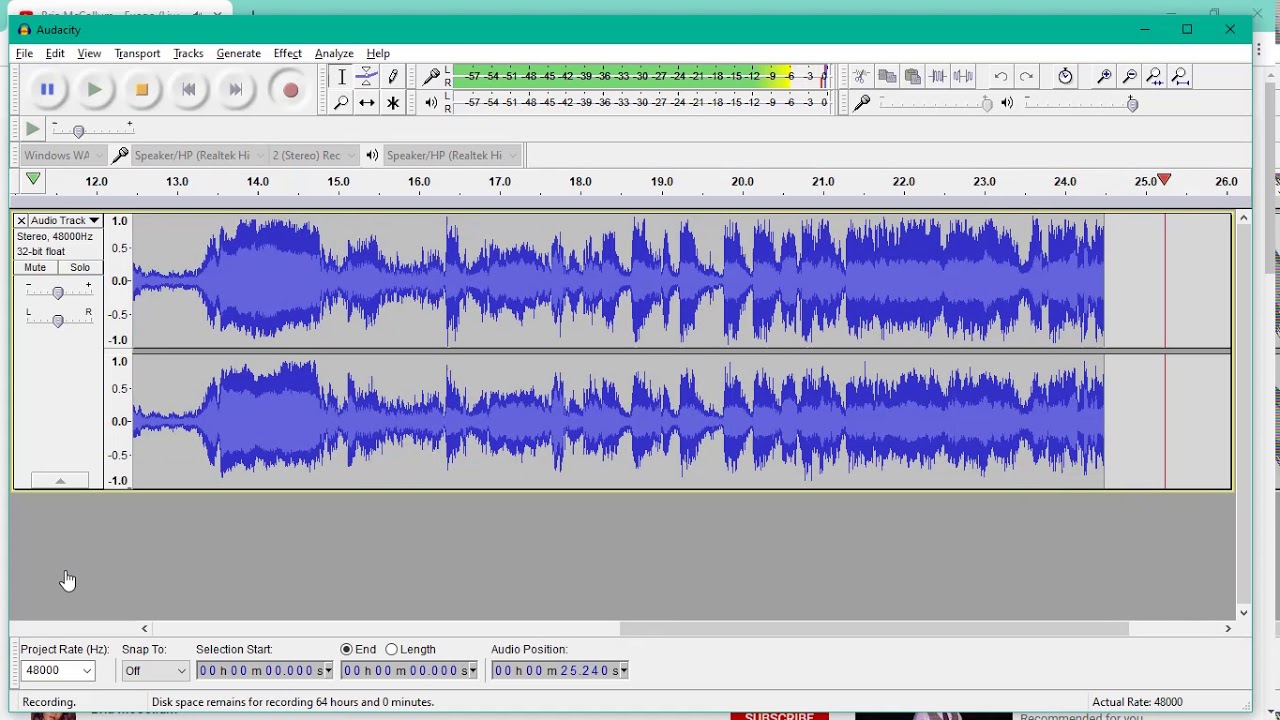
- Select Your Microphone: Before recording anything, you need to tell Audacity which microphone to use. Go to the dropdown menu at the top toolbar where it displays the Input device. Select your microphone. If you’re using a USB mic, it should appear as a separate device.
- Adjust Input Levels: It’s crucial to get your input levels just right! Speak into the microphone and watch the meters on the right side of the interface. Ideally, you want the level to peak around -12dB to -6dB to avoid clipping.
- Set Project Rate: Look at the bottom left corner of the window; you’ll see a setting for Project Rate (Hz). For YouTube audio, a rate of 44,100 Hz is generally best for quality, as it's standard for audio CDs.
- Enable Monitoring: To ensure you're capturing quality audio, enable monitoring. You can do this by clicking on the microphone icon to listen to yourself as you record. Just make sure to wear headphones to avoid feedback.
Once you’re all set up, hit that big red record button and start talking! Remember, you can always pause and resume recording to capture the audio just the way you want it. If you make a mistake, don’t stress! Audacity makes it easy to edit out any bloopers or unwanted sections later on.
Congratulations! You’re now ready to dive into the exciting world of audio recording with Audacity. Have fun, experiment, and most importantly, enjoy creating your content!
Also Read This: How to Download YouTube Videos on an iPhone
5. How to Capture Audio from YouTube
If you’re looking to record audio from YouTube, it’s crucial to do it the right way, both for quality and legality. Before diving into tools and methods, remember to respect copyright laws and only capture audio that you're allowed to use. Now, let’s explore how to capture YouTube audio using your trusty Audacity!
Here’s a step-by-step process you can follow:
- Download Audacity: If you haven’t installed Audacity yet, head over to their official website and grab the latest version. It’s free and simple to set up.
- Install a Virtual Audio Cable: To capture the audio from YouTube, you may need a virtual audio driver. Programs like VB-Audio Virtual Cable work wonders. This software routes audio from one application to another, allowing you to record YouTube audio directly.
- Set Up Your Audio Sources:
- Open your sound settings. Navigate to the "Recording" tab and set the Virtual Audio Cable as your default device.
- In Audacity, select the same virtual cable as your recording input. You can find this option in the dropdown menu next to the microphone icon.
- Play Your YouTube Video: Once everything is set up, open YouTube and find the video you want to capture audio from.
- Hit Record: Switch back to Audacity and click the record button. Then, play your YouTube video. The audio should start flowing into Audacity, making it easy to capture.
- Monitor Levels: Keep an eye on the audio levels in Audacity. You want to ensure they’re not peaking into the red zone, which indicates distortion.
- Stop and Save: When you’re done, press the stop button in Audacity. Don't forget to save your project!
And voila! You’ve successfully captured audio from YouTube using Audacity. It’s a straightforward process when you get the hang of it. Just remember to check legalities before using the audio in your projects.
Also Read This: How to Watch YouTube on a School Computer: A Complete Guide
6. Editing Your Recorded Audio in Audacity
Great job on recording! Now comes the fun part: editing your audio to perfection. Audacity is packed with features that can help you enhance your recording and polish it up for your audience. Let’s dive into some essential editing techniques.
Here’s how to make your audio shine:
- Import Your Recording: If you haven’t already, open the recorded audio file in Audacity. You can do this by dragging the file into the workspace or using the "File" menu to select “Open.”
- Listen and Assess: Play back your recording. Take notes on parts that need improvement—maybe there are pauses, background noise, or sections you'd like to cut out.
- Trim Unwanted Sections:
- Use the selection tool to highlight any unwanted audio. You can then hit the delete key to remove those segments.
- Adjust Volume Levels:
- To adjust volume, highlight the sections you want to change and use the “Effect” menu. Choose “Amplify” to boost the volume or “Normalize” to ensure consistency throughout the track.
- Remove Background Noise:
- Highlight a section of silence or noise. Go to the “Effect” menu and select “Noise Reduction.” Capture this noise profile and apply it to the whole track—it’s like magic!
- Add Effects: Want to make your audio sound more professional? Audacity offers various effects like equalization, reverb, and compression. Experiment to see what enhances your audio best.
- Export Your Finished Product: Once you're satisfied, go to the “File” menu and choose “Export” to save your edited audio in your desired format (like MP3 or WAV).
Edit your recording with care, and don’t be afraid to experiment! It’s all part of the learning process. Remember, the more you practice editing in Audacity, the better your audio will sound in your YouTube videos.
Also Read This: How to Get YouTube TV on Apple TV for Seamless Streaming
7. Exporting Your Audio Files
Congratulations! You've put in the hard work by recording and editing your audio in Audacity. Now it’s time to export your masterpiece so that it’s ready for your YouTube video. But don’t rush it just yet! There are some important things to keep in mind to ensure your audio sounds its best when it goes live.
To start exporting your audio, head to the top menu and follow these simple steps:
- Click on File.
- Select Export.
- You will see several options to choose from, such as Export as MP3, Export as WAV, or Export as Ogg Vorbis.
You might wonder: "Which format should I choose?" Generally speaking:
- MP3: This is the most common format and works well for YouTube. However, it does compress the audio, which might slightly affect quality.
- WAV: This is a lossless format, meaning you won't lose any quality. It results in larger file sizes, but if sound quality is your top priority, this is the way to go.
- Ogg Vorbis: This format is comparable to MP3 but tends to offer better quality at similar bit rates. It's a bit less common than MP3 but still a good option.
Once you've selected your format, you’ll be prompted to choose a location to save your file. Make sure to choose a spot where you can easily find it later—your desktop or a dedicated folder for your YouTube projects works well.
Next, before you click Save, Audacity will give you an option to fill in some metadata for your audio file. This includes information such as the title, artist name, and album. Having this information can be beneficial for organization and for various platforms that might display this info. Just fill in what you want and hit OK when you're done!
Now, you can sit back and feel proud of the high-quality audio file you’ve just created, ready to enhance your YouTube content. Always remember to keep a backup of your Audacity project file (.aup) in case you need to make future edits!
Also Read This: How to Download YouTube Videos to Your iPad for Offline Watching
8. Common Issues and Troubleshooting Tips
As with any software, sometimes things don’t go as planned. But don’t worry! Here are some common issues you might run into while recording or exporting audio in Audacity, along with tips to troubleshoot them.
- No Sound While Recording: Make sure your microphone is properly connected and selected as the input device in Audacity. Check your computer's sound settings to ensure the mic is recognized.
- Popping or Clicking Sounds: This can happen if your audio buffer size is set too low. To fix this, go to Edit > Preferences > Devices and increase your buffer size in the Latency settings.
- Audio Distortion: If your recording sounds distorted, it could be because you were too close to the mic or recording at a high gain level. Consider adjusting your mic distance and lowering the input volume in Audacity.
- Exported Audio Sounds Different: If you notice a difference in sound quality after exporting, check the export settings. Ensure you're using a high bit rate when exporting to MP3 for the best quality.
- Audacity Crashing: Keep your software updated to the latest version. If it crashes frequently, try reducing the number of effects applied or recording in smaller segments.
If you encounter an issue that isn't listed here, don't hesitate to check the Audacity forums or YouTube’s help resources. The community is quite active and you can often find solutions from fellow users. Remember, every problem has a solution when recorded audio is involved!
Now that you know how to resolve some common issues, you’re well-equipped to tackle any hiccups that come your way as you dive deeper into the world of audio recording. Happy recording!
Conclusion and Further Resources
In conclusion, recording high-quality audio for your YouTube videos using Audacity is an accessible and rewarding process. With the tips and techniques outlined in this guide, you can significantly enhance the audio quality of your content. Remember to experiment with different settings and tools within Audacity to find what works best for your specific needs.
As you continue to improve your audio recording skills, consider exploring the following resources:
- Audacity Official Manual: Comprehensive guide covering all features of Audacity - Audacity Manual
- YouTube Creator Academy: Free courses on various aspects of YouTube content creation - YouTube Creator Academy
- Online Audacity Tutorials: Websites and channels offering step-by-step guides and tutorials - YouTube Audacity Tutorials
- Audio Editing Forums: Join communities to share experiences, get feedback, and ask questions - Audacity Forum
By leveraging these resources, you can deepen your understanding of audio recording and editing techniques, ensuring your YouTube videos stand out with pristine audio quality. Happy recording!
 admin
admin


