Recording audio from YouTube can be a game changer for content creators, podcasters, or anyone who wants to capture sound for personal use. Whether you're looking to extract music for a project, create a podcast episode, or save informative lectures, knowing how to record audio efficiently is key. In this guide, we’ll delve into the essentials of using Audacity, a free and powerful audio editing tool. Let’s get started on your audio journey!
What You Need to Get Started
Before diving into the recording process, it’s essential to gather the right tools and set up your workspace. Here’s a handy checklist of what you’ll need:
- Computer: A desktop or laptop with sufficient processing power.
- Audacity Software: Download and install Audacity from the official website. It’s free and compatible with Windows, macOS, and Linux.
- Audio Interface (Optional): If you’re capturing high-quality audio, consider using an audio interface for better sound quality.
- Headphones: A good pair of headphones will help you monitor the audio while recording.
- Internet Connection: You’ll need this to access YouTube and potentially download audio files.
Once you have your gear in place, it’s all about the settings. Here’s a brief rundown:
| Item | Purpose |
|---|---|
| Microphone | To capture any additional audio, if needed. |
| Audio Driver | Use either MME or WASAPI for Windows; Core Audio for macOS. |
| Recording Device | Select 'Stereo Mix' or 'What U Hear' for capturing audio from YouTube. |
With everything set up, you’re ready to explore your recording capabilities. Remember, practice makes perfect! The more you experiment with Audacity, the more comfortable you’ll become with its features. In the next sections, we’ll cover the step-by-step process of recording audio from YouTube.
Also Read This: How to Ban Someone from Your YouTube Channel Permanently
3. Setting Up Audacity for Audio Recording
Alright, let’s get Audacity ready for our audio recording adventure! First things first, if you haven’t already, make sure you download and install Audacity from the official website. It’s free and works on multiple platforms, which is a big plus. Once you have it installed, we can dive into the setup.
To begin, launch Audacity. You’ll be greeted by a clean interface that might look a bit overwhelming at first, but don’t worry—it’s pretty intuitive once you get the hang of it. Here’s what you need to do to set it up for recording audio from YouTube:
- Select Your Input Device: Go to the dropdown menu next to the microphone icon. This is where you’ll choose your input device. If you’re using your computer’s sound, look for something like “Stereo Mix” or “What U Hear.” If you don’t see this option, you might need to enable it in your sound settings.
- Set Recording Channels: Right next to the input device, you’ll see a dropdown for channels. Make sure it’s set to 2 (Stereo) to capture the full audio experience.
- Adjust the Recording Volume: Use the slider next to the microphone icon to adjust the recording volume. Start at a moderate level to avoid clipping, and you can adjust it as needed during the recording.
- Enable Software Playthrough: This feature lets you hear the audio as it records. To enable it, go to Edit > Preferences > Recording and check the box next to “Enable software playthrough.” This is particularly useful if you want to monitor the audio quality while recording.
After you’ve gone through these settings, give Audacity a quick test run. Play a short clip from YouTube, hit record in Audacity, and see if you can hear the audio. If everything sounds good, you’re ready to start recording!
Also Read This: Streaming NFL RedZone on YouTube TV: A Beginner’s Guide
4. Step-by-Step Guide to Recording Audio from YouTube
Now that Audacity is all set up, let’s move on to the actual recording process! Follow these steps to capture audio from YouTube like a pro:
- Open Your YouTube Video: Navigate to the YouTube video you want to record. Make sure it’s ready to play, as you’ll need to switch between your browser and Audacity quickly.
- Prepare Audacity: Before hitting that record button, ensure you’ve selected the correct input device and set the recording levels as we discussed earlier. It’s smart to do a quick test recording to fine-tune everything.
- Hit Record: In Audacity, click the red record button. You’ll see a new track start to populate as the audio plays. Make sure to start your YouTube video immediately after hitting record!
- Monitor the Recording: Keep an eye on the audio levels while the video plays. You want to avoid peaking (the red zone) and keep the volume in the green or yellow range for optimal quality.
- Stop the Recording: Once the section you want to capture is done, click the brown stop button in Audacity. Your audio should now be visible as a waveform.
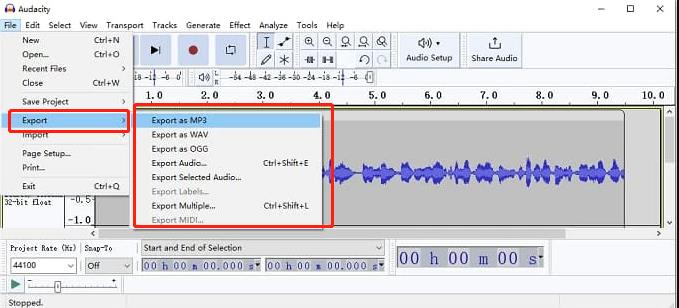
- Save Your Work: Go to File > Export > Export as WAV (or MP3 if you prefer) to save your recording. Choose your desired file name and location, then click Save.
And voila! You’ve successfully recorded audio from YouTube using Audacity. How easy was that? Now you can enjoy your favorite content offline or use it in your own projects. Happy recording!
Also Read This: How to Watch the Debate Live on YouTube: A Guide for Viewers
5. Editing Your Recorded Audio in Audacity
Now that you’ve successfully recorded your YouTube audio, it’s time to dive into the fun part—editing! Audacity is a powerful tool that allows you to clean up your audio, enhance its quality, and make it sound professional. Let’s explore some essential editing features to get you started.
Trimming Unwanted Sections
First things first, you’ll want to trim out any unnecessary parts of your recording. Maybe there were some awkward pauses or that pesky “um” you want to eliminate. Here’s how you do it:
- Select the Selection Tool (the I-beam icon).
- Click and drag over the section you want to remove.
- Hit the Delete key on your keyboard, and voila! It’s gone.
Applying Noise Reduction
Background noise can be a real nuisance in your audio recordings. Luckily, Audacity has a fantastic noise reduction feature that can help clean things up.
- Highlight a section of the audio that only contains background noise.
- Go to Effect > Noisify and click Get Noise Profile.
- Now, select the entire audio track.
- Return to Effect > Noise Reduction and click OK.
This should significantly reduce any unwanted background noise, giving your audio a clearer sound.
Adjusting Volume Levels
To ensure your audio is balanced throughout, you may want to adjust the volume levels. Select the portion of audio you want to adjust and use the Amplify effect to raise or lower the volume.
With these edits, your audio is shaping up nicely! Don’t forget to listen back to your edits to ensure everything flows well. Happy editing!
Also Read This: Adding Viewer Discretion Warnings to Your YouTube Videos: A Complete Guide
6. Exporting and Saving Your Audio File
Once you’re satisfied with your edits, it’s time to export your masterpiece! Saving your audio file in the right format ensures it’s ready for sharing or uploading to your YouTube channel. Here’s how to do it:
Choosing Your Export Format
Audacity allows you to export your audio in various formats, but the most common for YouTube are MP3 and WAV. MP3 is great for smaller file sizes, while WAV provides higher quality but takes up more space.
Steps to Export Your Audio:
- Go to the top menu and click on File.
- Select Export and choose your desired format (e.g., Export as MP3).
- In the dialog that appears, choose the location where you want to save the file.
- Add a File Name and click Save.
You might also want to adjust the Bit Rate for MP3 files during this process. A higher bit rate gives better quality, so consider using 192 kbps or higher for optimal results.
Tagging Your Audio
Before you finish up, Audacity allows you to add metadata tags. This can include your name, track title, and album info. It’s a nice touch that helps identify your audio later. Just fill in the fields provided when exporting.
Finally, click OK, and your audio will be exported! Now you have a polished audio file ready to be uploaded or shared. Great job!
Also Read This: How to Upload a Video from iPhone to YouTube: Easy Steps
7. Tips for Better Audio Quality
Recording high-quality audio can make a world of difference in your YouTube videos. Here are some tips to elevate your audio game:
- Choose the Right Environment: Find a quiet space to record. Look for areas with minimal background noise, like a dedicated room or a closet filled with clothes to dampen sound.
- Use a Good Microphone: Invest in a decent microphone. USB microphones like the Blue Yeti or the Audio-Technica AT2020 can dramatically improve your audio quality.
- Check Your Levels: Before recording, do a sound check. Aim for your audio levels to peak around -6 dB to -3 dB to avoid distortion.
- Pop Filters Are Your Friend: A pop filter can help reduce plosive sounds (like “P” and “B” sounds) that can cause distortion. They’re affordable and can really enhance your recordings.
- Monitor Your Sound: Use headphones to monitor your audio while recording. This allows you to catch issues in real-time, ensuring you don’t miss any problems until post-production.
- Consider Acoustic Treatment: If you’re serious about your recordings, look into acoustic panels or soundproofing your space. This can help reduce echo and improve clarity.
By incorporating these tips, you’ll create a more professional sound that keeps your audience engaged. Remember, great audio is just as important as great visuals!
8. Common Issues and Troubleshooting
Even with the best intentions, things can go wrong while recording audio. Here are some common issues you might encounter and how to fix them:
| Issue | Solution |
|---|---|
| Background Noise | Make sure to record in a quiet environment. If noise persists, try using noise reduction features in Audacity during editing. |
| Low Volume Levels | Check your microphone settings. Ensure the gain is set appropriately, and consider amplifying the audio track in Audacity. |
| Echo or Reverb | Record in a less reflective space or use acoustic treatments. During editing, utilize Audacity’s effect tools to reduce reverb. |
| Distortion | Lower the recording levels or adjust the microphone positioning. If distortion occurs, reduce the gain or check for any hardware issues. |
| Static or Interference | Check all connections and cables. Use a different USB port or try another microphone to see if the issue persists. |
Don’t let small hiccups derail your recording sessions! With patience and the right troubleshooting techniques, you can overcome most audio challenges and deliver smooth, engaging sound for your YouTube audience.
 admin
admin