If you’re venturing into the world of containerization, understanding Docker images is your first step. So, what exactly is a Docker image? In simple terms, it’s a lightweight, standalone, executable package that includes everything your application needs to run: the code, runtime, libraries, environment variables, and configuration files. Think of it as a blueprint for creating Docker containers.
Docker images are incredibly versatile and help developers streamline application deployment. They ensure that an application runs consistently regardless of the environment it’s deployed in. This means you can smoothly transition your application from development to testing and then to production without facing compatibility issues.
To create a Docker image, developers usually start with a base image, such as one for a lightweight Linux distribution or a specific programming language. New layers are then created on top of this base, allowing for easy version control and smaller updates when changes are made. This layering system also saves disk space and improves performance.
On top of that, Docker Hub equips you with a massive library of pre-built images that can be pulled and customized for your projects. So whether you're building complex microservices or a simple application, understanding Docker images is crucial. It’s all about making your development process smoother and more efficient!
Prerequisites for Pulling Docker Images

Before you start pulling Docker images, there are a few prerequisites you'll need to check off your list. Don't worry; it’s a straightforward process! Let's walk through what you need to get started.
- Docker Installed: First and foremost, you need to have Docker installed on your machine. You can easily download it from the official Docker website. Installation varies slightly depending on your operating system—Windows, macOS, or Linux—but the documentation provides clear instructions for each.
- Command Line Interface (CLI) Access: You should be comfortable using the command line. Most operations with Docker involve typing commands, so being familiar with basic CLI commands can make your experience smoother.
- Account on Docker Hub (Optional): While not strictly necessary, having an account on Docker Hub can be helpful. It allows you to manage your images and access private repositories if you have any.
- Internet Connection: Since you’re pulling Docker images from a remote repository (like Docker Hub), a reliable internet connection is essential.
Once you’ve checked these boxes, you’re all set to start pulling Docker images! It’s really an easy and exciting part of working with Docker, so let’s dive into the mechanics of how you can do it.
Also Read This: Exploring the Largest Tech Hubs in the USA and Their Influence on the Economy
3. Step-by-Step Guide to Pulling a Docker Image

Pulling a Docker image might seem a bit daunting at first, but trust me, it's a straightforward process once you get the hang of it! Here’s a step-by-step guide to make it easy for you:
- Install Docker: Before you can pull images, ensure Docker is installed on your system. You can find installation instructions on the official Docker website.
- Open Your Terminal: After installation, open your terminal or command prompt. This is where you will type your commands.
- Log into Docker Hub: If you need to pull private images, you might need to log into your Docker Hub account. Use the command:
docker loginand enter your username and password when prompted. - Find the Image You Want: You can search for images on Docker Hub using the search page. For example, if you want an Ubuntu image, you might look for “ubuntu” in the search bar.
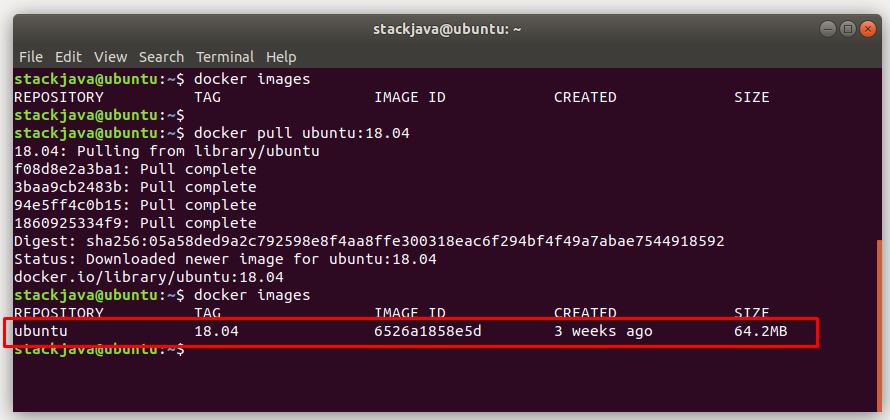
- Pull the Image: Once you find the right image, use the pull command:
docker pullFor example:: docker pull ubuntu:latest - Verify the Image is Pulled: To ensure the image was pulled correctly, list all your images with:
docker images
And there you go! You’ve successfully pulled a Docker image!
Also Read This: Step-by-Step Guide to Casting Dailymotion Videos to Your TV
4. Understanding the Docker Pull Command

The Docker Pull Command is your gateway to accessing a wide range of Docker images from Docker Hub or a custom registry. Let’s break down how it works:
What is the Docker Pull Command?
Essentially, the docker pull command allows you to download an image from a repository. The general syntax is as follows:
docker pull <repository>/<image-name>[:<tag>]Components of the Docker Pull Command
- Repository: This refers to the source from where the Docker image is being pulled, typically Docker Hub.
- Image Name: The name of the image you wish to download. For instance, "ubuntu."
- Tag: This is an optional parameter that points to the specific version of the image, like "latest" or "18.04." If no tag is specified, Docker defaults to the "latest" tag.
Why Use the Pull Command?
The docker pull command is crucial because:
- It allows you to access pre-built images, saving you time.
- It ensures you're working with the latest versions of images by specifying tags.
- It supports collaboration by enabling teams to pull the same images consistently.
In summary, mastering the Docker Pull Command opens up a world of possibilities for using Docker images in your projects!
Also Read This: Don’t Worry Darling Watch Online on Dailymotion How to Stream
Common Issues and Troubleshooting
When working with Docker images, it’s essential to recognize that issues may arise from time to time. Here are some common problems and their solutions to help you navigate through them smoothly:
- Image Not Found: This error usually occurs when you try to pull an image that doesn’t exist or is misspelled. To solve this issue, double-check the image name and tag for typos. You can also search for the correct image on Docker Hub.
- Network Issues: If you're having trouble in pulling an image, it might be due to network connectivity problems. Ensure your internet connection is stable, and that Docker can connect to Docker Hub. You can try accessing Docker Hub in your browser as a quick test.
- Insufficient Disk Space: You might run into disk space issues when pulling large images. You can check your available disk space using terminal commands. To free up space, consider removing unused images with
docker image prune. - Docker Daemon Not Running: Ensure that your Docker daemon is up and running. You can start it using
systemctl start dockeron Linux or use the Docker Desktop application for Windows or macOS. - Permissions Issues: Sometimes, you might face permission errors when pulling images. In such cases, ensure that you have the right permissions to execute Docker commands. You can add your user to the Docker group via
sudo usermod -aG docker.
By keeping these common issues in mind, you’ll be better prepared to troubleshoot effectively, making your Docker experience smoother and more enjoyable!
Also Read This: Perfect Nescafe Classic Coffee Recipe
Best Practices for Managing Docker Images
Managing Docker images efficiently is key to maintaining a clean and functional environment. Here are some best practices to keep in mind:
- Use Tags Wisely: Always tag your Docker images with meaningful, specific tags. Instead of just using
latest, opt for version numbers or descriptive tags that indicate the image’s purpose or compatibility (e.g.,app:v1.0). - Clean Up Unused Images: Regularly prune unused images to free up disk space. You can automate this with commands like
docker image pruneor rundocker system pruneto clean everything up. - Layer Optimization: Keep your Dockerfile efficient by minimizing the number of layers. Combine commands where possible to reduce the final image size. This not only conserves space but also increases build time.
- Document Your Images: Maintain documentation that explains what each Docker image does. Include details like dependencies, environment variables, and usage instructions. This will help onboard new team members and keep your workflow organized.
- Use a Private Registry if Necessary: If you're working with sensitive or proprietary images, consider using a private Docker registry instead of Docker Hub. This adds an additional layer of security for your images.
By implementing these best practices, you’ll find that managing Docker images becomes a more streamlined and efficient process, ultimately leading to greater productivity in your development workflow!
How to Pull a Docker Image
Docker is a powerful platform that enables developers to automate the deployment of applications inside lightweight containers. One of the first steps to using Docker effectively is to pull Docker images from a registry. This guide will walk you through the process of pulling a Docker image, ensuring you can start building and running your applications with ease.
To pull a Docker image, follow these steps:
- Install Docker: Ensure that Docker is installed on your system. You can download Docker from the official website and follow the installation instructions for your operating system.
- Open a Terminal or Command Prompt: Access your command line interface where you will execute Docker commands.
- Login to Docker Hub (optional): If you need to pull a private image, log in to Docker Hub using the command:
docker login - Pull the Image: Use the `docker pull` command followed by the name of the image. For example:
This command pulls the latest Ubuntu image from Docker Hub.docker pull ubuntu
### Tips for Successful Image Pulling
- Check the image name for typos.
- Use a specific tag for version control:
docker pull ubuntu:18.04. - Ensure that you have an active internet connection.
In case you want to see all images pulled, you can use the command:
docker imagesBy mastering the process of pulling Docker images, you set the foundation for efficient application development and deployment.
Conclusion: Pulling a Docker image is a straightforward process that opens the door to utilizing containerization in your projects, allowing for swift and scalable application deployment.
 admin
admin


