Note: Editing is a highly advanced field that requires professionalism, so any inaccuracies could lead to misinterpretation of the writer’s ideas hence changing context which leads to low understanding of a given text by others.Human beings can never do without printing images because resolution and size matter most when dealing with pictures. Image resolution entails how much detail an image possesses as measured in pixels per inch (PPI). In simple terms, high PPI means a more defined print. On the other hand, size signifies its physical measurements typically described using inches or cm. It is important for one to know these two concepts if they want quality prints.
To exemplify it, allow me to offer a brief summary:
- Low Resolution: Typically 72 PPI. Best for web images, but can appear blurry when printed.
- Medium Resolution: About 150 PPI. Suitable for smaller prints, like brochures.
- High Resolution: 300 PPI or more. Ideal for professional printing and larger formats.
When printing, it’s essential to match the image resolution to the intended print size. For instance, if you want to print an 8x10 inch photo at 300 PPI, your image should be at least 2400x3000 pixels. Understanding these basics will set you on the right path to printing beautiful images.
Choosing the Right Image for Printing

The quality of your print can be greatly affected by the kind of images you use. The first thing that should come into your mind is where these pictures are coming from; thus, some tips might help:
- Use High-Quality Sources: Choose images from professional stock photo sites or your own high-resolution photos.
- Avoid Compressed Images: Compressed images often lose quality. Opt for RAW or TIFF formats when possible.
- Consider the Content: Ensure the image content matches your printing needs—whether it’s for a poster, flyer, or personal photo.
Maintain in mind that the better the quality of the initial picture, the better will be your print out. It is particularly true with bigger prints in which any detail loss will be more conspicuous.
Also Read This: Proven Strategies for Gaining More Facebook Likes with Dailymotion Content
Steps to Resize an Image for Printing
A picture may look challenging to resize for printing but actually it is very easy if you break it down step by step. Here’s what you can do:
- Open Your Image Editing Software: Use tools like Photoshop, GIMP, or online editors like Canva.
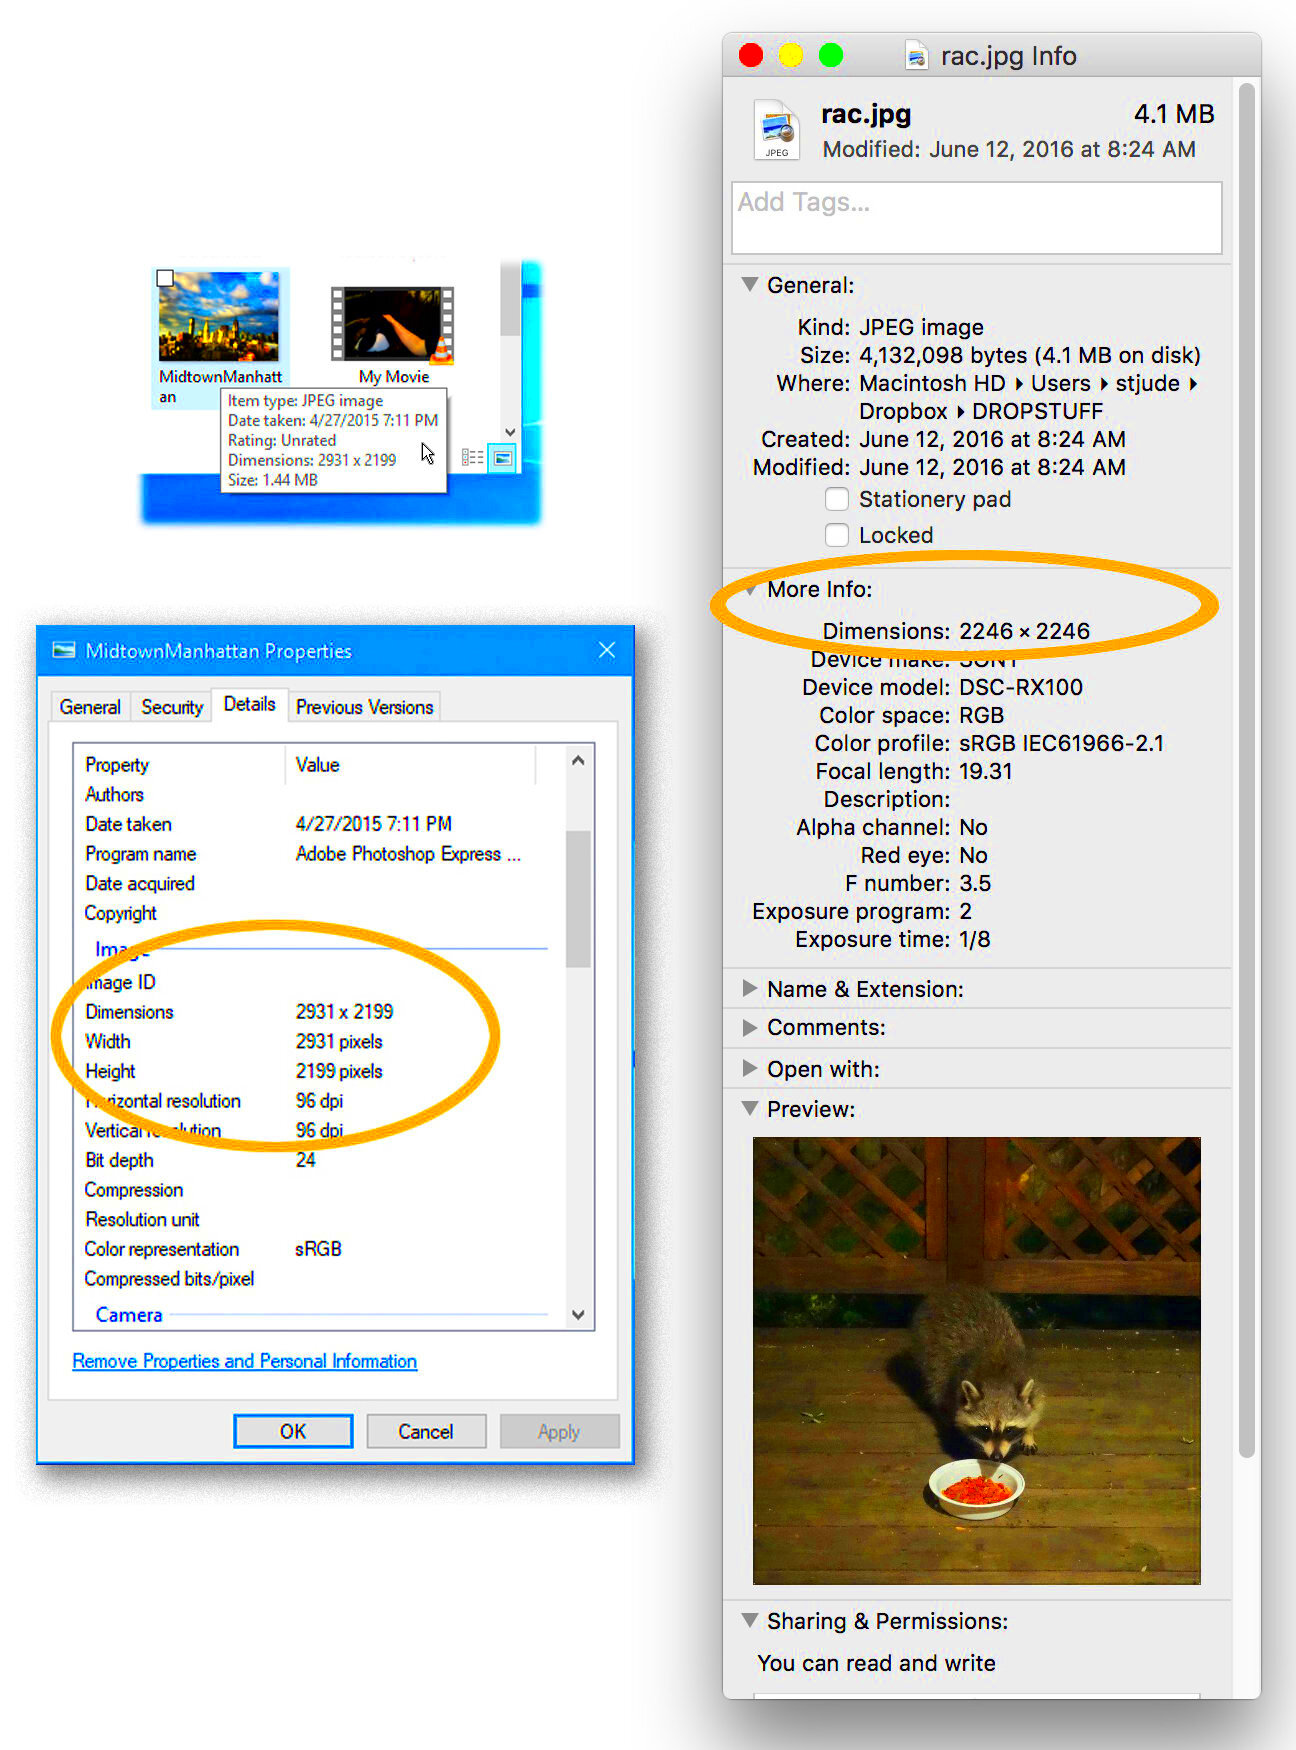
- Check Image Dimensions: Look at the current dimensions and resolution. You can usually find this under the "Image" menu.
- Adjust the Resolution: Change the PPI to your desired setting (e.g., 300 PPI for prints).
- Change the Size: Input the physical dimensions you want. Ensure the aspect ratio remains locked to avoid distortion.
- Save Your Image: Choose a suitable format, preferably PNG or TIFF, to maintain quality.
In searching for a high resolution original image, there is little need to panic if your resized pictorial becomes pixelated. Always begin by using the best quality!
Also Read This: How to Upscale Images Using Krita for Better Quality
Using Online Tools to Resize Images for Print
Resizing pictures for printing has become very easy with the availability of multiple online platforms. Most of these websites are user-friendly and do not charge a dime thus favoring those who do not own professional programs. In this article, we will discuss ways in which one can utilize most of these websites to resize images to their desired size for printing purposes.
Here are some well-known online tools that may be worth your consideration:
- Canva: Great for designing and resizing images. You can set your custom dimensions and download in high quality.
- PicResize: A simple tool that allows you to upload an image, resize it, and then save it without hassle.
- Fotor: This offers image resizing along with a suite of editing tools to enhance your images before printing.
- BeFunky: This site provides a straightforward interface for resizing images and includes various editing options.
Utilizing these instruments is usually a piece of cake like:
- Upload your image.
- Select the dimensions or resolution you need.
- Download your resized image in the desired format.
Just always keep in mind to always check the quality again after resizing. Certain tools can also compress it, thereby influencing the final print.
Also Read This: What to Do When Alamy Is Down – Troubleshooting Tips for Users
Common Mistakes When Printing Images at Specific Sizes
In terms of photos’ printing, there are a number of usual errors that can destroy your outcome. Being acquainted with such downsides can help you avoid wasting time, resources and energy.
Here are some blunders one must steer clear of:
- Ignoring Resolution: Not checking the PPI can lead to blurry images. Always ensure you have at least 300 PPI for prints.
- Using Low-Quality Images: Attempting to print a low-resolution image can result in pixelation. Always choose high-quality sources.
- Not Cropping Correctly: Failing to crop an image properly can lead to unwanted parts appearing in the print.
- Choosing the Wrong Paper Type: Not all images are suitable for all paper types. Make sure your image matches the paper finish.
You can guarantee a less complicated printing procedure and an improved end product if you are conscious of these errors. Always review your image before sending it to the printer!
Also Read This: Perfecting Your Eyebrows at Home with a Pencil
How to Maintain Image Quality When Resizing
Retain the clarity of your pictures for amazing prints when resizing them. Since this may result in losing detail, they should be handled delicately. This makes it necessary that you know some few secrets concerning resizing images which will keep them looking crisp and detailed.
Strategies for maintaining quality include:
- Start with a High-Resolution Image: The better the original image, the easier it is to resize without losing quality.
- Avoid Upscaling Too Much: Enlarging an image significantly can lead to blurriness. Try to stay within a reasonable size increase.
- Use Professional Software: If possible, use tools like Adobe Photoshop, which provide better algorithms for resizing images than many free tools.
- Adjust in Small Increments: When resizing, make adjustments gradually instead of making big leaps. This helps retain quality.
Finally, before printing your resized image, make sure that you have previewed it always. To be sure that you are prepared for an excellent print, keep an eye out for any indications of pixelation or blurriness!
Also Read This: Reversing Colors in Images for a Fresh Look
FAQs About Printing Images at a Specific Size
Questions related to printing an image in a particular size can often arise. To help clarify things, let us look at some of the questions that are often asked.
What is the ideal resolution for printing?
For high-quality prints, aim for at least 300 PPI. This ensures that your images are sharp and clear.
Can I print an image that is too small?
While you can technically print a small image, it may result in pixelation or blurriness. It’s best to use images with sufficient resolution for your desired print size.
How do I know if my image is high enough quality?
Check the PPI and dimensions of your image. You can do this in most image editing software. For example, an 8x10 inch print at 300 PPI requires a minimum resolution of 2400x3000 pixels.
What format should I save my image in for printing?
Use lossless formats like TIFF or PNG for printing. These formats retain image quality better than JPEG, which can lose detail due to compression.
How can I adjust the print size without losing quality?
Use high-quality editing software and avoid large upscaling. Resize gradually, and always start with the highest resolution image available.
To print images properly sized, these frequently asked questions will help to remove any doubts and keep you directed towards deriving ideal outcomes.
Conclusion
It isn’t necessary to be terrified of printing images in determined sizes. To achieve high quality prints consistently, ensure you know image resolution, pick the right pictures and evade simple errors. Regardless of whether art, posters or private photographs are being created; applying these tips will lead to magnificent outcomes you can be satisfied with.
 admin
admin


