Printing images can transform a simple photo into a magnificent piece of art. Whether you're looking to create posters for a wall, display vibrant graphics, or even build a fun collage, understanding how to print effectively is essential. In this post, we’ll dive into the exciting world of printing images, particularly focusing on the technique of spreading a single image across multiple pages. This method can turn any standard image into a large-scale masterpiece that’s sure to impress!
Why Print Images on Multiple Pages?
So, why would you want to print an image across multiple pages? Here are some compelling reasons:
- Size Matters: Sometimes, a single sheet of paper just isn't big enough to capture the essence of your image. By printing across multiple pages, you can create a larger-than-life representation that draws the eye and makes a statement.
- Cost-Effective: Large-format printing can be expensive. Printing on standard-sized paper saves money while still allowing you to create impressive displays. You can print your image at home or your local print shop without breaking the bank.
- Customization: When printing on multiple pages, you have the flexibility to customize the layout. Want a portrait orientation on one page and landscape on another? Go for it! This creativity can lead to unique compositions.
- Easy to Handle: Large prints can be cumbersome. By dividing an image into smaller segments, you make it more manageable to transport and assemble. Think of it like piecing together a puzzle—each page is a piece that fits perfectly into the bigger picture.
Now, let’s consider some practical scenarios where printing images on multiple pages shines:
- Home Decor: Turn your favorite vacation photo into a stunning wall display. By spreading it across several pages, you can create a dramatic focal point that sparks conversations.
- Event Decor: Planning a birthday party or event? Large images can serve as great backdrops. Picture a giant birthday greeting or themed decorations that enhance the atmosphere.
- Presentations: Need to impress in a meeting? A large visual aid printed across multiple pages can highlight your points effectively and keep your audience engaged.
In conclusion, printing images across multiple pages is not just a fun project; it opens up a world of possibilities for creativity and visual impact. Whether for personal use, events, or professional presentations, this technique can elevate your prints from ordinary to extraordinary. So grab your favorite image, and let’s get printing!
Also Read This: Making Money from Getty Images Images: Exploring Revenue Opportunities
3. Preparing Your Image for Printing
Before you hit that print button, it's crucial to ensure your image is ready for the big screen—or should I say, the big paper! Proper preparation can make a world of difference in the final output, so let’s dive into some essential steps to get your image print-ready.
Check Resolution: One of the first things to consider is the resolution of your image. For printing, you'll want a resolution of at least 300 DPI (dots per inch). This ensures that your image remains sharp and clear when printed. If your image is too low in resolution, it might look pixelated when enlarged across multiple pages.
Adjust Image Size: Next, you need to adjust the size of your image. If you're planning to print across multiple pages, you should calculate the total dimensions. For example, if you want a final print size of 6 feet by 4 feet, you’ll need to scale your image accordingly. Use photo editing software like Adobe Photoshop or GIMP to resize your image to the proper dimensions.
Color Mode: Ensure your image is in RGB color mode for digital screens and CMYK color mode for printing. Most printers work better with CMYK, as they’re designed to mix these four inks (Cyan, Magenta, Yellow, Black) for the best color output. You can convert your image in programs like Photoshop under the “Image” menu.
File Format: Save your image in a format suitable for printing. Common formats include JPEG, TIFF, and PNG. TIFF is often the go-to choice for high-quality prints due to its lossless compression, making it ideal for images that require fine details.
Lastly, preview your image on screen to ensure everything looks just right. Adjust brightness, contrast, or saturation as needed to make sure your image pops when printed!
Also Read This: How to View and Manage Your LinkedIn Resume and Profile
4. Choosing the Right Software for Image Printing
With your image prepared, the next step is selecting the right software for printing. The software you choose can greatly influence the quality and ease of the process. Here are some popular options that cater to various needs:
- Adobe Photoshop: This is the gold standard for image editing. If you’re already familiar with it, Photoshop offers extensive control over image size, resolution, and color settings. Plus, you can easily split your image into multiple sections for printing.
- GIMP: An excellent free alternative to Photoshop, GIMP also provides robust editing features. It allows you to prepare your image effectively and is compatible with various file formats typically used in printing.
- Microsoft Publisher: If you’re looking for a straightforward way to print across multiple pages, Publisher is a user-friendly option that simplifies the process. You can set up your pages and easily arrange your images.
- Inkscape: This open-source vector graphics editor is great for those who work with scalable images. It allows for precise layout control and is perfect for creating prints that require high detail.
When choosing software, consider the following:
- User Experience: Make sure the interface is user-friendly. You want to spend time creating, not figuring out how to use the software!
- Features: Look for features that support large-format printing and allow for easy image splitting. Tools that offer print layout options are especially helpful.
- Compatibility: Ensure the software works well with your printer. Some programs include printer profiles that optimize print quality.
Once you’ve selected the right software, you’ll be well on your way to creating stunning prints that span across multiple pages! So get ready to showcase your art in a big way!
Also Read This: How to Add a Hyperlink to an Image
5. Step-by-Step Guide to Print an Image on Multiple Pages
Ready to take your printing game to the next level? Printing an image across multiple pages can transform a regular picture into a stunning poster. Let’s break this down into simple steps, so you can achieve those eye-catching results effortlessly!
Step 1: Choose Your Image
First things first, pick an image that you want to print. It should be high resolution to ensure that it looks great when enlarged. Think about vibrant photos, artwork, or even your favorite quotes that you want to display. Once you’ve chosen the image, make sure it’s saved in a format suitable for printing, such as JPEG or PNG.
Step 2: Use a Printing Software
Next, you’ll need a program that can handle the task of splitting your image. Many software options are available for this purpose, such as:
- Adobe Acrobat
- Microsoft Paint
- Block Posters (a web-based tool)
For our example, let’s use Block Posters for its simplicity!
Step 3: Upload Your Image
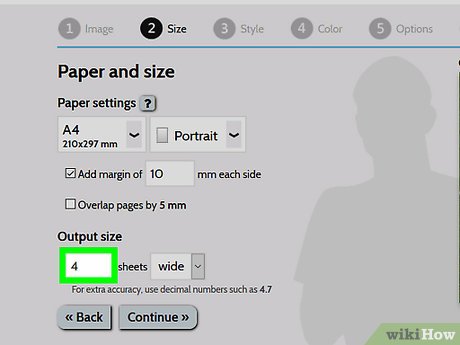
Head over to the Block Posters website and upload your chosen image. You’ll be prompted to adjust the settings:
- Select the number of pages you want to use.
- Choose the size of the paper you’ll be printing on (like A4 or Letter).
- Adjust the margins if necessary.
Once you’re satisfied, click on the “Create My Poster” button.
Step 4: Download and Print
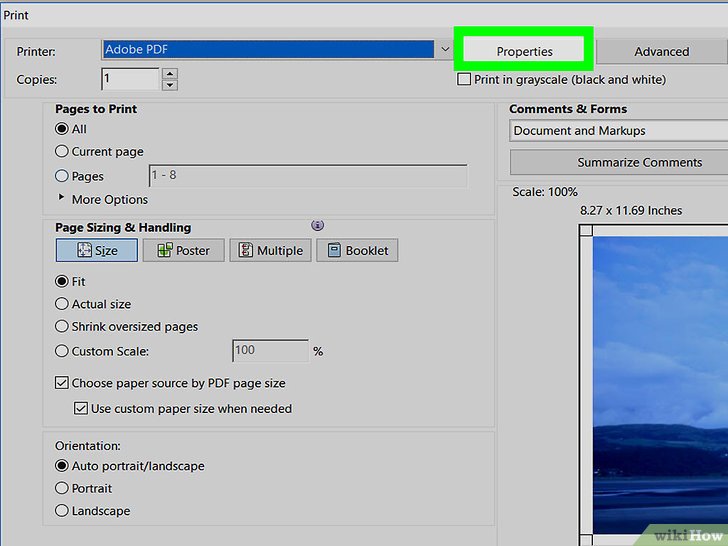
After the poster is generated, download the PDF or images to your computer. Open the file and double-check the layout. When everything looks good, it’s time to print! Make sure your printer settings are configured properly:
- Set the print quality to high.
- Ensure that you are printing in color (if applicable).
- Check that the scaling is set to 100% to keep the dimensions accurate.
Step 5: Assemble Your Poster
After printing, carefully cut off any excess white margins if needed. Now, lay out the pages on a flat surface according to the order they’ll be placed together. Use tape or glue to connect them neatly, and voilà! You have a beautiful, large image displayed across multiple pages!
Also Read This: Can YouTubers See Who Unsubscribed
6. Troubleshooting Common Printing Issues
Even with the best intentions, printing can sometimes lead to unexpected hiccups. Don’t worry! Here are some common issues you might encounter while printing an image on multiple pages, along with tips on how to tackle them.
Issue 1: Image Quality is Poor
If your printed image looks pixelated or blurry, it could be due to:
- Low-resolution images: Always use high-resolution images to ensure clarity.
- Incorrect scaling settings: Make sure your printer settings are set to “Actual Size” or “100%” scaling.
Issue 2: Pages Don’t Align Properly
Misalignment can be frustrating! Here’s how to fix it:
- Ensure you print all pages in the same orientation (portrait or landscape).
- Check that you’re using the same paper size for all pages.
- Double-check the margins in your printing software settings.
Issue 3: Printer Jams or Paper Feeds Incorrectly
Printer jams can happen, especially with thicker paper. Here’s how to avoid issues:
- Use a reputable brand of paper to reduce the risk of jams.
- Ensure the paper tray is properly loaded and not overfilled.
Issue 4: Colors are Inaccurate
If your printed colors don’t match what you see on the screen, consider the following:
- Check your printer’s color settings to ensure you’re using the appropriate color profile.
- Make sure your printer has enough ink; low ink levels can affect color accuracy.
By following these steps and troubleshooting tips, you’ll be well on your way to creating beautiful, large images that make a statement in any space. Happy printing!
Also Read This: Maximizing Your Earnings with Adobe Stock Photos
7. Tips for Best Results When Printing Images
When it comes to printing images across multiple pages, achieving the best results is a blend of technique and know-how. Here are some handy tips to ensure your prints look stunning:
- Choose High-Resolution Images: Always start with a high-resolution image. A resolution of 300 DPI (dots per inch) is ideal for printing. Lower resolutions can lead to pixelation and blurry prints.
- Adjust Your Printer Settings: Before hitting print, check your printer settings. Choose options like "Best Quality" and ensure you’re using the correct paper type. This can make a significant difference in the final output.
- Test Print on Plain Paper: If you're unsure about color accuracy, run a test print on plain paper first. This way, you can make adjustments without wasting high-quality paper.
- Use Borderless Printing: For a seamless look, consider using the borderless printing option. This can help eliminate any white edges that might disrupt your design when printed across multiple pages.
- Calibrate Your Monitor: To ensure the colors you see on your screen match what you get on paper, calibrate your monitor. This step helps in achieving a more accurate color representation.
- Plan Your Layout: Take some time to plan how your image will be divided across pages. Using software like Adobe Photoshop or even Microsoft Word can help you visualize how the final product will look.
- Choose the Right Paper: The type of paper you use can drastically affect the outcome. Consider glossy paper for vibrant colors or matte paper for a more subdued look.
- Allow for Drying Time: After printing, give your images some time to dry completely before touching them. This prevents smudging and ensures that your prints remain sharp and clear.
By following these tips, you’ll significantly enhance the quality of your printed images and create impressive multi-page displays.
8. Conclusion and Final Thoughts
Printing images across multiple pages is not just about functionality; it's an art form that combines creativity with technical prowess. Whether you're preparing a stunning wall mural, an engaging presentation, or simply a decorative piece for your home, the process can be both fulfilling and rewarding.
Remember, the key to successful multi-page printing lies in preparation. From choosing the right image and ensuring its quality to selecting appropriate settings and materials, each step plays a crucial role in the final output. If you find yourself overwhelmed, don’t hesitate to seek out tutorials or even ask for advice at your local print shop. They can often provide insights tailored to your specific project.
And most importantly, have fun with it! Experiment with different images, layouts, and printing techniques. You might discover unique combinations that elevate your work to the next level. So gather your materials, unleash your creativity, and start printing your masterpiece across multiple pages!
 admin
admin


