Welcome to the world of Photoshop! Have you ever found yourself juggling multiple images and wishing you could work on them simultaneously? If so, you're in the right place. In this guide, we’ll explore how to open multiple images as layers in Photoshop, a technique that can streamline your workflow and enhance your creative projects. Get ready to dive into the benefits of using layers and learn some practical steps for managing your images like a pro!
Why Use Layers in Photoshop?
Layers are an essential feature in Photoshop, allowing you to manipulate, edit, and design more effectively. Here are some compelling reasons why you should embrace using layers in your projects:
- Non-Destructive Editing: Layers enable you to work without permanently altering your original images. You can make changes, add effects, or apply adjustments to individual layers without affecting the overall composition.
- Flexibility: With layers, you can easily reposition, resize, or modify each element of your design independently. This flexibility allows for greater creativity as you can experiment without fear.
- Organization: Working with multiple images? Layers help you keep everything organized. By stacking images and grouping related layers, you can manage your project much more efficiently.
- Blending Options: Photoshop offers various blending modes that allow layers to interact in unique ways. This gives you the ability to create stunning effects and textures that would be challenging to achieve with a single image.
- Layer Effects and Styles: You can apply effects such as shadows, glows, and strokes to individual layers. This allows you to enhance specific elements within your design without affecting others.
- Masking Capabilities: Layers come equipped with masks that let you hide or reveal parts of an image. This is particularly useful for blending images together seamlessly.
Consider this scenario: You're designing a poster that incorporates multiple photographs. By opening each image as a separate layer, you can easily adjust each one—maybe you want to change the opacity of one or add a filter to another. This level of control is unmatched and essential for achieving professional results.
Using layers not only improves your workflow but also boosts your creativity. The possibilities are endless when you can think outside the box and manipulate each layer to fit your vision. So, whether you’re a beginner or a seasoned pro, embracing layers in Photoshop can elevate your projects to the next level!
Also Read This: How to Properly Give Credit to an Image for Copyright Compliance
3. Preparing Your Images for Layering
Before diving into the world of layers in Photoshop, it’s crucial to have your images ready for the task. Proper preparation can help streamline your workflow and enhance the final result of your project. Here are a few steps to get you started:
- Choose the Right Images: Select images that complement each other in terms of composition, color, and theme. Consider how the images will interact when layered.
- Check Image Resolution: Make sure all images are of a similar resolution. This helps avoid issues like pixelation or blurriness. For web use, 72 DPI is standard, while print usually requires at least 300 DPI.
- Rename Files: To keep things organized, rename your image files in a way that reflects their sequence or purpose. Clear names can save you time when looking for specific files later.
- File Format: Use compatible file formats such as JPEG, PNG, or TIFF. Each type has its strengths; for instance, PNG supports transparency, which can be handy for layering.
By taking these steps, you ensure that your images are not only ready to be layered but also that the final composition retains a high level of quality and impact. Now that you’ve prepped your images, it’s time to bring them into Photoshop!
Also Read This: 10 Creative Ideas for Capturing Unique and Artistic Photos
4. Opening Images as Layers in Photoshop
Now that your images are all set, let’s explore the process of opening them as layers in Photoshop. This technique is super handy for combining multiple photos into one cohesive artwork. Here’s a simple step-by-step guide:
- Launch Photoshop: Start by opening Adobe Photoshop on your computer. It’s showtime!
- Access the File Menu: Click on the ‘File’ menu located in the top-left corner of the interface.
- Select 'Scripts': Hover over the ‘Scripts’ option in the dropdown menu.
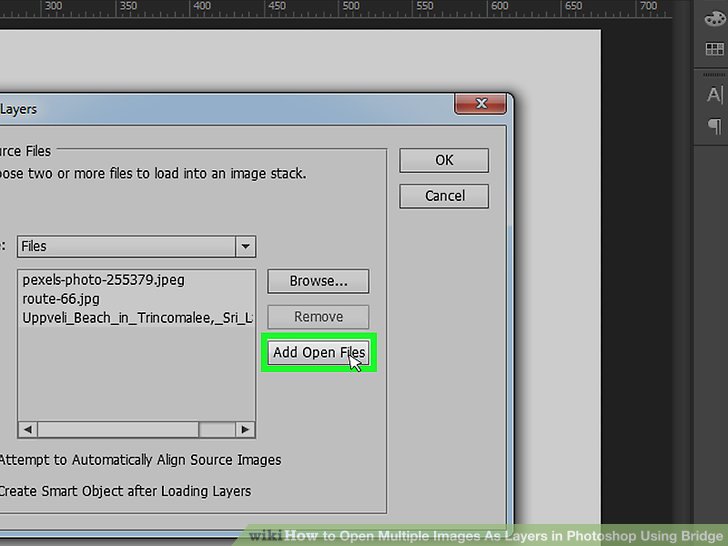
- Choose ‘Load Files into Stack’: This option allows you to open multiple images as individual layers.
Next, a dialog box will appear:
- Click ‘Browse’: A window will pop up where you can navigate to the folder containing your selected images. Choose the files you want to layer.
- Select Your Images: Hold down the ‘Shift’ key to select multiple images at once, or use the ‘Ctrl’ (or ‘Command’ on Mac) key to choose specific files.
- Click ‘Open’: Once you've selected your images, click ‘Open’ to load them into the dialog box.
After loading the images:
- Check the ‘Attempt to Automatically Align Source Images’ box: If your images are not perfectly aligned, this option can help to align them based on content.
Finally, hit the ‘OK’ button. Photoshop will now work its magic and open the selected images as layers in a single document!
And just like that, you’re ready to start editing! Each image will appear as a separate layer in the Layers panel, allowing you to manipulate them independently. You can adjust the opacity, apply masks, or blend them creatively for the desired effect. So go ahead, let your creativity flow!
Also Read This: Song Select: Choosing All Songs in a Spotify Playlist – A Quick Selection
5. Using the File Menu to Open Layers
Alright, let’s dive into how you can use the File Menu in Photoshop to open multiple images as layers. This method is super straightforward and a great way to seamlessly bring in your images if you prefer a more traditional approach.
First things first, open Photoshop. Once you're in, follow these steps:
- Click on File in the top menu.
- Select Open from the dropdown menu. This will bring up your system's file dialog.
- Navigate to the folder where your images are stored. You can hold down the Ctrl (or Cmd on Mac) key and click to select multiple images at once.
- Once you've selected the images you want to open, click on the Open button.
By default, Photoshop will open each selected image in its own window. However, the neat trick here is that you can drag and drop each image into your main canvas to create layers. Here’s how you do it:
- Select the Move Tool (shortcut: V) from the toolbar.
- Click on the image you want to move and drag it into the main working area. Each time you do this, a new layer is created in the Layers Panel.
With this method, you can keep your workflow organized by renaming your layers as you go, which is super helpful to avoid clutter later on. Just double-click the layer name in the Layers Panel to rename it.
This technique is particularly useful if you want to have a clear perspective on how your images overlay and interact with each other. Plus, once the layers are placed in your canvas, you can easily reposition and resize them as per your design requirements!
Also Read This: Imago Images for Bloggers Elevating Your Content with Stunning Pictures
6. Drag and Drop Method for Layering Images
If you’re looking for a quicker way to bring multiple images into Photoshop, let’s talk about the Drag and Drop method. This way is not only fast, but it also feels very intuitive! Here’s how you can do it.
To start, make sure the folders containing your desired images are ready to be accessed:
- Open Adobe Photoshop.
- Minimize Photoshop, and navigate to the folder where your images are located.
- Select the images you want to use by holding down Ctrl (or Cmd on Mac) and clicking each image.
Now for the magic:
- Simply drag the selected images from your file explorer and drop them directly into the Photoshop workspace.
- As you drop each image into Photoshop, it will automatically create a new layer for each one.
This method provides an efficient way to add images while giving you immediate visual feedback on how they are arranged together. You can easily adjust the positioning by selecting the layer and using the Move Tool (V) to reposition it within your canvas.
Once you've brought your images in, don't forget to work with the layers. You can change their order by dragging them up or down in the Layers Panel. This is key when you want specific images to be in front of or behind others. And if you ever need to transform a layer, just highlight it, and use Edit > Free Transform (or shortcut Ctrl + T / Cmd + T). It’s super easy!
The Drag and Drop method is stylish and often quite visual, making it perfect for creatives who prefer a more hands-on approach to layering images. It’s not just about convenience; it’s about getting your creative process rolling smoothly!
Also Read This: Legal and Ethical Ways to Share Getty Images
7. Organizing Layers for Better Workflow
When working with multiple images in Photoshop, it's easy for things to get chaotic. However, organizing your layers is crucial for maintaining a smooth workflow. Let’s dive into some effective techniques to keep your layers tidy.
1. Use Folders: Just like with a physical filing system, using folders in Photoshop can help you categorize and manage your layers better. To create a folder, select multiple layers (hold down the Shift key and click on the layers) and then press Ctrl + G (or Cmd + G on Mac). This will group them together, making it simpler to toggle visibility or move the entire group as a single unit.
2. Name Your Layers: It might seem trivial, but naming your layers can save you tons of time later on. Instead of having layers labeled “Layer 1,” “Layer 2,” etc., give each layer a descriptive name that reflects its content or purpose. For example, “Background Sky,” “Product Image,” or “Text Overlay.” This practice helps you quickly find the layers you need to edit without scrolling through a long list.
3. Color Code Layers: Photoshop allows you to color code your layers, which can be a fantastic visual aid. Right-click on a layer and select Layer Color to choose a color. You could use a particular color for all text layers, another for background layers, and so on. This strategy not only makes locating layers easier but also gives your layer panel a sleek, organized look.
4. Keep Similar Layers Together: Positioning layers logically can also enhance your workflow. For example, keeping all your adjustment layers together at the top of your layers panel allows you to access them quickly when making tweaks to your project. Layer organization is like a well-ordered workspace: it helps minimize distractions and inefficiencies.
By implementing these organizational strategies, your experience with multiple layers in Photoshop will become much more manageable, allowing you to focus on your creative process without getting bogged down by layer chaos. Remember, a well-organized workspace promotes productivity!
Also Read This: Leading Telecommunication Technology Companies Operating in the USA
8. Tips for Working with Multiple Layers
Working with multiple layers can enhance your creative projects tremendously, but it does come with its own set of challenges. Here are some tips to help you work effectively with multiple layers in Photoshop:
1. Use Layer Masks: Instead of erasing part of a layer, utilize layer masks to hide or reveal portions non-destructively. This way, you can make adjustments without permanently altering your original images. Just select a layer and click the Layer Mask icon at the bottom of the Layers panel to begin masking.
2. Leverage Adjustment Layers: Whenever you need to adjust color or tonal values, use Adjustment Layers instead of applying adjustments directly to your image layers. These layers allow you to make changes that are non-destructive, meaning you can easily tweak or remove any adjustments without affecting your original layer.
3. Regularly Flatten or Merge Layers: If you're at a stage in your project where you no longer need separate layers, consider flattening or merging them for simplicity. This can help reduce the file size and simplify your layer panel, making it easier to focus on the remaining layers that still require edits.
4. Use Shortcuts: Familiarize yourself with keyboard shortcuts for common layer operations. For example, Ctrl + J (or Cmd + J on Mac) duplicates the selected layer, while Ctrl + E merges selected layers. These shortcuts can speed up your workflow significantly.
5. Take Advantage of Layer Styles: Layer Styles can give your layers depth and dimension effortlessly. Play with options like Drop Shadow, Inner Glow, or Bevel & Emboss to make your layers pop without a lot of extra work.
6. Save Versions of Your Work: It’s always a good habit to save your work frequently, but taking it a step further by saving versions of your files allows you to revert back if needed. Use a naming convention that reflects the version, such as “MyProject_v1.psd,” so you can track progress without losing past iterations.
By implementing these tips, you can streamline your process when working with multiple layers in Photoshop. Each technique not only enhances your workflow but can also lead to more creative outcomes in your projects. Happy editing!
Conclusion
Opening multiple images as layers in Photoshop is a powerful technique that can enhance your workflow and creative possibilities. By following the steps outlined in this blog post, you can easily combine images, adjust layers, and create stunning compositions. Here’s a quick recap of the process:
- File Preparation: Ensure all images are in a compatible format.
- Open in Layers: Utilize the 'Load Files into Stack' option for efficient layer management.
- Organize Layers: Name and arrange your layers for easier access during your editing process.
- Adjustment and Editing: Use blending modes, masks, and filters to enhance your images.
With these techniques at your fingertips, you can now create complex artwork or edit images in a more streamlined fashion. Remember to experiment with different adjustments and layer effects, as this is where the magic of Photoshop truly happens. Don’t hesitate to explore and push your creative boundaries!
 admin
admin


